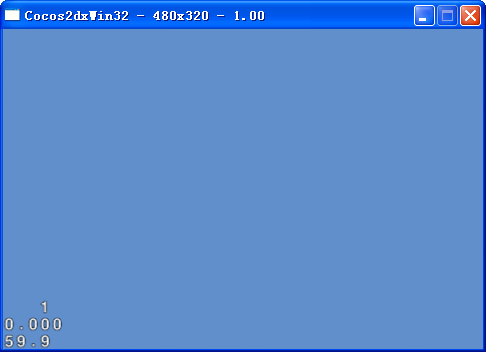
运行截图
随机数
- 注意随机种子的设定需要在for循环的外面
- 用到了cocos2dx的 CCRANDOM_0_1
/** @def CCRANDOM_0_1 returns a random float between 0 and 1 */
#define CCRANDOM_0_1() ((float)rand()/RAND_MAX)
TIMEVAL psv;
gettimeofday(&psv,NULL);
// 初始化随机种子
// timeval是个结构体,里边有俩个变量,一个是以秒为单位的,一个是以微妙为单位的
unsigned rand_seed = (unsigned)(psv.tv_sec * 1000 + psv.tv_usec / 1000);    //都转化为毫秒
srand(rand_seed);

for (int i = 0; i < N; i++)
{
    int a = 0;
    int b = visibleSize.width;
    float xt = CCRANDOM_0_1() * (b - a + 1) + a;

    a = 0;
    b = visibleSize.height;
    float yt = CCRANDOM_0_1() * (b - a + 1) + a;

    vx[i] = origin.x + xt;
    vy[i] = origin.y + yt;

    labels[i] = Label::createWithSystemFont("*","Arial",24);

    // position the label on the center of the screen
    labels[i]->setPosition(Point(vx[i],vy[i]));

    // add the label as a child to this layer
    this->addChild(labels[i],1);
}
完整代码
.h
#ifndef __HELLOWORLD_SCENE_H__
#define __HELLOWORLD_SCENE_H__

#include <vector>

#include "cocos2d.h"

#define N 200

USING_NS_CC;

class HelloWorld : public cocos2d::Layer
{
public:
    // there's no 'id' in cpp,so we recommend returning the class instance pointer
    static cocos2d::Scene* createScene();

    // Here's a difference. Method 'init' in cocos2d-x returns bool,instead of returning 'id' in cocos2d-iphone
    virtual bool init();

    // a selector callback
    void menuCloseCallback(cocos2d::Ref* pSender);

    // implement the "static create()" method manually
    CREATE_FUNC(HelloWorld);
public:
    virtual void update(float delta);

    void menuStopCallback(cocos2d::Ref* pSender);
    void menuSlowCallback(cocos2d::Ref* pSender);
    void menuMidCallback(cocos2d::Ref* pSender);
    void menuFastCallback(cocos2d::Ref* pSender);

    MenuItemFont *stop;
    //
    MenuItemFont *slow;
    //
    MenuItemFont *mid;
    //
    MenuItemFont *fast;
public:
    Size visibleSize;
    Point origin;

    Label* labels[N];
    float speed;
    float vx[N];
    float vy[N];
};

#endif // __HELLOWORLD_SCENE_H__
.cpp
#include "HelloWorldScene.h"
#include <cstdlib>
#include <ctime>

USING_NS_CC;

Scene* HelloWorld::createScene()
{
    // 'scene' is an autorelease object
    auto scene = Scene::create();

    // 'layer' is an autorelease object
    auto layer = HelloWorld::create();

    // add layer as a child to scene
    scene->addChild(layer);

    // return the scene
    return scene;
}

// on "init" you need to initialize your instance
bool HelloWorld::init()
{
    //////////////////////////////
    // 1. super init first
    if ( !Layer::init() )
    {
        return false;
    }

    visibleSize = Director::getInstance()->getVisibleSize();
    origin = Director::getInstance()->getVisibleOrigin();


    // add a label shows "Hello World"
    // create and initialize a label

#if 0
    //LabelTTF* label = LabelTTF::create("1","Arial",24);
    Label* label = Label::createWithSystemFont("1",24);

    // position the label on the center of the screen
    label->setPosition(Point(origin.x + visibleSize.width/2,origin.y + visibleSize.height - label->getContentSize().height));

    // add the label as a child to this layer
    this->addChild(label,1);
#endif

    TIMEVAL psv;
    gettimeofday(&psv,NULL);
    // 初始化随机种子
    // timeval是个结构体,里边有俩个变量,一个是以秒为单位的,一个是以微妙为单位的
    unsigned rand_seed = (unsigned)(psv.tv_sec * 1000 + psv.tv_usec / 1000);    //都转化为毫秒
    srand(rand_seed);

    for (int i = 0; i < N; i++)
    {
        int a = 0;
        int b = visibleSize.width;
        float xt = CCRANDOM_0_1() * (b - a + 1) + a;

        a = 0;
        b = visibleSize.height;
        float yt = CCRANDOM_0_1() * (b - a + 1) + a;

        vx[i] = origin.x + xt;
        vy[i] = origin.y + yt;

        labels[i] = Label::createWithSystemFont("*",24);

        // position the label on the center of the screen
        labels[i]->setPosition(Point(vx[i],vy[i]));

        // add the label as a child to this layer
        this->addChild(labels[i],1);
    }

    speed = 1;

    this->scheduleUpdate(); // 定时器
    //
    MenuItemFont::setFontSize(22);// 系统设定字体大小
stop = MenuItemFont::create("stop");
    stop->setTarget(this,menu_selector(HelloWorld::menuStopCallback));
    //
slow = MenuItemFont::create("slow");
    slow->setColor(Color3B::RED);
    slow->setTarget(this,menu_selector(HelloWorld::menuSlowCallback));
    //
mid = MenuItemFont::create("mid");
    mid->setTarget(this,menu_selector(HelloWorld::menuMidCallback));
    //
fast = MenuItemFont::create("fast");
    fast->setTarget(this,menu_selector(HelloWorld::menuFastCallback));

    //创建一个菜单容器 把菜单栏目放上去
    Menu *menu = Menu::create(stop,slow,mid,fast,NULL);
    //显示菜单
    this->addChild(menu);
    //菜单的显示位置
    menu->setPosition(Point(50,visibleSize.height - 100));
    //设置栏目间的宽度距离
    menu->alignItemsverticallyWithPadding(10.0);


    return true;
}

void HelloWorld::update(float delta)
{
    for (int i = 0; i < N; i++)
    {
        vy[i] -= speed;//2.0;
        if (vy[i] <= 0)
        {
            int a = 0;
            int b = visibleSize.width;
            vx[i] = origin.x + CCRANDOM_0_1() * (b - a + 1) + a;
            vy[i] = visibleSize.height;
        }
        labels[i]->setPosition(Point(vx[i],vy[i]));
    }
}

// 改变下落的速度
void HelloWorld::menuStopCallback(cocos2d::Ref* pSender)
{
    this->unscheduleUpdate();
    speed = -1.0;

    stop->setColor(Color3B::RED);
    slow->setColor(Color3B::WHITE);
    mid->setColor(Color3B::WHITE);
    fast->setColor(Color3B::WHITE);
}
void HelloWorld::menuSlowCallback(cocos2d::Ref* pSender)
{
    if (speed < 0)
        this->scheduleUpdate();
    speed = 1.0;

    stop->setColor(Color3B::WHITE);
    slow->setColor(Color3B::RED);
    mid->setColor(Color3B::WHITE);
    fast->setColor(Color3B::WHITE);
}
void HelloWorld::menuMidCallback(cocos2d::Ref* pSender)
{
    if (speed < 0)
        this->scheduleUpdate();
    speed = 3.0;

    stop->setColor(Color3B::WHITE);
    slow->setColor(Color3B::WHITE);
    mid->setColor(Color3B::RED);
    fast->setColor(Color3B::WHITE);
}
void HelloWorld::menuFastCallback(cocos2d::Ref* pSender)
{
    if (speed < 0)
        this->scheduleUpdate();
    speed = 6.0;

    stop->setColor(Color3B::WHITE);
    slow->setColor(Color3B::WHITE);
    mid->setColor(Color3B::WHITE);
    fast->setColor(Color3B::RED);
}

void HelloWorld::menuCloseCallback(Ref* pSender)
{
#if (CC_TARGET_PLATFORM == CC_PLATFORM_WP8) || (CC_TARGET_PLATFORM == CC_PLATFORM_WINRT)
    MessageBox("You pressed the close button. Windows Store Apps do not implement a close button.","Alert");
    return;
#endif

    //Director::getInstance()->end();
    speed = 10;

#if (CC_TARGET_PLATFORM == CC_PLATFORM_IOS)
    exit(0);
#endif
}
粒子系统实现sNow
参考
cocos2dx中一些自定义的例子系统
http://www.2cto.com/kf/201409/333598.html
Particle System(粒子系统)讲解
http://www.cnblogs.com/shangdahao/archive/2012/04/14/2447571.html
bg.png
sNow.png
#include "HelloWorldScene.h"
#include <cstdlib>
#include <ctime>

USING_NS_CC;

Scene* HelloWorld::createScene()
{
    // 'scene' is an autorelease object
    auto scene = Scene::create();

    // 'layer' is an autorelease object
    auto layer = HelloWorld::create();

    // add layer as a child to scene
    scene->addChild(layer);

    // return the scene
    return scene;
}

// on "init" you need to initialize your instance
bool HelloWorld::init()
{
    //////////////////////////////
    // 1. super init first
    if ( !Layer::init() )
    {
        return false;
    }

    visibleSize = Director::getInstance()->getVisibleSize();
    origin = Director::getInstance()->getVisibleOrigin();

    auto bg = Sprite::create("bg.png");
    bg->setPosition(Point(visibleSize.width / 2,visibleSize.height / 2));
    this->addChild(bg);

#if 0
    ParticleSystem* ps = ParticleSNow::createWithTotalParticles(9999);
    //ParticleSystem* ps = ParticleSNow::create();
    ps->setTexture(Director::getInstance()->getTextureCache()->addImage("sNow.png"));
    ps->setPosition(Point(visibleSize.width/2,visibleSize.height + 10));//生成的雪花从这个坐标往下落
    //ps->setEmissionRate(10);
    ps->setSpeed(200);
    ps->setLife(10);
    this->addChild(ps);
#endif

#if 1
    auto particleSystem = ParticleSystemQuad::createWithTotalParticles(200);
    //设置雪花粒子纹理图片
    particleSystem->setTexture(TextureCache::getInstance()->addImage("sNow.png"));
    //设置发射粒子的持续时间-1表示永远持续
    particleSystem->setDuration(-1);
    //这个点是相对发射点,x正方向为右,y正方向为上,可以设置发射的方向
    particleSystem->setGravity(Point(-10,-20));

    //设置角度以及偏差
    particleSystem->setAngle(90);
    particleSystem->setAngleVar(360);

    //设置径向加速度以及偏差
    particleSystem->seTradialAccel(10);
    particleSystem->seTradialAccelVar(0);

    //设置粒子的切向加速度以及偏差
    particleSystem->setTangentialAccel(30);
    particleSystem->setTangentialAccelVar(30);

    // 设置粒子初始化位置偏差
    //particleSystem->setPosition(CCPoint(400,500));
    particleSystem->setPosVar(Point(400,0));


    //设置粒子生命期以及偏差
    particleSystem->setLife(4);
    particleSystem->setLifeVar(2);

    //设置粒子开始时候旋转角度以及偏差
    particleSystem->setStartSpin(30);
    particleSystem->setStartSpinVar(60);

    //设置结束时候的旋转角度以及偏差
    particleSystem->setEndSpin(60);
    particleSystem->setEndSpinVar(60);

    //设置开始时候的颜色以及偏差
    particleSystem->setStartColor(Color4F(1,1,1));
    //设置结束时候的颜色以及偏差
    particleSystem->setEndColor(Color4F(0.9,0.9,1));

    //设置开始时候粒子大小以及偏差
    particleSystem->setStartSize(30);
    particleSystem->setStartSizeVar(0);

    //设置粒子结束时候大小以及偏差
    particleSystem->setEndSize(20.0f);
    particleSystem->setEndSizeVar(0);

    //设置每秒钟产生粒子的数量
    particleSystem->setEmissionRate(100);

    // 粒子系统位置
    particleSystem->setPosition(Point(visibleSize.width * 0.75,visibleSize.height + 50));

    this->addChild(particleSystem);
#endif

    return true;
}

void HelloWorld::update(float delta)
{

}
版权声明:本文内容由互联网用户自发贡献,该文观点与技术仅代表作者本人。本站仅提供信息存储空间服务,不拥有所有权,不承担相关法律责任。如发现本站有涉嫌侵权/违法违规的内容, 请发送邮件至 dio@foxmail.com 举报,一经查实,本站将立刻删除。