http://blog.csdn.net/xiaominghimi/article/details/7464635
转载自【黑米GameDev街区】原文链接:http://www.himigame.com/iphone-cocos2dx/681.html
☞ 点击订阅 ☜本博客最新动态!及时将最新博文通知您!
对于游戏公司而言,采用游戏脚本lua、python等进行开发也很常见,但是很多童鞋对脚本并没有很熟悉的概念,本篇则向大家简单介绍脚本的用途以及在Cocos2dx基础用法;
Lua和python这些详细介绍的话,请不太熟悉的童鞋自行百度百科哈,那么对于lua和python则是两个常用的脚本语言,lua相对于python而言,lua比较轻量级罢了,而其他区别就不多说了,但是为什么本章要讲解lua的原因则有两点,首先第一:cocos2dx 游戏引擎内嵌lua,第二点:自从“令人愤怒的小鸟”火起来之后,国内很多都偏向于使用lua了=。 =
那么对于脚本的用途这里也大概说两点:
1. 脚本在手游中是类于“大脑”的功能,所有游戏相关的逻辑代码一般都放在脚本中,而客户端(前台)的代码都则属于“肢体”,也可以说是“播放器”,作用只是用户展示出UI界面的功能;那么脚本的作用那么不仅仅如此,比如地图数据等都可以利用脚本使用;
2. 脚本在手机网游中的作用尤为重要,比如一款网游“Himi”没有使用脚本,如果“Himi”1.0版本在发布后突然发现客户端出现一些棘手的bug需要修复,那么你想修改那么也要等待再次更新客户端重新提交发布才可以解决,这样会流失一大批用户,而且游戏每次更新也会流失掉部分用户,这是肯定的;但是如果“Himi”这款网游使用脚本的话,那么解决此类问题很eazy,比如我在“Himi”游戏中的逻辑代码都放在脚本a.lua 中,那么如果a.lua逻辑中哪里出现了问题,我们直接可以将修复后的a.lua脚本更新至服务器中,因为一般脚本都会定义version号,比如a.lua有bug的version:1.0,那么我们修复后的a.lua version改成1.1,当用户每次启动游戏的时候,客户端都会将脚本的version与服务器脚本version做对比,当server端脚本version号比当前脚本新,那么自动下载并覆盖当前脚本,OK,问题解决;不仅仅如此,比如游戏中做个活动呀,换个图片呀等等都可以即使更新,而不是每次修改前端代码都要重新发布新的游戏版本,造成一些损失!
OK,不再多说了,下面我们来介绍在Cocos2dx中对于lua脚本的一些简单使用,首先我们通过新建一个Cocos2dx-lua模版项目,默认此模版中有个示例,童鞋们可以直接运行项目看效果,但是大家可能会郁闷在class中完全找不到任何相关的代码?!?那就对了,因为所有逻辑代码都放置在了lua脚本中,项目启动后直接解析的一个名称为hello.lua的脚本!
打开项目的Resources仔细找下,有没有发现有 hello.lua 合hello2.lua两个脚本文件?!OK,就是这里拉。 那么对于cocos2dx_lua demo的例子脚本我这里不多说比较容易,但是肯定不太熟悉的童鞋比较疑惑,那么Himi这里重新整理了一份简单的示例脚本代码,大家可以直接将如下代码直接复制到hello.lua中看效果;代码如下:
|
1
2
3
4
5
6
7
8
9
10
11
12
13
14
15
16
17
18
19
20
21
22
23
24
25
26
27
28
29
30
31
32
33
34
35
36
37
38
39
40
41
42
43
44
45
46
47
48
49
50
51
52
53
54
55
56
57
58
59
60
61
62
63
64
65
66
67
68
69
70
71
72
73
74
75
76
77
78
79
80
81
82
83
84
85
86
87
88
89
90
91
92
93
94
95
96
97
98
99
100
101
102
103
104
105
106
107
108
109
110
111
112
113
114
115
116
117
118
119
120
121
122
123
124
125
126
|
require
"hello2"
-- 包含hello2这个脚本
-- 注视语句
-- 打印
-- 创建一个Scene
sceneForWorld = cocos2d.CCScene:node()
-- 创建一个Layer
layerForWorld = cocos2d.cclayer:node()
sceneForWorld:addChild(layerForWorld)
-- 创建一个精灵
spriteForWorld = cocos2d.CCSprite:spriteWithFile(
"Icon.png"
)
layerForWorld:addChild(spriteForWorld)
-- 获取屏幕宽高
screenSize=cocos2d.CCDirector:sharedDirector():getWinSize()
-- 设置精灵坐标
spriteForWorld:setPosition(cocos2d.CCPoint(screenSize.width*0.5,screenSize.height*0.5))
-- 设置精灵缩放2倍
spriteForWorld:setScale(2)
myLableTTF =cocos2d.cclabelTTF:labelWithString(
"Himi- Lua 基础"
,
"Helvetica-Bold"
ottom:0px!important; margin-left:0px!important; padding-top:0px!important; padding-right:0px!important; padding-bottom:0px!important; padding-left:0px!important; border-top-width:0px!important; border-right-width:0px!important; border-bottom-width:0px!important; border-left-width:0px!important; border-style:initial; border-color:initial; font-weight:normal!important; font-style:normal!important; font-size:1em!important; font-family:Consolas,24)
myLableTTF:setPosition(cocos2d.CCPoint(screenSize.width*0.5,screenSize.height*0.5+100))
sceneForWorld:addChild(myLableTTF)
myLableTTF2 =cocos2d.cclabelTTF:labelWithString(
"上面icon跟随用户触屏位置"
ottom:0px!important; margin-left:0px!important; padding-top:0px!important; padding-right:0px!important; padding-bottom:0px!important; padding-left:0px!important; border-top-width:0px!important; border-right-width:0px!important; border-bottom-width:0px!important; border-left-width:0px!important; border-style:initial; border-color:initial; font-weight:normal!important; font-style:normal!important; font-size:1em!important; font-family:Consolas,24)
myLableTTF2:setPosition(cocos2d.CCPoint(screenSize.width*0.5,screenSize.height*0.5-100))
sceneForWorld:addChild(myLableTTF2)
-- @@@@@@@@@@触摸事件
--开启触摸
layerForWorld:setIsTouchEnabled(
true
)
-- 注册触摸事件
layerForWorld.__CCTouchDelegate__:registerScriptTouchHandler(cocos2d.CCTOUCHBEGAN,Fixed; background-color:initial!important; border-style:initial!important; border-color:initial!important; bottom:auto!important; float:none!important; height:auto!important; left:auto!important; line-height:1.1em!important; outline-width:0px!important; outline-style:initial!important; outline-color:initial!important; overflow-x:visible!important; overflow-y:visible!important; position:static!important; right:auto!important; text-align:left!important; top:auto!important; width:auto!important; min-height:inherit!important; color:blue!important">"btnTouchBegin"
)
layerForWorld.__CCTouchDelegate__:registerScriptTouchHandler(cocos2d.CCTOUCHMOVED,Fixed; background-color:initial!important; border-style:initial!important; border-color:initial!important; bottom:auto!important; float:none!important; height:auto!important; left:auto!important; line-height:1.1em!important; outline-width:0px!important; outline-style:initial!important; outline-color:initial!important; overflow-x:visible!important; overflow-y:visible!important; position:static!important; right:auto!important; text-align:left!important; top:auto!important; width:auto!important; min-height:inherit!important; color:blue!important">"btnTouchMove"
)
layerForWorld.__CCTouchDelegate__:registerScriptTouchHandler(cocos2d.CCTOUCHENDED,Fixed; background-color:initial!important; border-style:initial!important; border-color:initial!important; bottom:auto!important; float:none!important; height:auto!important; left:auto!important; line-height:1.1em!important; outline-width:0px!important; outline-style:initial!important; outline-color:initial!important; overflow-x:visible!important; overflow-y:visible!important; position:static!important; right:auto!important; text-align:left!important; top:auto!important; width:auto!important; min-height:inherit!important; color:blue!important">"btnTouchEnd"
)
-- touch handers
pointBegin = nil
function btnTouchBegin(e)
)
local v = e[1]
local pointMove = v:locationInView(v:view())
pointMove = cocos2d.CCDirector:sharedDirector():convertToGL(pointMove)
spriteForWorld:setPosition(cocos2d.CCPoint(pointMove.x,pointMove.y))
end
function btnTouchMove(e)
)
local v = e[1]
local pointMove = v:locationInView(v:view())
pointMove = cocos2d.CCDirector:sharedDirector():convertToGL(pointMove)
ottom:0px!important; margin-left:0px!important; padding-top:0px!important; padding-right:1em!important; padding-bottom:0px!important; padding-left:1em!important; border-top-width:0px!important; border-right-width:0px!important; border-bottom-width:0px!important; border-left-width:0px!important; border-style:initial; border-color:initial; font-weight:normal!important; font-style:normal!important; font-size:1em!important; font-family:Consolas,pointMove.y))
end
function btnTouchEnd(e)
)
end
-- @@@@@@@@@@触摸结束
--动态小狗
winSize = cocos2d.CCDirector:sharedDirector():getWinSize()
FrameWidth = 105
FrameHeight = 95
textureDog = cocos2d.CCTextureCache:sharedTextureCache():addImage(
"dog.png"
)
frame0 = cocos2d.CCSpriteFrame:frameWithTexture(textureDog,cocos2d.CCRectMake(0,FrameWidth,FrameHeight))
frame1 = cocos2d.CCSpriteFrame:frameWithTexture(textureDog,cocos2d.CCRectMake(FrameWidth*1,FrameHeight))
spriteDog = cocos2d.CCSprite:spriteWithSpriteFrame(frame0)
spriteDog:setPosition(cocos2d.CCPoint(100,winSize.height/4*3))
layerForWorld:addChild(spriteDog)
animFrames = cocos2d.CCMutableArray_CCSpriteFrame__:
new
(2)
animFrames:addobject(frame0)
animFrames:addobject(frame1)
animation = cocos2d.CCAnimation:animationWithFrames(animFrames,0.5)
animate = cocos2d.CCAnimate:actionWithAnimation(animation,
false
);
spriteDog:runAction(cocos2d.CCRepeatForever:actionWithAction(animate))
--自定义函数
function prForHimi()
"reFresh function"
)
--取消选择器
--cocos2d.CCScheduler:sharedScheduler():unscheduleScriptFunc(
"prForHimi"
)
end
--使用选择器进行函数更新
--cocos2d.CCScheduler:sharedScheduler():scheduleScriptFunc(
)
--循环语句
for
i=0,4,1
do
j=0,2
do
"for loop"
ottom:0px!important; margin-left:0px!important; padding-top:0px!important; padding-right:0px!important; padding-bottom:0px!important; padding-left:0px!important; border-top-width:0px!important; border-right-width:0px!important; border-bottom-width:0px!important; border-left-width:0px!important; border-style:initial; border-color:initial; font-weight:normal!important; font-style:normal!important; font-size:1em!important; font-family:Consolas,i)
end
end
-- 避免内存泄漏
collectgarbage(
"setpause"
ottom:0px!important; margin-left:0px!important; padding-top:0px!important; padding-right:0px!important; padding-bottom:0px!important; padding-left:0px!important; border-top-width:0px!important; border-right-width:0px!important; border-bottom-width:0px!important; border-left-width:0px!important; border-style:initial; border-color:initial; font-weight:normal!important; font-style:normal!important; font-size:1em!important; font-family:Consolas,100)
"setstepmul"
ottom:0px!important; margin-left:0px!important; padding-top:0px!important; padding-right:0px!important; padding-bottom:0px!important; padding-left:0px!important; border-top-width:0px!important; border-right-width:0px!important; border-bottom-width:0px!important; border-left-width:0px!important; border-style:initial; border-color:initial; font-weight:normal!important; font-style:normal!important; font-size:1em!important; font-family:Consolas,5000)
-- 播放背景音乐
-- 播放音效
-- run整个scene
cocos2d.CCDirector:sharedDirector():runWithScene(sceneForWorld)
"脚本hello正常执行结束... "
ottom:0px!important; margin-left:0px!important; padding-top:0px!important; padding-right:0px!important; padding-bottom:0px!important; padding-left:0px!important; border-top-width:0px!important; border-right-width:0px!important; border-bottom-width:0px!important; border-left-width:0px!important; border-style:initial; border-color:initial; font-weight:normal!important; font-style:normal!important; font-size:1em!important; font-family:Consolas,5))
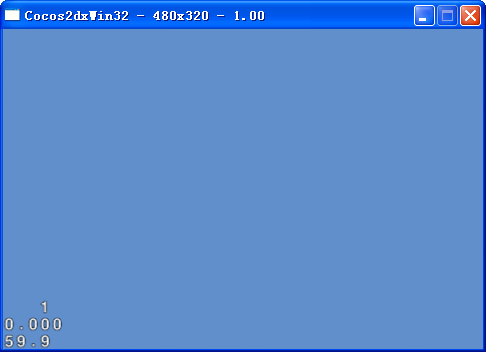
|
运行效果图如下:
对于Himi上面给出的自己修改后的代码注视写的狠清楚了 =。 = 所以不多加赘述,但是Himi这里需要还要详细说一点;
脚本lua等一般都示通过中间层(解析)进行与前端代码(Cocos2dX封装的引擎类库)交互,所以很多方法名称可能发生了改变,那么对于不太熟悉的童鞋我们如何下手?
OK,如刚才的代码中有个“备注”,不知道细心童鞋们看到没有,这里是添加了一个cclabelTTF ,假如我们不知道它的构造函数是否有修改,或者说参数忘记都是什么了,那么请打开你项目的libs文件夹,然后打开lua文件夹,继续打开cocos2dx_support文件夹找到 LuaCocos2d.cpp文件打开,(注意这个文件代码很多,打开较慢)然后你会看到很多方法的定义与实现!
那么假如我们来找 cclabelTTF的构造方法,那么搜一下如下语句:
|
tolua_beginmodule(tolua_S,Fixed; background-color:initial!important; border-style:initial!important; border-color:initial!important; bottom:auto!important; float:none!important; height:auto!important; left:auto!important; line-height:1.1em!important; outline-width:0px!important; outline-style:initial!important; outline-color:initial!important; overflow-x:visible!important; overflow-y:visible!important; position:static!important; right:auto!important; text-align:left!important; top:auto!important; width:auto!important; min-height:inherit!important; color:blue!important">"cclabelTTF"
);
|
你将发现此类下方一大批类似的代码:
没错这里就是此类的所有是lua-cocos2dx之间的转换函数定义,比如常用的cclabelTTF构造函数:
此函数第一参数大家不用理会,第二个参数表示我们使用cocos2d/x时调用的函数名称,后面则是lua-cocos2dx之间的转换函数实现代码,大家可以继续搜索第三个参数或者按住command然后点击第三个参数找到其函数实现代码:
/* method: labelWithString of class cocos2d::cclabelTTF */
{
tolua_Error tolua_err;
if
(
!tolua_isusertable(tolua_S,Fixed; background-color:initial!important; border-style:initial!important; border-color:initial!important; bottom:auto!important; float:none!important; height:auto!important; left:auto!important; line-height:1.1em!important; outline-width:0px!important; outline-style:initial!important; outline-color:initial!important; overflow-x:visible!important; overflow-y:visible!important; position:static!important; right:auto!important; text-align:left!important; top:auto!important; width:auto!important; min-height:inherit!important; color:blue!important">"cocos2d::cclabelTTF"
ottom:0px!important; margin-left:0px!important; padding-top:0px!important; padding-right:0px!important; padding-bottom:0px!important; padding-left:0px!important; border-top-width:0px!important; border-right-width:0px!important; border-bottom-width:0px!important; border-left-width:0px!important; border-style:initial; border-color:initial; font-weight:normal!important; font-style:normal!important; font-size:1em!important; font-family:Consolas,&tolua_err) ||
!tolua_isstring(tolua_S,2,&tolua_err) ||
ottom:0px!important; margin-left:0px!important; padding-top:0px!important; padding-right:1em!important; padding-bottom:0px!important; padding-left:1em!important; border-top-width:0px!important; border-right-width:0px!important; border-bottom-width:0px!important; border-left-width:0px!important; border-style:initial; border-color:initial; font-weight:normal!important; font-style:normal!important; font-size:1em!important; font-family:Consolas,3,&tolua_err) ||
!tolua_isnumber(tolua_S,&tolua_err) ||
!tolua_isnoobj(tolua_S,5,&tolua_err)
)
goto
tolua_lerror;
else
{
const
char
* label = ((
*) tolua_tostring(tolua_S,0));
* fontName = ((
ottom:0px!important; margin-left:0px!important; padding-top:0px!important; padding-right:0px!important; padding-bottom:0px!important; padding-left:0px!important; border-top-width:0px!important; border-right-width:0px!important; border-bottom-width:0px!important; border-left-width:0px!important; border-style:initial; border-color:initial; font-weight:bold!important; font-style:normal!important; font-size:1em!important; font-family:Consolas,0));
float
fontSize = ((
) tolua_tonumber(tolua_S,0));
{
cocos2d::cclabelTTF* tolua_ret = (cocos2d::cclabelTTF*) cocos2d::cclabelTTF::labelWithString(label,fontName,fontSize);
tolua_pushusertype(tolua_S,(
void
*)tolua_ret,Fixed; background-color:initial!important; border-style:initial!important; border-color:initial!important; bottom:auto!important; float:none!important; height:auto!important; left:auto!important; line-height:1.1em!important; outline-width:0px!important; outline-style:initial!important; outline-color:initial!important; overflow-x:visible!important; overflow-y:visible!important; position:static!important; right:auto!important; text-align:left!important; top:auto!important; width:auto!important; min-height:inherit!important; color:black!important">);
}
}
return
1;
tolua_lerror:
tolua_Cocos2d_cocos2d_cclabelTTF_labelWithString00(tolua_S);
}
#endif //#ifndef TOLUA_disABLE
|
到这里大家会很清楚需要的参数都是哪些,如果还不清楚,继续按住Command然后点击labelWithString进入cocos2dx引擎代码cclabelTTF.cpp中的此函数实现啦!
可能这部分有童鞋看得比较迷茫 =。 = 那么Himi来简化这些复杂来说:
解析lua脚本中的一句代码->通过解析层代码->将其转换并转到前端代码进行使用
那么当然此过程也可逆:
这里由于Himi对cocos2dx 中的lua还没有深入了解,所以不知是否过程可逆;
OK,基本就是这样,对于脚本的熟悉,主要还是在公司进行使用然后慢慢熟悉和熟练掌握的,本章主要需要童鞋们记住的是脚本的概念和作用!
版权声明:本文内容由互联网用户自发贡献,该文观点与技术仅代表作者本人。本站仅提供信息存储空间服务,不拥有所有权,不承担相关法律责任。如发现本站有涉嫌侵权/违法违规的内容, 请发送邮件至 dio@foxmail.com 举报,一经查实,本站将立刻删除。