

一、Bean定义继承
bean定义可以包含许多配置信息,包括构造函数参数,属性值和特定于容器的信息,例如初始化方法,静态工厂方法名称等。
子Bean定义从父定义继承配置数据。子定义可以根据需要覆盖某些值或添加其他值。
Spring Bean定义继承与java类继承无关,但继承概念是相同的。您可以将父bean定义定义为模板,其他子Bean可以从父bean继承所需的配置。
使用基于XML的配置元数据时,可以使用parent属性指定子Bean定义,并将父bean指定为此属性的值。
演示示例:
(1)编写HelloWorld.java
package com.tutorialspoint;
public class HelloWorld {
       private String message1;
        String message2;

       void setMessage1(String message){
          this.message1 = message;
       }
        setMessage2(String message){
          this.message2 = getMessage1(){
          System.out.println("World Message1 : " + message1);
       }
        getMessage2(){
          System.out.println("World Message2 : " + message2);
       }
}
(2)编写HelloIndea.java
 com.tutorialspoint;

 HelloIndia {
    String message1;
    String message2;
    String message3;

    setMessage1(String message){
       message;
   }
    setMessage2(String message){
       setMessage3(String message){
      this.message3 = getMessage1(){
      System.out.println("India Message1 : " + message1);
   }
    getMessage2(){
      System.out.println("India Message2 : " + message2);
   }
    getMessage3(){
      System.out.println("India Message3 : " + message3);
   }
}
(3)编写MainApp.java
import org.springframework.context.ApplicationContext;
 org.springframework.context.support.ClasspathXmlApplicationContext;

 MainApp {
   static  main(String[] args) {
      ApplicationContext context = new ClasspathXmlApplicationContext("Beans.xml");

      HelloWorld objA = (HelloWorld) context.getBean("helloWorld");
      objA.getMessage1();
      objA.getMessage2();

      HelloIndia objB = (HelloIndia) context.getBean("helloIndia");
      objB.getMessage1();
      objB.getMessage2();
      objB.getMessage3();
   }
}
(4)Beans.xml
<?xml version = "1.0" encoding = "UTF-8"?>

<beans xmlns = "http://www.springframework.org/schema/beans"
   xmlns:xsi = "http://www.w3.org/2001/XMLSchema-instance"
   xsi:schemaLocation = "http://www.springframework.org/schema/beans
   http://www.springframework.org/schema/beans/spring-beans-4.0.xsd">

     <bean id = "helloWorld" class = "com.tutorialspoint.HelloWorld">
      <property name = "message1" value = "Hello World!"/>
      <property name = "message2" value = "Hello Second World!"/>
       </bean>

   <bean id ="helloIndia" class = "com.tutorialspoint.HelloIndia" parent = "helloWorld">
      <property name = "message1" value = "Hello India!"/>
      <property name = "message3" value = "Namaste India!"/>
   </bean>


</beans>
(5)运行MainApp.java中的main方法

二、依赖注入
每个基于Java的应用程序都有一些对象可以协同工作,以呈现最终用户所看到的工作应用程序。在编写复杂的Java应用程序时,应用程序类应尽可能独立于其他java类,以增加重用这些类的可能性,并在单元测试时独立于其他类测试它们。依赖注入(或称为布线)有助于将这些类粘合在一起,同时保持它们的独立性。
依赖注入常用两种形式:
1.set注入(比较常用)
2.构造函数注入
set注入示例:
(1)编写TextEditor.java
 TextEditor {
    SpellChecker spellChecker;

    a setter method to inject the dependency.
    setSpellChecker(SpellChecker spellChecker) {
      System.out.println("Inside setSpellChecker." );
      this.spellChecker = spellChecker;
   }

    a getter method to return spellChecker
   public SpellChecker getSpellChecker() {
      return spellChecker;
   }
    spellCheck() {
      spellChecker.checkSpelling();
   }
}
(2)编写SpellChecker.java
 SpellChecker {
    SpellChecker(){
      System.out.println("Inside SpellChecker constructor." );
   }
    checkSpelling(){
      System.out.println("Inside checkSpelling." );
   }
}
(3)编写Beans.xml
<?xml version = "1.0" encoding = "UTF-8"?>

<beans xmlns = "http://www.springframework.org/schema/beans"www.springframework.org/schema/beans/spring-beans-4.0.xsd">

 <!-- DeFinition for textEditor bean using inner bean -->
   <bean id = "textEditor" class = "com.tutorialspoint.TextEditor">
      <property name = "spellChecker">
         <bean id = "spellChecker" class = "com.tutorialspoint.SpellChecker"/>
      </property>
   </bean>

</beans>
(4)编写MainApp.java
);
      TextEditor te = (TextEditor) context.getBean("textEditor");
      te.spellCheck();
   }
}
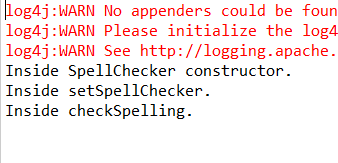
(5)运行MainApp.java中的main方法
2.注入集合
Spring提供四种集合注入方式:
(1)Set;(2)List;(3)Map;(4)Props;
演示示例如下:
(1)编写JavaCollection
import java.util.*;

 JavaCollection {
   List addressList;
   Set  addressSet;
   Map  addressMap;
   Properties addressprop;

    a setter method to set List
    setAddressList(List addressList) {
      this.addressList = addressList;
   }

    prints and returns all the elements of the list.
    List getAddressList() {
      System.out.println("List Elements :"  + addressList);
       a setter method to set Set
    setAddressSet(Set addressSet) {
      this.addressSet = addressSet;
   }

    prints and returns all the elements of the Set.
    Set getAddressSet() {
      System.out.println("Set Elements :"  + addressSet);
       a setter method to set Map
    setAddressMap(Map addressMap) {
      this.addressMap = addressMap;
   }

    prints and returns all the elements of the Map.
    Map getAddressMap() {
      System.out.println("Map Elements :"  + addressMap);
       a setter method to set Property
    setAddressprop(Properties addressprop) {
      this.addressprop = addressprop;
   }

    prints and returns all the elements of the Property.
    Properties getAddressprop() {
      System.out.println("Property Elements :"  + addressprop);
       addressprop;
   }
}
(2)编写Beans.xml
<?xml version = "1.0" encoding = "UTF-8"?>

<beans xmlns = "http://www.springframework.org/schema/beans"for javaCollection -->
   <bean id = "javaCollection" class = "com.tutorialspoint.JavaCollection">

      <!-- results in a setAddressList(java.util.List) call -->
      <property name = "addressList">
         <list>
            <value>INDIA</value>
            <value>Pakistan</value>
            <value>USA</value>
            <value>USA</value>
         </list>
      </property>

      <!-- results in a setAddressSet(java.util.Set) call -->
      <property name = "addressSet">
         <set>
            <value>INDIA</value>
            <value>Pakistan</value>
            <value>USA</value>
            <value>USA</value>
         </set>
      </property>

      <!-- results in a setAddressMap(java.util.Map) call -->
      <property name = "addressMap">
         <map>
            <entry key = "1" value = "INDIA"/>
            <entry key = "2" value = "Pakistan"/>
            <entry key = "3" value = "USA"/>
            <entry key = "4" value = "USA"/>
         </map>
      </property>

      <!-- results in a setAddressprop(java.util.Properties) call -->
      <property name = "addressprop">
         <props>
            <prop key = "one">INDIA</prop>
            <prop key = "one">INDIA</prop>
            <prop key = "two">Pakistan</prop>
            <prop key = "three">USA</prop>
            <prop key = "four">USA</prop>
         </props>
      </property>
   </bean>

</beans>
(3)编写MainApp.java
 MainApp {
        main(String[] args) {
              ApplicationContext context = );
              JavaCollection jc=(JavaCollection)context.getBean("javaCollection");

              jc.getAddressList();
              jc.getAddressSet();
              jc.getAddressMap();
              jc.getAddressprop();
           }
}
(4)运行MainApp.java中的main方法
结果如下:

版权声明:本文内容由互联网用户自发贡献,该文观点与技术仅代表作者本人。本站仅提供信息存储空间服务,不拥有所有权,不承担相关法律责任。如发现本站有涉嫌侵权/违法违规的内容, 请发送邮件至 dio@foxmail.com 举报,一经查实,本站将立刻删除。

