为什么要学习CSS布局属性
首先,React Native使用JSX语法(后边的博客会详细讲解)来编程,它其实是一个语法糖,React Native 的代码格式和原来的HTML + CSS 的代码格式有些相似,重要的是,它布局的属性和CSS的布局属性基本是差不多的,所以,我们从CSS的布局属性过渡到React Native 的布局属性,会更加平滑好理解,毕竟它的岁数大很多。。。
常用的CSS布局属性
“alignItems”,
“alignSelf”,
“backfaceVisibility”,
“backgroundColor”,
“borderBottomColor”,
“borderBottomLefTradius”,
“borderBottomrighTradius”,
“borderBottomWidth”,
“borderColor”,
“borderLeftColor”,
“borderLeftWidth”,
“borderRadius”,
“borderRightColor”,
“borderRightWidth”,
“borderStyle”,
“borderTopColor”,
“borderTopLefTradius”,
“borderTopRighTradius”,
“borderTopWidth”,
“borderWidth”,
“bottom”,
“color”,
“flex”,
“flexDirection”,
“flexWrap”,
“fontFamily”,
“fontSize”,
“fontStyle”,
“fontWeight”,
“height”,
“justifyContent”,
“left”,
“letterSpacing”,
“lineHeight”,
“margin”,
“marginBottom”,
“marginHorizontal”,
“marginLeft”,
“marginRight”,
“marginTop”,
“marginVertical”,
“opacity”,
“overflow”,
“padding”,
“paddingBottom”,
“paddingHorizontal”,
“paddingLeft”,
“paddingRight”,
“paddingTop”,
“paddingVertical”,
“position”,
“resizeMode”,
“right”,
“shadowColor”,
“shadowOffset”,
“shadowOpacity”,
“shadowRadius”,
“textAlign”,
“textdecorationColor”,
“textdecorationLine”,
“textdecorationStyle”,
“tintColor”,
“top”,
“transform”,
“transformMatrix”,
“width”,
“writingDirection”
代码效果展示需要一个.html文件,我们创建一个文本文件,后缀名改一下,把下边这段代码整个复制进去,我们在里边要搞出一些事情:(每次修改完代码,保存,双击文件,如果已经打开,刷新浏览器即可)
<DOUCTYPE!>
    <html>
<head>
<style> .flex-container{ background-color: #f00; width: 190; height: 190; display: flex; } .flex-container div { width: 50; height: 50; background-color: #00f; margin: 1 1 1 1; } .flex-container div h1{ width:50; height: 50; } .flex-item1 { } .flex-item2 { } .flex-item3 { } .flex-item4 { } .flex-item5 { } </style>
</head>
<body>
        <div class="flex-container">
            <div class="flex-item1">
                <h1 >1</h1>
            </div>
            <div class="flex-item2">
                <h1 >2</h1>
            </div>
            <div class="flex-item3">
                <h1 >3</h1>
            </div>
            <div class="flex-item4">
                <h1 >4</h1>
            </div>
            <div class="flex-item5">
                <h1 >5</h1>
            </div>
        </div>
</body>
    </html>
我们来讲解几个重要的属性
常用属性之-伸缩容器属性
伸缩布局图-图1
默认情况下,伸缩容器由两根:主轴(main axis)和交叉轴(cross axis),可以理解成坐标系中的x轴和y轴,主轴开始和结束位置分别叫 main start 和 main end, 同理交叉轴开始和结束位置分别叫cross start 和cross end,二者可以互为交替(在代码中设置),无论哪条轴作为主轴,默认情况下,伸缩项目总是沿着主轴,flexBox目前还处于草稿状态,在使用的时候,需要加上各个浏览器的私有前缀,即-webkit 、-moz、-ms、-o等(这个大家可以自行百度一下,本篇主要讲布局属性),后边的代码为了方便都没有写前缀。
伸缩容器属性
display
flex-direction
flex-wrap
flex-flow
justify-content
align-items
align-content
下边简要介绍这几个属性
1、display
该属性用来指定元素是否为伸缩容器,语法:
display:flex | inline-flex
.flex-container {
    display:flex;
}
inline-flex:用于产生行级伸缩容器 CSS代码:
.flex-container {
    display:inline-flex;
}
注:这个时候
columns在伸缩容器上没有效果,float、clear和vertical-align在伸缩项目上没有效果
2、flex-direction
该属性指定主轴方向,语法:
flex-direction: row | row-reverse | column | column-reverse
属性意义:
row:(默认值),伸缩容器若为水平方向轴,伸缩项目的排版方式从左向右排列,CSS代码:
.flex-container {
    display:flex;
    flex-direction:row;
}
效果如图2-1:
图2-1 flex-direction 为row的效果图
注:flex-direction默认为row,如果容器是横向伸缩,不用定义
row-reverse:伸缩容器若为水平方向,伸缩项目的排版方式为从右到左,CSS代码:
.flex-container {
    display:flex;
    flex-direction:row-reverse;
}
效果如图2-2:
图2-2 flex-direction 为row-reverse时的效果图
column:伸缩容器若为垂直方向轴,伸缩项目的排版方式为从上向下排列,CSS代码:
.flex-container {
    display:flex;
    flex-direction:column;
}
效果如图2-3:
图2-3 flex-direction 为column时的效果图
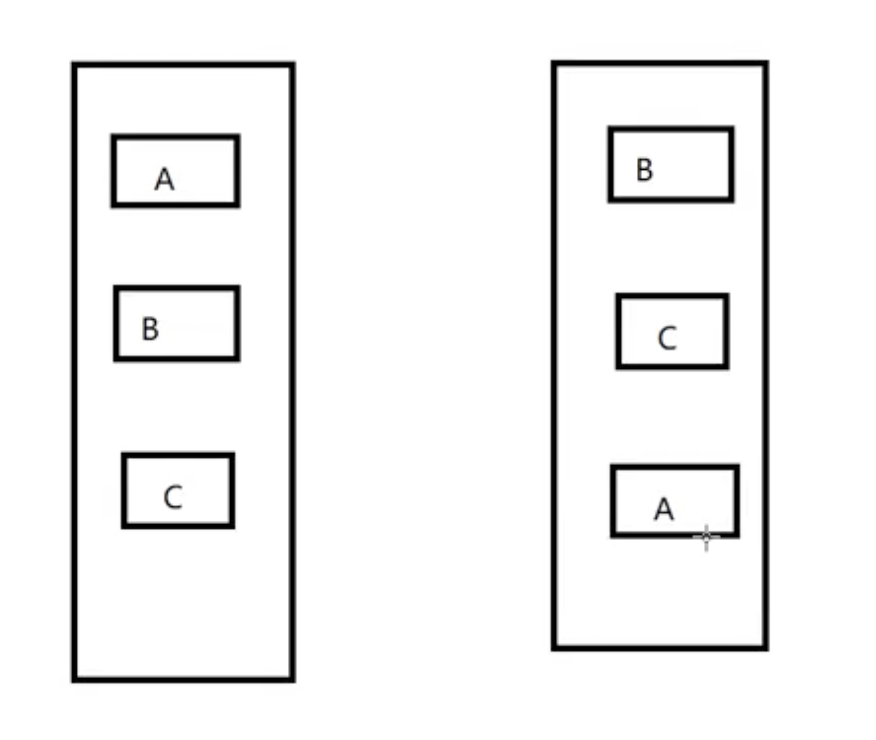
column-reverse:伸缩容器若为垂直方向轴,伸缩项目的排版方式为从下向上排列,CSS代码:
.flex-container {
    display:flex;
    flex-direction:column-reverse;
}
效果如图2-4:
图2-4 flex-direction 为column-reverse时的效果图
3、flex-wrap
该属性主要来指定伸缩容器的主轴线方向空间不足的情况下,是否换行以及该如何换行,语法:
flex-wrap: wrap | Nowrap | wrap-reverse
下面简要介绍这三个属性值的含义:
wrap:伸缩容器空间不足的情况下允许换行。若主轴为水平轴,换行方向为从上到下。CSS代码:
.flex-container{
    background-color: #f00;
    width: 190;
    height: 190;
    display: flex;
    flex-direction:row;
    flex-wrap:wrap;
}
效果如图2-5:
图2-5 flex-wrap 为wrap时的效果图
wrap-reverse:伸缩容器空间不足的情况下允许换行。若主轴为水平轴,换行方向为从下到上。CSS代码:
.flex-container{
    background-color: #f00;
    width: 190;
    height: 190;
    display: flex;
    flex-direction:row;
    flex-wrap:wrap-reverse;
}
效果如图2-6:
图2-6 flex-wrap 为wrap-reverse时的效果图
4、flex-flow
该属性是flex-direction和flex-wrap属性的缩写版本,他同时定义了伸缩容器的主轴和侧轴,其默认值为row Nowrap。语法
flex-flow:flex-direction flex-wrap
CSS代码:
.flex-container{
    background-color: #f00;
    width: 190;
    height: 190;
    display: flex;
    flex-flow:row wrap-reverse;
}
效果如图2-7:
图2-7 flex-flow 为row wrap-reverse时的效果图
5、justify-content
该属性来定义伸缩项目沿主轴线的对其方式,语法:
justify-content:flex-start | flex-end | center | space-between | space-around
下面简要介绍这个5个属性的含义
flex-start:伸缩项目向主轴线的起始位置靠齐。
CSS代码:
.flex-container{
    background-color: #f00;
    width: 190;
    height: 190;
    display: flex;
    flex-flow:row Nowrap;
    justify-content:flex-start;
}
效果如图2-8:
图2-8 justify-content 为flex-start时的效果图
flex-end:伸缩项目向主轴线的结束位置靠齐。
CSS代码:
.flex-container{
    background-color: #f00;
    width: 190;
    height: 190;
    display: flex;
    flex-flow:row Nowrap;
    justify-content:flex-end;
}
效果如图2-9:
图2-9 justily-content 为flex-end时的效果图
center:伸缩项目向主轴线的中间位置靠齐。
CSS代码:
.flex-container{
    background-color: #f00;
    width: 190;
    height: 190;
    display: flex;
    flex-flow:row Nowrap;
    justify-content:center;
}
效果如图2-10:
图2-10 justily-content 为center时的效果图
space-between:伸缩项目会平均的分布在主轴线里。第一个伸缩项目在主轴线的开始位置,最后一个伸缩项目在主轴线的重点位置。
CSS代码:
.flex-container{
    background-color: #f00;
    width: 190;
    height: 190;
    display: flex;
    flex-flow:row Nowrap;
    justify-content:space-between;
}
效果如图2-11:
图2-11 justily-content 为space-between时的效果图
space-between:伸缩项目会平均的分布在主轴线里。两端保留一半的空间。
CSS代码:
.flex-container{
    background-color: #f00;
    width: 190;
    height: 190;
    display: flex;
    flex-flow:row Nowrap;
    justify-content:space-around;
}
效果如图2-12:
图2-12 justily-content 为space-around时的效果图
6、align-items
该属性用来定义伸缩项目在伸缩容器的交叉轴上的对齐方式,其语法为:
align-items:flex-start | flex-end | center | baseline | stretch
下面简要介绍这5个属性值的含义。
flex-start(默认值):伸缩项目向交叉轴的起始位置靠齐。
CSS代码:
.flex-container{
    background-color: #f00;
    width: 190;
    height: 190;
    display: flex;
    flex-flow:row Nowrap;
    align-items:flex-start;
}
效果如图2-13:
图2-13 align-items 为flex-start时的效果图
flex-end:伸缩项目向交叉轴的结束位置靠齐。
CSS代码:
.flex-container{
    background-color: #f00;
    width: 190;
    height: 190;
    display: flex;
    flex-flow:row Nowrap;
    align-items:flex-end;
}
效果如图2-14:
图2-14 align-items 为flex-end时的效果图
center:伸缩项目向交叉轴的中间位置靠齐。
CSS代码:
.flex-container{
    background-color: #f00;
    width: 190;
    height: 190;
    display: flex;
    flex-flow:row Nowrap;
    align-items:center;
}
效果如图2-15:
图2-15 align-items 为center时的效果图
注:可以试一下
flex-flow:row wrap并且5个视图的情况下的效果
baseline:伸缩项目根据它们的基线对齐。
CSS代码:
.flex-container{
    background-color: #f00;
    width: 190;
    height: 190;
    display: flex;
    flex-flow:row Nowrap;
    align-items:baseline;
}
.flex-item1 {
    padding-top:15px;
}
.flex-item2 {
    padding-top:10px;
}
.flex-item3 {
    padding-top:5px;
}
效果如图2-16:
图2-16 align-items 为baseline时的效果图
stretch:伸缩项目根据它们的基线对齐。
CSS代码:
.flex-container{
    background-color: #f00;
    width: 190;
    height: 190;
    display: flex;
    flex-flow:row Nowrap;
    align-items:stretch;
}

.flex-container div {
    width: 50;
    /*height: 50;*/
    background-color: #00f;
    margin: 1 1 1 1;
}
效果如图2-17:
图2-17 align-items 为stretch时的效果图
注:使用height时,在这个轴上的伸缩属性stretch就会失效,所以,我们需要把单个伸缩项目的固定高度控制代码注释掉,才能看到这个效果
7、align-content
这个属性主要用来调整伸缩项目出现换行后在交叉轴上的对齐方式,类似于伸缩项目的主轴上使用justify-content,语法:
align-content: flex-start | flex-end | center | space-between | space-around | stretch
注:
flex-wrap:wrap一定要开启,且它在出现换行的情况下才能看到效果。下边提到的伸缩项目均指伸缩项目所在的行,因为这里调整的启示就是伸缩项目换行后每行之间的对其方式
下面主要介绍这6个属性值的含义:
flex-start:伸缩项目向交叉轴的起始位置靠齐。
CSS代码:
.flex-container{
    background-color: #f00;
    width: 190;
    height: 190;
    display: flex;
    flex-flow:row wrap;
    align-content:flex-start;
}
效果如图2-18:
图2-18 align-content 为flex-start时的效果图
flex-end:伸缩项目向交叉轴的结束位置靠齐。
CSS代码:
.flex-container{
    background-color: #f00;
    width: 190;
    height: 190;
    display: flex;
    flex-flow:row wrap;
    align-content:flex-end;
}
效果如图2-19:
图2-19 align-content 为flex-end时的效果图
space-between:伸缩项目向交叉轴中平均分布。
CSS代码:
.flex-container{
    background-color: #f00;
    width: 190;
    height: 190;
    display: flex;
    flex-flow:row wrap;
    align-content:space-between;
}
效果如图2-20:
图2-20 align-content 为space-between时的效果图
space-around:伸缩项目向交叉轴中平均分布,且在两边各有一班的空间。
CSS代码:
.flex-container{
    background-color: #f00;
    width: 190;
    height: 190;
    display: flex;
    flex-flow:row wrap;
    align-content:space-around;
}
效果如图2-21:
图2-21 align-content 为space-around时的效果图
stretch(默认值):伸缩项目将会在交叉轴上伸展以占用剩余空间。
CSS代码:
.flex-container{
    background-color: #f00;
    width: 190;
    height: 190;
    display: flex;
    flex-flow:row wrap;
    align-content:stretch;
}
.flex-container div {
    width: 50;
    /*height: 50;*/
    background-color: #00f;
    margin: 1 1 1 1;
}
效果如图2-22:
图2-22 align-content 为stretch的效果图
注:同
justify-content:stretch一样,我们设置它交叉轴的拉伸方式的时候如果时这种自动填充的情况,伸缩项目的height属性不能被应用
center:伸缩项目将会向交叉轴的中间位置靠齐。
CSS代码:
.flex-container{
background-color: #f00;
width: 190;
height: 190;
display: flex;
flex-flow:row wrap;
align-content:center;
}
效果如图2-23:
图2-23 align-content 为center的效果图
总结:伸缩容器的属性以上有一个单独的简单的介绍,复杂的应用应该是多个属性同时控制一个容器,需要大家自己练习,发挥自己的想象。下一篇我们学习,伸缩项目的属性。
版权声明:本文内容由互联网用户自发贡献,该文观点与技术仅代表作者本人。本站仅提供信息存储空间服务,不拥有所有权,不承担相关法律责任。如发现本站有涉嫌侵权/违法违规的内容, 请发送邮件至 dio@foxmail.com 举报,一经查实,本站将立刻删除。