这个是一个第三方按钮菜单组件,原版是使用Objective-C编写的名为AwesomeMenu的组件,地址是:
https://github.com/levey/AwesomeMenu
源码下载:HanggeMenu.zip
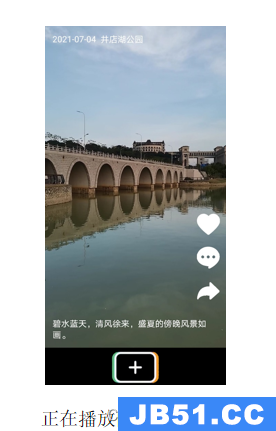
这里改造成了Swift版,效果图如下:
(2015.10.20再次修改,在Swift2下使用正常。)
使用代码:
|
1
2
3
4
5
6
7
8
9
10
11
12
13
14
15
16
17
18
19
20
21
22
23
24
25
26
27
28
29
30
31
32
33
34
35
36
37
38
39
40
41
42
43
44
45
46
47
48
49
50
51
52
53
54
55
56
57
58
59
60
61
62
63
64
65
66
67
68
69
70
71
72
73
74
75
76
77
78
79
80
81
82
83
84
85
86
|
import
UIKit
class
ViewController
:
UIViewController
,
HanggeSwiftMenuDelegate
{
override
func
viewDidLoad() {
super
.viewDidLoad()
let
storyMenuItemImage =
UIImage
(named:
"bg-menuitem.png"
)
starImage =
"icon-star.png"
)
// Default Menu
starMenuItem1 =
HanggeSwiftMenuItem
(image:storyMenuItemImage!,
starMenuItem2 =
ottom:auto!important; float:none!important; height:auto!important; left:auto!important; line-height:1.5em!important; margin:0px!important; overflow:visible!important; padding:1px 0px!important; position:static!important; right:auto!important; top:auto!important; vertical-align:baseline!important; width:auto!important; font-family:Consolas,
)
starMenuItem3 =
ottom:auto!important; float:none!important; height:auto!important; left:auto!important; line-height:1.5em!important; margin:0px!important; overflow:visible!important; padding:1px 0px!important; position:static!important; right:auto!important; top:auto!important; vertical-align:baseline!important; width:auto!important; font-family:Consolas,
)
starMenuItem4 =
ottom:auto!important; float:none!important; height:auto!important; left:auto!important; line-height:1.5em!important; margin:0px!important; overflow:visible!important; padding:1px 0px!important; position:static!important; right:auto!important; top:auto!important; vertical-align:baseline!important; width:auto!important; font-family:Consolas,
)
starMenuItem5 =
ottom:auto!important; float:none!important; height:auto!important; left:auto!important; line-height:1.5em!important; margin:0px!important; overflow:visible!important; padding:1px 0px!important; position:static!important; right:auto!important; top:auto!important; vertical-align:baseline!important; width:auto!important; font-family:Consolas,
)
starMenuItem6 =
ottom:auto!important; float:none!important; height:auto!important; left:auto!important; line-height:1.5em!important; margin:0px!important; overflow:visible!important; padding:1px 0px!important; position:static!important; right:auto!important; top:auto!important; vertical-align:baseline!important; width:auto!important; font-family:Consolas,
)
starMenuItem7 =
ottom:auto!important; float:none!important; height:auto!important; left:auto!important; line-height:1.5em!important; margin:0px!important; overflow:visible!important; padding:1px 0px!important; position:static!important; right:auto!important; top:auto!important; vertical-align:baseline!important; width:auto!important; font-family:Consolas,
)
starMenuItem8 =
ottom:auto!important; float:none!important; height:auto!important; left:auto!important; line-height:1.5em!important; margin:0px!important; overflow:visible!important; padding:1px 0px!important; position:static!important; right:auto!important; top:auto!important; vertical-align:baseline!important; width:auto!important; font-family:Consolas,
)
starMenuItem9 =
ottom:auto!important; float:none!important; height:auto!important; left:auto!important; line-height:1.5em!important; margin:0px!important; overflow:visible!important; padding:1px 0px!important; position:static!important; right:auto!important; top:auto!important; vertical-align:baseline!important; width:auto!important; font-family:Consolas,
)
menus = [starMenuItem1,starMenuItem2,starMenuItem3,starMenuItem4,
starMenuItem5,starMenuItem6,starMenuItem7,starMenuItem8,starMenuItem9]
startItem =
(image:
"bg-addbutton.png"
)!,
highlightedImage:
"bg-addbutton-highlighted.png"
ottom:auto!important; float:none!important; height:auto!important; left:auto!important; line-height:1.5em!important; margin:0px!important; overflow:visible!important; padding:1px 0px!important; position:static!important; right:auto!important; top:auto!important; vertical-align:baseline!important; width:auto!important; font-family:Consolas,
contentimage:
"icon-plus.png"
ottom:auto!important; float:none!important; height:auto!important; left:auto!important; line-height:1.5em!important; margin:0px!important; overflow:visible!important; padding:1px 0px!important; position:static!important; right:auto!important; top:auto!important; vertical-align:baseline!important; width:auto!important; font-family:Consolas,
)
menu =
HanggeSwiftMenu
(frame:
self
.view.bounds,startItem:startItem,aMenusArray:menus)
menu.delegate =
self
.view.addSubview(menu)
}
func
SwiftSelectMenu
(menu:
ottom:auto!important; float:none!important; height:auto!important; left:auto!important; line-height:1.5em!important; margin:0px!important; overflow:visible!important; padding:1px 0px!important; position:static!important; right:auto!important; top:auto!important; vertical-align:baseline!important; width:auto!important; font-family:Consolas,didSelectIndex idx:
Int
)
{
print
(
"Select the index : %d"
ottom:auto!important; float:none!important; height:auto!important; left:auto!important; line-height:1.5em!important; margin:0px!important; overflow:visible!important; padding:1px 0px!important; position:static!important; right:auto!important; top:auto!important; vertical-align:baseline!important; width:auto!important; font-family:Consolas,idx)
}
HanggeSwiftMenuDidFinishAnimationClose
)
{
"Menu was closed!"
)
}
HanggeSwiftMenuDidFinishAnimationopen
)
{
"Menu is open!"
)
}
HanggeSwiftMenuWillAnimateOpen
)
{
}
HanggeSwiftMenuWillAnimateClose
)
{
}
didReceiveMemoryWarning() {
.didReceiveMemoryWarning()
}
}
|
原文出自: www.hangge.com 转载请保留原文链接: http://www.hangge.com/blog/cache/detail_649.html
版权声明:本文内容由互联网用户自发贡献,该文观点与技术仅代表作者本人。本站仅提供信息存储空间服务,不拥有所有权,不承担相关法律责任。如发现本站有涉嫌侵权/违法违规的内容, 请发送邮件至 dio@foxmail.com 举报,一经查实,本站将立刻删除。