Introduction to Swift Programming for beginners
android 进阶的同时,该学学ios开发啦 。
When starting any language it’s important to get a firm understanding of the basics. This beginners introduction to programming with Swift will do just that. Mentioning best practices and coding conventions you’ll be developing iOS 8 apps in Swift in no time.
Table of Contents 目录
- What is Swift?
- Variables 变量
- Collections 集合
- Loops 循环
- Conditional Statements 条件语句
- Resources 资源
- References 引用
What is Swift?
In late 2014 Apple released a new programming language to create iOS and OS apps,this language is if you have not already guessed called Swift. Taken from Apple’s [1] own website:
Swift is an innovative new programming language for Cocoa and Cocoa Touch. Writing code is interactive and fun,the syntax is concise yet expressive,and apps run lightning-fast. Swift is ready for your next iOS and OS X project — or for addition into your current app — because Swift code works side-by-side with Objective-C.
Variables
Variables in Swift are a way for you to create dynamically assigned values. Dynamic means that the value you have set can change. To set a variable in Swift you would prefix your variable name with the word var. This then tells Xcode that you are declaring a variable to use. The name for the variable that you set is a way for you to reference the value you want to set and use. The standard convention for declaring variables in Swift is to use camel case (Wikipedia) [2]. Camel Case means that if you use several words to declare a variable,the first word will start with a lower case and the words after that will start with an uppercase.
变量 驼峰命名 变量名前加 var 前缀 。
Lets say you wanted to created a variable that would reference your age on Friday. You would do this like so:
var myAgeOnFriday
Because Swift is a type safe language it’s better (best practice) to create an explicit variable. This means you tell Xcode what type of variable is going to be used. After the above declaration you would follow that with a colon : and then declare the variable type. Because the above variable is going to be a number or integer we tell Xcode that it can expect an integer to be assigned like so:
冒号间隔 后面跟变量类型 :
var myAgeOnFriday : Int
Finally,the next thing we need to do to this variable is to specify the value. So let’s say on Friday you’re going to be 23 you then need to add the following and you have successfully declared a variable called myAgeOnFriday with the value of 23.
var myAgeOnFriday : Int = 23
In the above Swift variable declaration the equals sign = initialises the variable with that value.
Swift String Mutability 易变性
This might sound weird(怪异) or even scaring (可怕)but it is nothing to worry about. I’m only adding this section in briefly as I’ve seen a lot of people refer to the term String Mutability. When I first started coding I was very unfamiliar with this. So Succinctly(简洁的) here is the Explanation taken from Apple:
Integers
Integers in Swift is a whole number which can be positive or negative. As you can see in the above declaration you would initialise an integer in Swift with Int.
Float
A Float is basically an integer with a decimal place in it,for example 1.23. Setting a float variable in Swift is pretty much the same as setting an integer however you use the word Float. Let’s say you had loan amount that you borrowed and you needed to set this at the top of the code. You would do this like so:
var myLoanAmount : Float = 3500.37
Strings
A String is a collection of ordered characters and can be made up of both integers and letters. For example you could have:
var myStatusUpdate: String = "Today I won £300"
Boolean
Booleans are a fantastic type of variable that you can set. This variable will return the value of either true or false and to set it you use the Bool declaration after the colon in your variable,like so:
var isUserLoggedIn: Bool = true
Constants
So we have covered how to create variables in Swift and how you can change them. But what if you wanted to use a variable that you knew was not going to change? For example the date you were born. For this we can use a constant. Declaring a constant in Swift is a little different than the usual variable declaration of var instead we use let. So to declare a constant in Swift we would write:
let dateOfBirth: Int = 12011988
Swift Type Inference
So,the way that I have shown you so far is to declare your variable by giving it a name and then defining the type of variable: Int,String,Bool. However,This is only the best practice and you do not need to do this. Swift is clever enough to know what type of variable you are wanting to create just by the way you define the value (value is the assigned data at the right side of the equals sign). For example if you wrap the value in “value” double quotation marks then Swift will know that this value is a String. So using the above defined variables this is how you can define them without using the Swift explicit variable option:
// Declare an integer
var myAgeOnFriday = 23

// Declare a Boolean
var isUserLoggedIn = true

// Declare a String
var myStatusUpdate  = "Today I won £300"
As you can see,the colon and the declaration of type (Int,Boolean) is no longer required. This can save you a lot of time.
Concatenation
Concatenating strings is a way to join two or more strings together. This comes in very useful when you are gathering peoples names for example.
Let’s say that you have a variable called name:
var name = "iOS"
Which only has the first name but you want to assign a last name also. Because the variable as already been initialised you can simply just type the variable name and add it to itself.
name = name + " Blog"
// This now outputs 'iOS Blog'
Why would you do this? This might be very useful especially if you get the first name and the last name from different views and at different points throughout the application process.
You can also add two variables together like so:
var firstName = "iOS"
var lastName = " Blog"
var fullName = "" // Blank but initialised

fullName = firstName + lastName

// This outputs iOS Blog
You can also add in String variables and text and concatenate them together,like so:
var flowerColour = "red"
var flowerType = "Tulip"
var sentence = ""

sentence = "The " + flowerType + " was " + flowerColour + " and looked amazing"

// Outputs:
// The Tulip was red and looked amazing
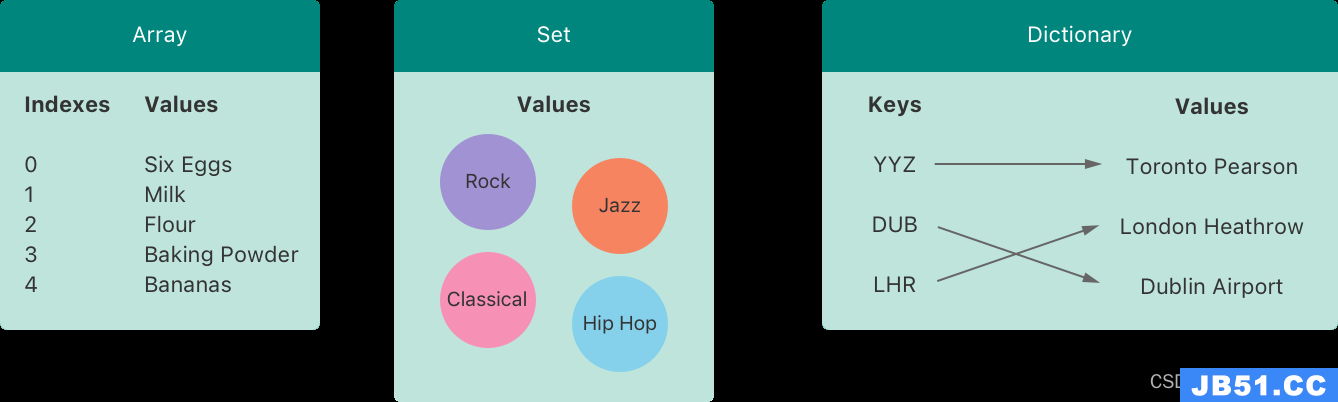
Collections
Swift provides Arrays and Dictionaries to help you hold onto multiple values of data. These are called collections and are an absolute gem when you are wanting to re-use data multiple times throughout your project or even just to store associated data together in a nice bundle.
Dictionaries
In Swift,you can store associates Key and Value data in dictionaries. A quick way to remember this is just think about a book. The table of contents is the key and the page is the value. Dictionaries do not sort or organise your data in any specific order and to get the Value you need to reference the Key. Let’s say that you have three children (Rich,John and Carl) and you want to store their ages (3,5,9) respectively. You would do this like:
var children : [String: Int] = ["Rich" : 3,"John": 5,"Carl": 9]
As you can see in the example above,We have declared a Dictionary by typing var children :. We have then declared the type inference for the Key as String and the Value as Integer: [String: Int] and then we have added the values: = [“Rich” : 3,“John”: 5,“Carl”: 9]. Each of the Keys (the names) have the corresponding value (their ages).
To access a specific value,for example the age of John we would type:
children['John']

//Output
// 5
If you wanted to add another Key and Value to the dictionary (you have had another child) later you can do this:
children['Zoey'] = 1
Have you ever coded another language? PHP? This looks a lot like the way to push into an array.
Oh no,you got one of your kids ages wrong. Not to worry you can simply call the dictionary with the Key referencing the new Value and it will overwrite it. Like so:
children['Carl'] = 10
Now,Carl is 10. Your entire dictionary is: [“Rich” : 3,“Carl”: 10,“Zoey”: 1].
Ok,so let’s say that you want to remove a child from your family (I wont judge on the reason) you can run the same line you used to update the Value but this time set it to nil like so:
nil删除
children['Rich'] = nil
Oh dear,Rich is now no longer part of the ‘children’ dictionary.
Arrays
We know how to create a variable for a name,but lets assume that you are running a phone call tree and you have a list of 23 and growing names. Adding new lines for every single name is going to be tedious. So what is an Array? Well its basically a way to hold many variables in a specific order. An Array will assign each Value an index value. It’s important to know that the index values in Arrays start at 0.
Taking into account what I just mentioned that the list is for a phone call tree and that we do not know how many people will be in the list we can create an Array like so:
var phoneTreeNames: [String] = ["John","Laura","Chris","Dave","Liam","Joseph"]
As you can see,we have started with the declaration of a variable: var. and then specified the array name: phoneTreeNames and then the type inference of: String however we do not need to specify the type,just like we don’t when declaring variables in Swift.
As mentioned previously if you are wondering about the Mutability of Collections then the rules specified above are exactly the same.
As mentioned at the beginning of the Array section each Value in the Array will have an automatic index value assigned to it. We can use this to get the item out of the array like so:
var phoneTreeNames: [String] = ["John","Joseph"]

phoneTreeNames[3]
// Outputs Dave
So,how many names are in this Array? If you need to get the total value of these arrays at any time you can call the count function. Like so:
phoneTreeNames.count

//Outputs 6
Modifying arrays
You can append items to the array,providing that it is mutable. This means that you have declared the array with ‘var’ not ‘let’.
You can do this quite easily,like so:
phoneTreeNames.append("Simon")
If you are wanting to change the name in an array,then you can modify it using the allocated array index value.
Let’s say you want to change the name ‘Laura’ which is in the second position of the array but has an index value of 1. Remember I said that arrays start their index value at 0. You would do this like:
phoneTreeNames[2] = "Jeremy"
Oh no,Jeremy has decided to leave the phone tree and now you have to remove him from the list. no problem. Again use the array index value but this time pass it as a parameter to the Swift removeAtIndex(*) Function:
phoneTreeNames.removeAtIndex(2)
All done. He has now been removed from the list.
Loops 循环
Loops in Swift allow you to iterate over pieces of code and perform actions on them.
For Loops in Swift for 循环
One of the more common loops in Swift is the For-Condition-Increment (‘For loop’ for short). This loop follows this format:
for (variable; condition; increment) { }
The variable is often an integer that is used to keep track of the current number of loops iterated. The condition is checked after each loop; if it is true,the loop runs again. If the condition is false,the loop will stop running. Last but not least is the increment which is the amount added to the variable every time the loop executes.
Take the following code:
for (var counter = 0; counter < 6; counter++) {
    println("Looped")
}
Ranges
Swift includes two range operators,which are shortcuts for expressing a range of values. A range is similar to an array of integers. There are two types of Ranges in Swift; Closed range and Half-Closed Range.
A closed range is written with three dots and includes the uppermost number:
1...5
//1,2,3,4,5
A half-closed range is written with two dots followed by a less-than sign and does not include the uppermost number:不包含最高位
1..<5
//1,4
You can use for-in loops with a range of numbers instead of an array or dictionary. For example:
for index in 1...5 {
    println("The current number is \(index)")
}
//Output
//The current number is 1
//The current number is 2
//The current number is 3
//The current number is 4
//The current number is 5
Conditional Statements 条件语句
Condition statements allow you to perform a task on a specific piece of code based on a condition. Let us assume that you have some data about cars and their colours but you only wanted to show the cars that were red. You would use a Swift Conditional Statement to achieve this.
if Statements
版权声明:本文内容由互联网用户自发贡献,该文观点与技术仅代表作者本人。本站仅提供信息存储空间服务,不拥有所有权,不承担相关法律责任。如发现本站有涉嫌侵权/违法违规的内容, 请发送邮件至 dio@foxmail.com 举报,一经查实,本站将立刻删除。