SpringBoot2
文档
- Spring 官网:https://spring.io/
- SpringBoot 官网:https://spring.io/projects/spring-boot
- 尚硅谷SpringBoot2课程文档地址:https://www.yuque.com/atguigu/springboot
HelloWord
第一步:创建一个Maven工程
第二步:导入pom依赖
<parent>
    <groupId>org.springframework.boot</groupId>
    <artifactId>spring-boot-starter-parent</artifactId>
    <version>2.7.1</version>
</parent>
第三步:添加web启动器
<dependencies>
    <dependency>
        <groupId>org.springframework.boot</groupId>
        <artifactId>spring-boot-starter-web</artifactId>
    </dependency>
</dependencies>
第四步:编写MainApplication方法,核心运行方法
/**
 * @author songzhengxiang
 * @create 2022-07-14 22:30
 *
 * 添加一个 @SpringBootApplication 注解表示这是一个 springboot 项目
 */
@SpringBootApplication
public class MainApplication {
    public static void main(String[] args) {
        // 启动服务,固定写法
        SpringApplication.run(MainApplication.class,args);
    }
}
第五步:编写HelloController
@RestController
public class HelloController {
    @GetMapping("/hello")
    public String hello(){
        return "hello spring boot2";
    }
}
此时的项目结构
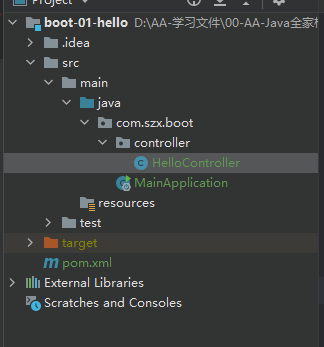
第六步:运行MainApplication
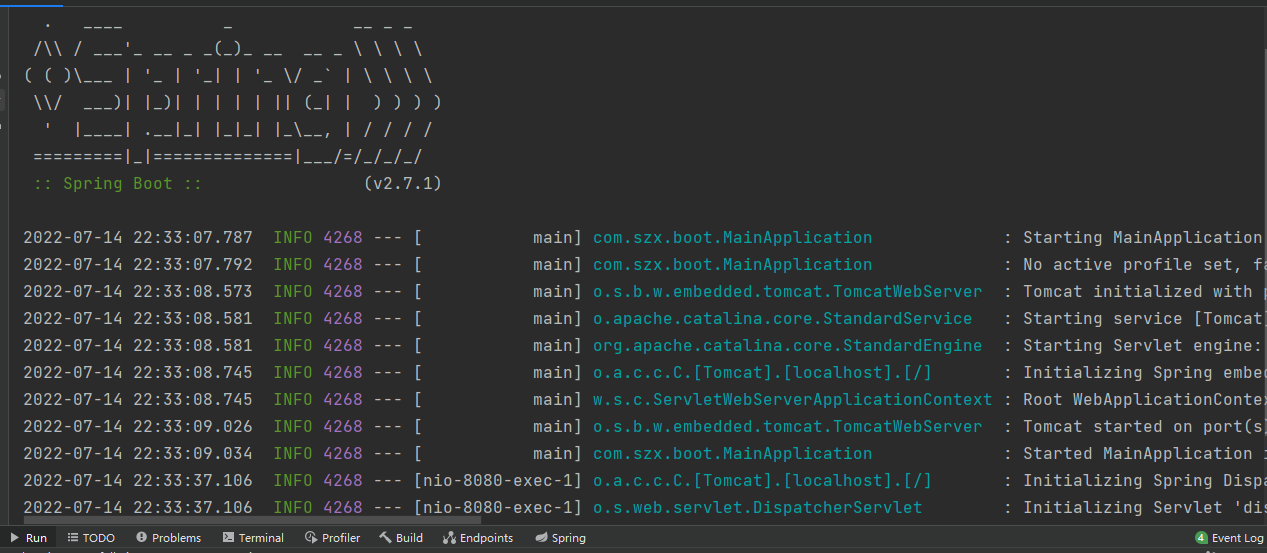
启动成功后再浏览器输入 http://localhost:8080/hello,页面成功响应 hello spring boot2

修改默认端口
SpringBoot默认启动的端口号是 8080,我们可通过配置文件修改默认启动的端口号。新建一个 application.properties,里面指定启动端口号
server.port=8081
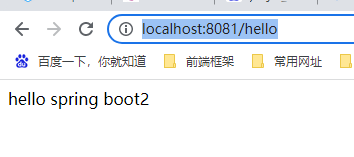
然后再次启动服务,可以看到在 8081 端口运行我们的项目

此时在浏览器输入 http://localhost:8081/hello,页面成功响应
自动装配组件的注意点
- SpringBoot 默认自动装配声明了 @SpringBootApplication 注解的同级以及下面的包
- 如果想要改变这种默认的装配规则,可以在运行类中设置
@SpringBootApplication(scanBasePackages = "com.szx")修改这种默认规则
底层注解
@Configuration
新建一个 MyConfig 类,作为一个配置类,在配置类中可以注册 bena 到容器中
@Configuration(proxyBeanMethods = false)
public class MyConfig {
    @Bean
    public User user(){
        return new User("张三",18);
    }

    @Bean
    public Pet pet(){
        return new Pet("猫");
    }
}
如果在配置类中声明了 proxyBeanMethods = false,则通过配置类获取bean不会先在容器中判断是否存在,每次返回的都会是一个新的bean
在启动类中可以获取容器中的 bean
@SpringBootApplication(scanBasePackages = "com.szx")
public class MainApplication {
    public static void main(String[] args) {
        // 启动服务,固定写法
        ConfigurableApplicationContext run = SpringApplication.run(MainApplication.class, args);

        // 从容器中获取bean,默认获取到的容器是单实例的
        User user = run.getBean("user", User.class);
        User user1 = run.getBean("user", User.class);
        System.out.println(user == user1);

        // 如果在配置类中声明了 proxyBeanMethods = false,则通过配置类获取bean不会先在容器中判断是否存在,每次返回的都会是一个新的bean
        MyConfig myConfig = run.getBean(MyConfig.class);
        User user2 = myConfig.user();
        User user3 = myConfig.user();
        boolean b = user2 == user3;
        System.out.println(b);

    }
}
@Import
处理手动的在配置类中添加 bean 之外,也可在配置类上添加 @Import 注解导入组件
@Import({User.class,Pet.class})
@Configuration
public class MyConfig {
    @Bean
    public User user(){
        return new User("张三",18,new Pet("金毛"));
    }

    @Bean
    public Pet pet(){
        return new Pet("猫");
    }
}
运行结果

@Conditional条件装配
-
@ConditionalOnBean(name = "pet")当容器中有某个bena时才会注册这个bena,要注意有先后顺序的问题 -
@ConditionalOnMissingBean当容器中没有某个组件时,就注册那个组件
@Configuration
public class MyConfig {

    @Bean
    public Pet pet(){
        return new Pet("猫");
    }

    // 当容器中有pet时,才会注册 user,注意这里有先后循序问题
    @ConditionalOnBean(name = "pet")
    @Bean
    public User user(){
        return new User("张三",18,new Pet("金毛"));
    }
}
可以通过 run.containsBean(“user”); 来判断是否存在 user bean
@SpringBootApplication
public class MainApplication2 {
    public static void main(String[] args) {
        ConfigurableApplicationContext run = SpringApplication.run(MainApplication2.class);

        boolean isUser = run.containsBean("user");
        System.out.println("是否存在user:" + isUser);

        boolean isPet = run.containsBean("pet");
        System.out.println("是否存在pet:" + isPet);
    }
}
@ImportResource
@ImportResource 注解允许导入一个Spring配置文件
例如新建一个 bean.xml
<?xml version="1.0" encoding="UTF-8"?>
<beans xmlns="http://www.springframework.org/schema/beans"
       xmlns:xsi="http://www.w3.org/2001/XMLSchema-instance"
       xsi:schemaLocation="http://www.springframework.org/schema/beans http://www.springframework.org/schema/beans/spring-beans.xsd">

    <bean id="haha" class="com.szx.boot.beans.User">
        <property name="name" value="haha"></property>
        <property name="age" value="15"></property>
    </bean>

    <bean id="hehe" class="com.szx.boot.beans.Pet">
        <property name="name" value="dog"></property>
    </bean>
</beans>
然后通过 @ImportResource 注解导入这个配置类
package com.szx.boot.config;

import com.szx.boot.beans.Pet;
import com.szx.boot.beans.User;
import org.springframework.boot.autoconfigure.condition.ConditionalOnBean;
import org.springframework.boot.autoconfigure.condition.ConditionalOnMissingBean;
import org.springframework.context.annotation.Bean;
import org.springframework.context.annotation.Configuration;
import org.springframework.context.annotation.Import;
import org.springframework.context.annotation.ImportResource;

/**
 * @author songzx
 * @create 2022-07-16 12:05
 */
@ImportResource("classpath:beans.xml")
@Import({User.class,Pet.class})
@Configuration
public class MyConfig {

    @Bean
    public Pet pet(){
        return new Pet("猫");
    }

    // 当容器中有pet时,才会注册 user,注意这里有先后循序问题
    @ConditionalOnBean(name = "pet")

    @Bean
    public User user(){
        return new User("张三",18,new Pet("金毛"));
    }
}
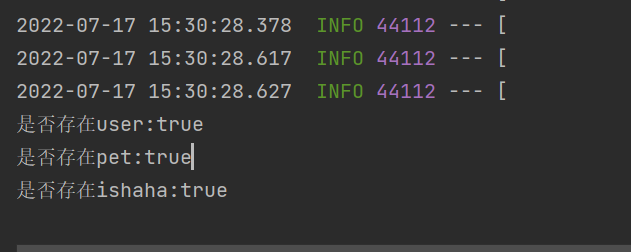
然后判断容易中是否存在 haha
package com.szx.boot;

import com.szx.boot.beans.User;
import org.springframework.boot.SpringApplication;
import org.springframework.boot.autoconfigure.SpringBootApplication;
import org.springframework.context.ConfigurableApplicationContext;

/**
 * @author songzx
 * @create 2022-07-17 15:10
 */
@SpringBootApplication
public class MainApplication2 {
    public static void main(String[] args) {
        ConfigurableApplicationContext run = SpringApplication.run(MainApplication2.class);

        boolean isUser = run.containsBean("user");
        System.out.println("是否存在user:" + isUser);

        boolean isPet = run.containsBean("pet");
        System.out.println("是否存在pet:" + isPet);

        boolean ishaha = run.containsBean("haha");
        System.out.println("是否存在ishaha:" + ishaha);
    }
}
结果显示为 true
@ConfigurationProperties 配置绑定
在配置文件中配置一个类中属性默认值,可以通过 @ConfigurationProperties 注解绑定这个值
添加 Car 类
package com.szx.boot.beans;

import org.springframework.boot.context.properties.ConfigurationProperties;
import org.springframework.stereotype.Component;

/**
 * @author songzx
 * @create 2022-07-17 15:42
 */

@Component
@ConfigurationProperties(prefix = "car")
public class Car {
    String name;
    Integer price;

    public Car() {
    }

    public Car(String name, Integer price) {
        this.name = name;
        this.price = price;
    }

    public String getName() {
        return name;
    }

    public void setName(String name) {
        this.name = name;
    }

    public Integer getPrice() {
        return price;
    }

    public void setPrice(Integer price) {
        this.price = price;
    }

    @Override
    public String toString() {
        return "Car{" +
                "name='" + name + '\'' +
                ", price=" + price +
                '}';
    }
}
-
必须是在容器中的类,才能使用 ConfigurationProperties 注解
-
prefix 表示使用配置类中的那个前缀
在 application.properties 配置文件中添加 car 类属性的默认值
car.name=yd
car.price=100000
package com.szx.boot.controller;
import com.szx.boot.beans.Car;
import org.springframework.beans.factory.annotation.Autowired;
import org.springframework.web.bind.annotation.*;


/**
 * @author songzhengxiang
 * @create 2022-07-14 22:32
 */
@RestController
public class HelloController {

    @Autowired
    Car car;

    @GetMapping("/car")
    public Car getCar(){
        return car;
    }
}
启动程序,访问 car
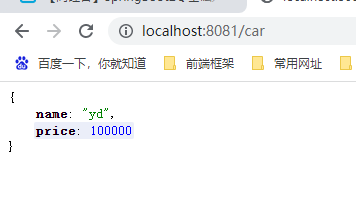
第二种方法:
不在类上添加 @Component 注解,在配置类中添加 @EnableConfigurationProperties(Car.class) 注解。表示在容器中注册 Car 类,并开启从配置文件中读取属性值
修改 Car 类
@ConfigurationProperties(prefix = "car")
public class Car {
配置类中添加 @EnableConfigurationProperties 注解
@EnableConfigurationProperties(Car.class)
@ImportResource("classpath:beans.xml")
@Import({User.class,Pet.class})
@Configuration
public class MyConfig {
开发小技巧
LomBok 简化bean开发
第一步导入依赖
<dependency>
    <groupId>org.projectlombok</groupId>
    <artifactId>lombok</artifactId>
</dependency>
第二步:安装idea插件
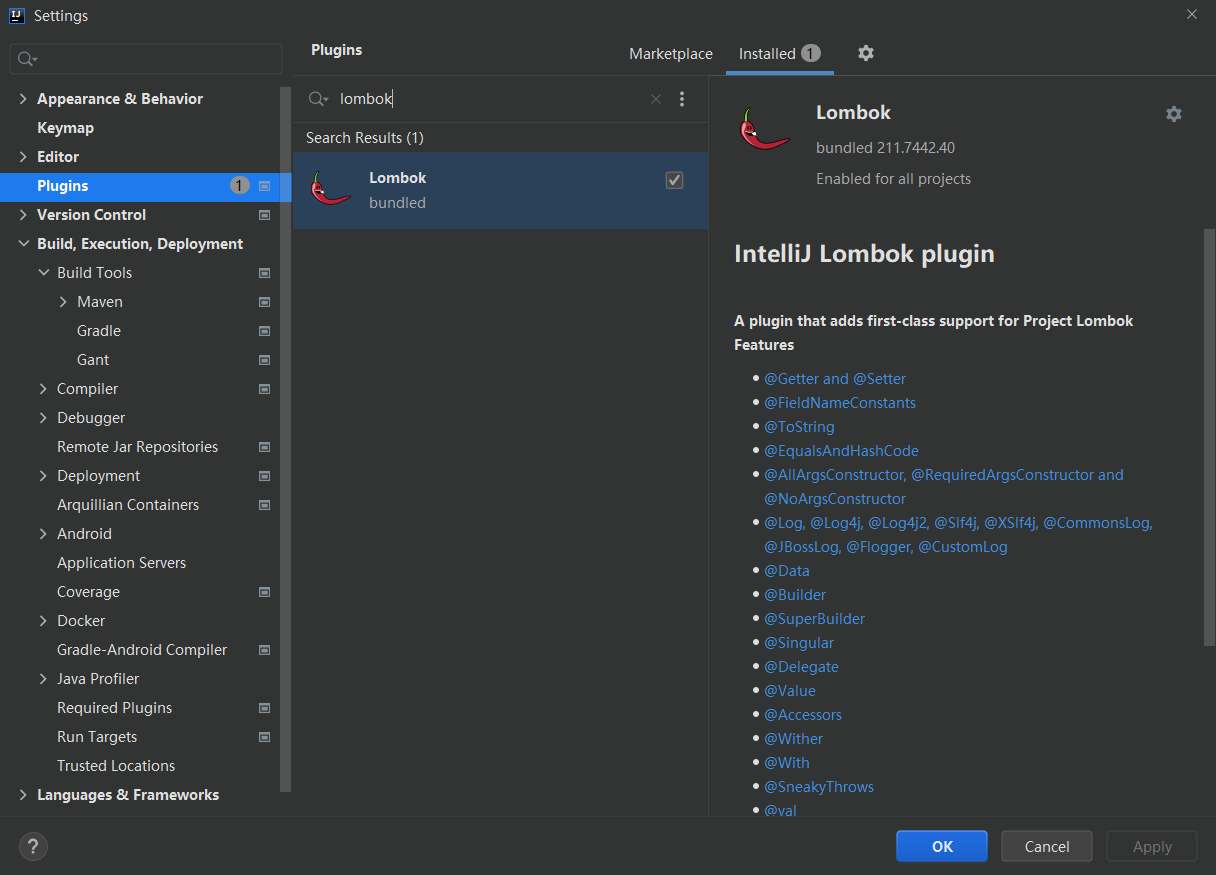
第三步,使用相关注解
@Data // getter 和 setter 方法
@ToString // toString 方法
@NoArgsConstructor // 无参构造器
@AllArgsConstructor // 全参构造器
public class Car {

    String name;
    Integer price;
}
额外的还有 @Slf4j 注解,可以将信息直接输出在控制台中
在 Controller 类上添加 @Slf4j
package com.szx.boot.controller;
import com.szx.boot.beans.Car;
import lombok.extern.slf4j.Slf4j;
import org.springframework.beans.factory.annotation.Autowired;
import org.springframework.web.bind.annotation.*;


/**
 * @author songzhengxiang
 * @create 2022-07-14 22:32
 */
@Slf4j
@RestController
public class HelloController {

    @Autowired
    Car car;


    @GetMapping("/car")
    public Car getCar(){
        log.info("请求进来");
        return car;
    }
}
然后浏览器访问 /car ,查看控制台打印

devtools 热部署
引入依赖
<dependency>
    <groupId>org.springframework.boot</groupId>
    <artifactId>spring-boot-devtools</artifactId>
    <optional>true</optional>
</dependency>
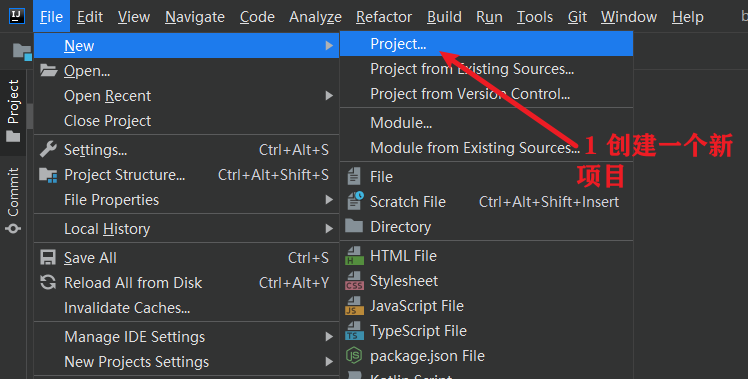
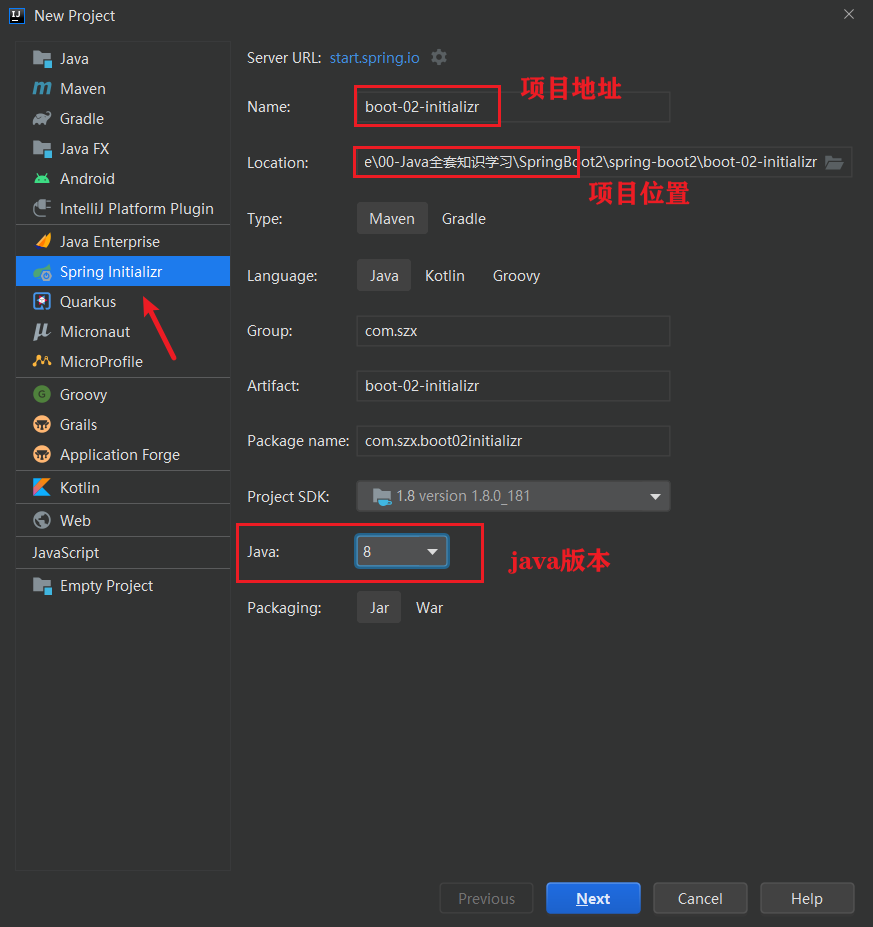
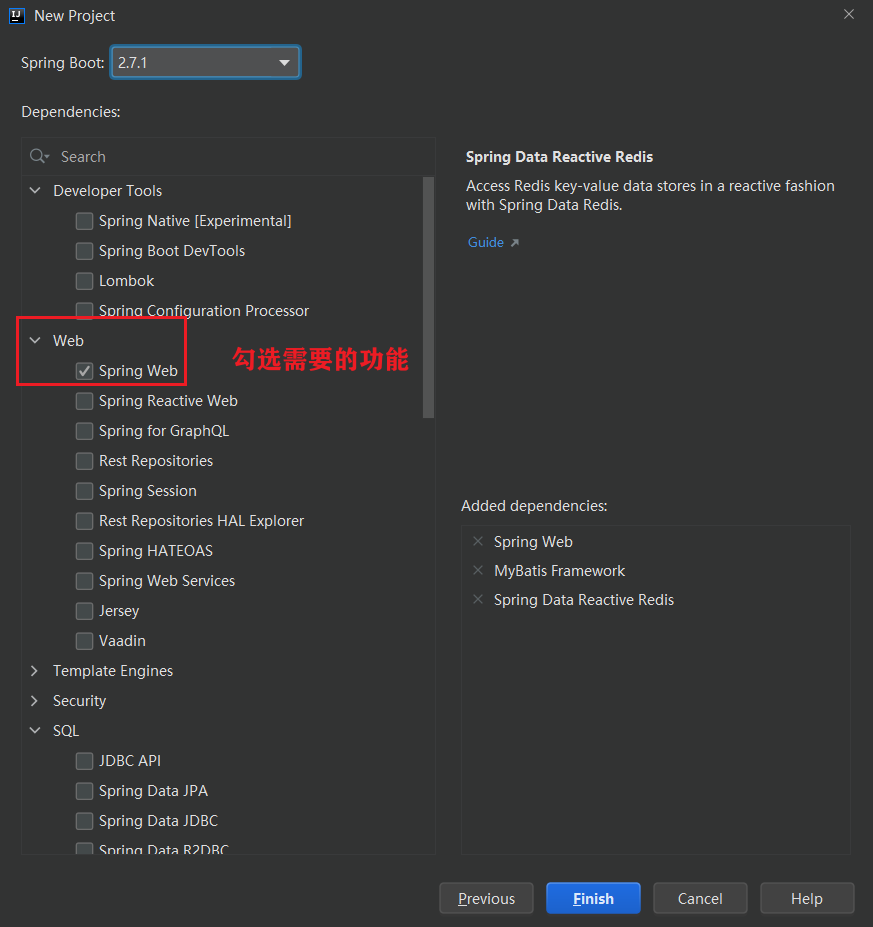
Spring Iintializr 初始化向导
通过 Spring Iintializr 创建项目,我们只需要通过选择的方式,就可以快速的生成一个工程
配置文件
yaml
YAML 是 “YAML Ain’t MarkuP Language”(YAML 不是一种标记语言)的递归缩写。在开发的这种语言时,YAML 的意思其实是:“Yet Another MarkuP Language”(仍是一种标记语言)。
非常适合用来做以数据为中心的配置文件
基本语法
- key: value;kv之间有空格
- 大小写敏感
- 使用缩进表示层级关系
- 缩进不允许使用tab,只允许空格
- 缩进的空格数不重要,只要相同层级的元素左对齐即可
- '#'表示注释
- 字符串无需加引号,如果要加,''与""表示字符串内容 会被 转义/不转义
数据类型
字面量:单个的、不可再分的值。date、boolean、string、number、null
k: v
对象:键值对的集合。map、hash、set、object
行内写法:  k: {k1:v1,k2:v2,k3:v3}
#或
k:
  k1: v1
  k2: v2
  k3: v3
数组:一组按次序排列的值。array、list、queue
行内写法:  k: [v1,v2,v3]
#或者
k:
 - v1
 - v2
 - v3
示例
新建一个 User 类和 Pet 类
import java.util.Date;
import java.util.List;
import java.util.Map;
import java.util.Set;

/**
 * @author songzx
 * @create 2022-07-17 23:10
 */
@AllArgsConstructor
@NoArgsConstructor
@ToString
@Data
@Component
@ConfigurationProperties(prefix = "user")
public class User {
    String userName;
    boolean boss;
    Date birth;
    Integer age;
    String[] interests;
    List<String> animal;
    Map<String,Object> score;
    Set<Double> salarys;
    Pet pet;
    Map<String,List<Pet>> allPets;
}
/**
 * @author songzx
 * @create 2022-07-18 18:17
 */
@AllArgsConstructor
@NoArgsConstructor
@ToString
@Data
@ConfigurationProperties(prefix = "pet")
@Component
public class Pet {
    String petName;
    Double price;
}
新建 application.yml 文件
server:
  port: 8081

user:
  userName: 张三
  boss: false
  birth: 2020/07/18
  age: 15
#  interests: ["a","b","c"]
#  或者
  interests:
    - a
    - b
    - c
  animal:
    - 羽毛球
    - 乒乓球
    - 篮球
#  score: {weight:60,height:186}
#  或者
  score:
    weight: 60
    height: 186
  salarys:
    - 99.99
    - 88.88
  pet:
    petName: BYD
    price: 100000
  allPets:
    sike:
      - {petName: bwm,price: 99999}
    healh: [{petName: wuling,price: 6666}]
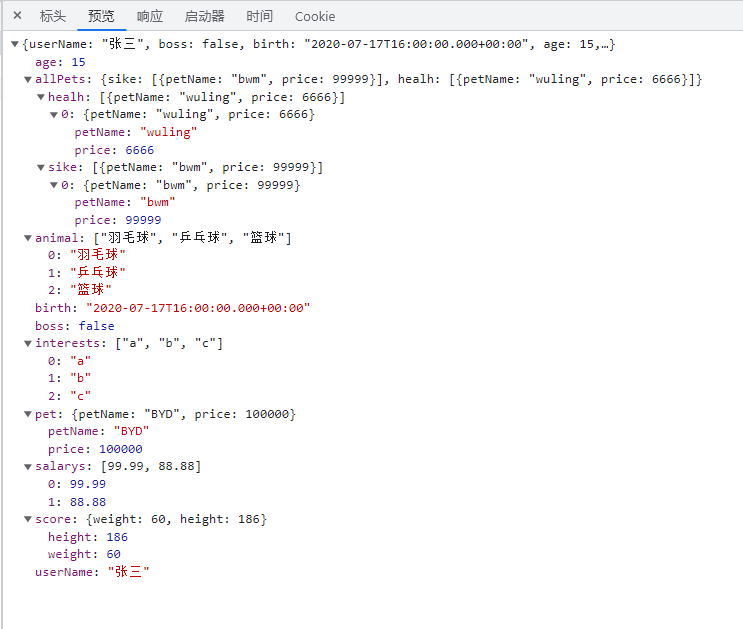
新建 UserController 控制器,返回 user 类
@RestController
public class UserController {
    @Autowired
    User user;
    @GetMapping("/getuser")
    public User user(){
        return user;
    }
}
浏览器访问 /getuser 查看效果
配置提示
添加依赖
<!--开启配置提示功能-->
<dependency>
    <groupId>org.springframework.boot</groupId>
    <artifactId>spring-boot-configuration-processor</artifactId>
    <optional>true</optional>
</dependency>
设置在打包时去掉提示的依赖
<!--设置打包时去掉配置提示的依赖包-->
<build>
    <plugins>
        <plugin>
            <groupId>org.springframework.boot</groupId>
            <artifactId>spring-boot-maven-plugin</artifactId>
            <configuration>
                <excludes>
                    <exclude>
                        <groupId>org.springframework.boot</groupId>
                        <artifactId>spring-boot-configuration-processor</artifactId>
                    </exclude>
                </excludes>
            </configuration>
        </plugin>
    </plugins>
</build>
web场景
静态资源访问
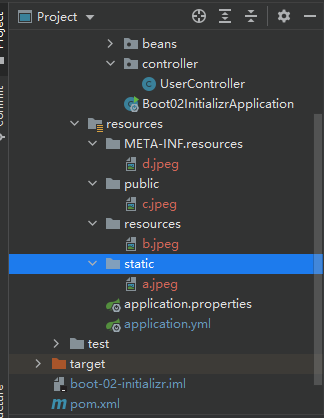
默认情况下,Spring Boot 将类路径中名为/static(或/public或/resources或/meta-inf/resources)的目录作为静态资源目录,我们只需要将文件放在这些文件夹中就可以访问到这些静态资源
启动服务,直接输入静态资源名称即可访问到
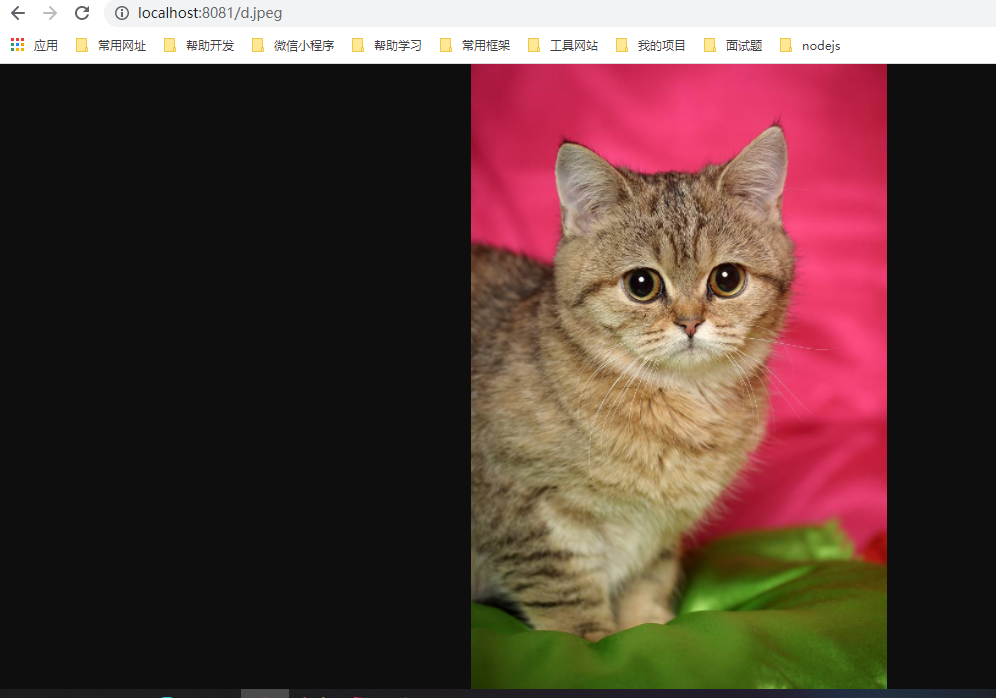
默认情况下,资源映射在 上/**,但您可以使用该spring.mvc.static-path-pattern属性对其进行调整。例如,将所有资源重新定位到/res/**可以实现如下:
在 application.yml 中添加如下配置
spring:
  # 自定义静态资源访问前缀
  mvc:
    static-path-pattern: /res/**
这时访问静态资源应该以 res 开头

您还可以使用该spring.web.resources.static-locations属性自定义静态资源位置(将默认值替换为目录位置列表),示例如下
spring:
  # 自定义静态资源访问前缀
  mvc:
    static-path-pattern: /res/**
  # 自定义静态资源目录
  web:
    resources:
      static-locations: [classpath:/haha/]
设置完之后,其他的静态资源位置将会失效,只有 haha 文件夹会作为静态资源文件夹
欢迎页和favicon.ico图标
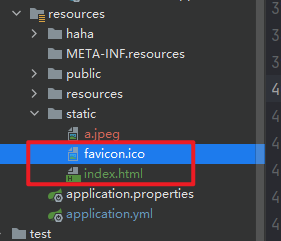
只要在静态资源文件夹放一个 index.html 和 favicon.ico图标,然后访问首页时就可以访问页面和显示网站小图标
但是在设置了静态资源访问前缀后这个功能不会生效

Rest映射
通过请求方式的不同,来实现不同业务的接口请求
| 请求方式 | 接口 | 说明 |
|---|---|---|
| GET | /user | 获取user信息 |
| POST | /user | 添加user信息 |
| DELETE | /user | 删除user信息 |
| PUT | /user | 修改user信息 |
添加实现类
@RestController
public class UserRestController {

    @GetMapping("/user")
    public String getUser(){
        return "get user";
    }

    @PostMapping("/user")
    public String postUser(){
        return "post user";
    }

    @PutMapping("/user")
    public String putUser(){
        return "put user";
    }

    @DeleteMapping("/user")
    public String deleteUser(){
        return "delete user";
    }
}
通过页面表单访问时,需要开启以下配置
spring:
  mvc:
    # 自定义静态资源访问前缀
    static-path-pattern: /**
    # 开启rest映射表单格式请求转换
    hiddenmethod:
      filter:
        enabled: true
然后通过表单发送 delet 或者 put 请求时需要携带 _method 参数
<form action="/user" method="post">
    <input type="hidden" name="_method" value="delete">
    <input type="submit">
</form>
改变默认的_method参数
添加配置类,调用setMethodParam方法设置属性名为 _m
@Configuration
public class WebConfig {
    @Bean
    public HiddenHttpMethodFilter hiddenHttpMethodFilter(){
        HiddenHttpMethodFilter hhmf = new HiddenHttpMethodFilter();
        hhmf.setMethodParam("_m");
        return hhmf;
    }
}
然后修改表单中发送的参数即可
<form action="/user" method="post">
    <input type="hidden" name="_m" value="delete">
    <input type="submit">
</form>
请求参数
常用参数注解
接口定义:@GetMapping("/getCar/{id}/{name}")
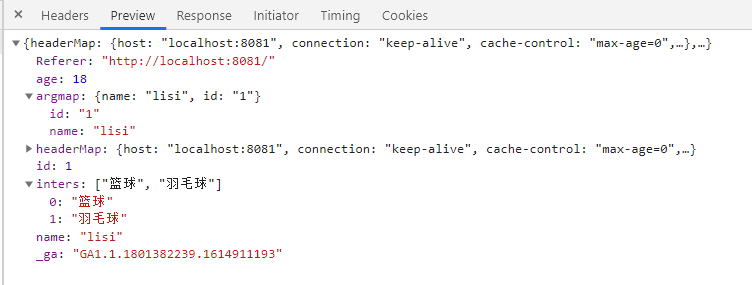
请求地址:/getCar/1/lisi?age=18&inters=篮球&inters=羽毛球
| 注解 | 含义 |
|---|---|
| @PathVariable(“id”) Integer id | 获取路径上的id |
| @PathVariable Map<String,String> argmap | 以map的形式将路径上所有的参数放在argmap中 键值必须都是String类型 |
| @RequestHeader(“Referer”) String Referer | 获取请求头信息中的Referer值 |
| @RequestHeader Map<String,String> headerMap | 获取所有的请求头信息,并放在map集合中 |
| @RequestParam(“age”) Integer age | 获取请求参数 age |
| @RequestParam(“inters”) List inters | 以List集合的方式获取请求参数inters |
| @CookieValue(“_ga”) String _ga | 获取Cookie中的_ga值 |
| @CookieValue(“_ga”) Cookie cookie | 获取Cookie中的_ga值,以Cookie的形式接收 |
| @RequestAttribute(“msg”) String msg | 获取在请求域中保存的msg属性 |
定义一个CarController
package com.szx.boot02initializr.controller;
import org.springframework.web.bind.annotation.*;
import javax.servlet.http.Cookie;
import java.util.HashMap;
import java.util.List;
import java.util.Map;

/**
 * @author songzhengxiang
 * @create 2022-07-20 21:41
 */
@RestController
public class CarController {

    @GetMapping("/getCar/{id}/{name}")
    public Map<String,Object> getCar(@PathVariable("id") Integer id,
                                     @PathVariable("name") String name,
                                     @PathVariable Map<String,String> argmap,
                                     @RequestHeader("Referer") String Referer,
                                     @RequestHeader Map<String,String> headerMap,
                                     @RequestParam("age") Integer age,
                                     @RequestParam("inters") List<String> inters,
                                     @CookieValue("_ga") String _ga,
                                     @CookieValue("_ga") Cookie cookie){
        Map<String, Object> map = new HashMap<>();
        map.put("id",id);
        map.put("name",name);
        map.put("argmap",argmap);
        map.put("Referer",Referer);
        map.put("headerMap",headerMap);
        map.put("age",age);
        map.put("inters",inters);
        map.put("_ga",_ga);
        System.out.println(cookie.getName());
        System.out.println(cookie.getValue());
        return map;
    }
}
前端发送请求
<a href="/getCar/1/lisi?age=18&inters=篮球&inters=羽毛球">getCar/1/lisi</a>
浏览器响应返回的数据
接收form表单参数
发送form表单请求
<form action="/getFormArgs" method="get">
    <input type="text" name="age">
    <input type="email" name="email">
    <input type="submit">
</form>
方式一:以map形式接收
/**
 * 接收form表单参数
 */
@GetMapping("/getFormArgs")
public Map getFormArgs(@RequestParam Map<String,Object> formarg){
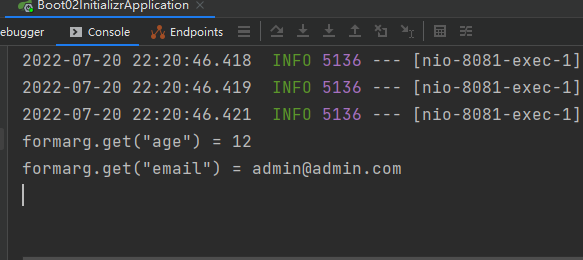
    System.out.println("formarg.get(\"age\") = " + formarg.get("age"));
    System.out.println("formarg.get(\"email\") = " + formarg.get("email"));
    return formarg;
}
接收的数据
方式二:获取单个数据
/**
 * 接收form表单参数
 * 方式二
 */
@GetMapping("/getFormArgs")
public Map getFormArgs(@RequestParam("age") String age,
                       @RequestParam("email") String email){
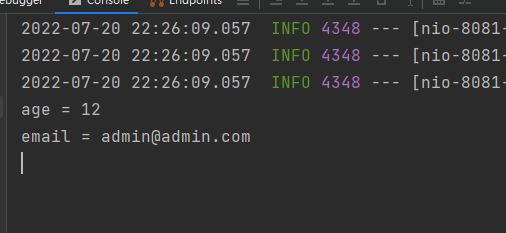
    System.out.println("age = " + age);
    System.out.println("email = " + email);
    HashMap<String, Object> argMap = new HashMap<>();
    argMap.put("age",age);
    argMap.put("email",email);
    return argMap;
}
接收到的数据
方式三:以对象形式接收
首先简单封装一个对象
@Data
@ToString
@AllArgsConstructor
@NoArgsConstructor
public class FormBean {
    Integer age;
    String email;
}
以FormBean的形式接收到传递过来的值
/**
 * 接收form表单参数
 * 方式三
 */
@GetMapping("/getFormArgs")
public FormBean getFormArgs(FormBean formBean){
    System.out.println("formBean.getAge() = " + formBean.getAge());
    System.out.println("formBean.getEmail() = " + formBean.getEmail());
    return formBean;
}
接收到的参数

接收json数据
首先通过apiPost模拟发送post请求

方式一:以Map形式接收
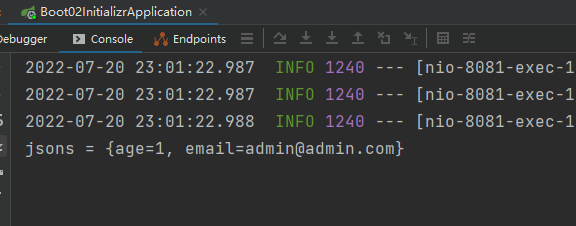
@PostMapping("/getJsonArgs")
public Map getPostArgs(@RequestBody Map<String,Object> jsons){
    System.out.println("jsons = " + jsons);
    return jsons;
}
接收到的数据
方式二:以对象形式接收
@PostMapping("/getJsonArgs")
public FormBean getPostArgs(@RequestBody FormBean formBean){
    System.out.println("formBean = " + formBean);
    return formBean;
}
接收到的数据

获取请求域中的参数
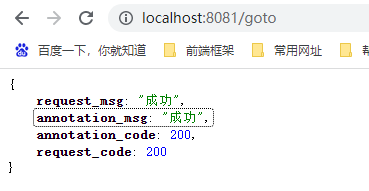
新建 RequestController,访问 goto 然后内部转发请求 success,在转发前往 httpServletRequest 中保存 msg 和 code 两个属性
@Controller
public class RequestController {

    @GetMapping("/goto")
    public String goToSuc(HttpServletRequest httpServletRequest){
        httpServletRequest.setAttribute("msg","成功");
        httpServletRequest.setAttribute("code",200);
        return "forward:/success";
    }

    @ResponseBody
    @GetMapping("/success")
    public Map success(@RequestAttribute("msg") String msg,
                       @RequestAttribute("code") Integer code,
                       HttpServletRequest request){
        Object request_code = request.getAttribute("code");
        Object request_msg = request.getAttribute("msg");
        HashMap<String, Object> map = new HashMap<>();
        map.put("annotation_msg",msg);
        map.put("annotation_code",code);
        map.put("request_msg",request_msg);
        map.put("request_code",request_code);
        return map;
    }
}
在success方法中 @RequestAttribute("msg") 注解获取在请求与中保存的msg属性
浏览器发送请求查看返回值
获取矩阵变量参数
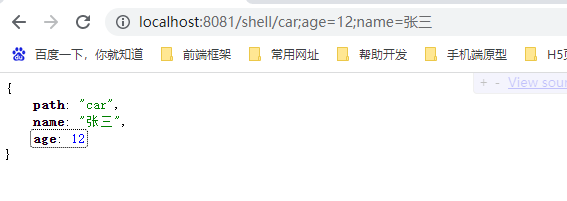
例如当浏览器发送如下格式的地址:/shell/car;age=12;name=张三,后端可以通过 @MatrixVariable 注解来获取第一个分号后面的参数。我们称这种参数为矩阵变量。
注意:获取矩阵变量的数据必须前提是Rest风格的地址
/**
     * 获取矩阵变量的参数
     * @author Songzx
     * @date 2022/7/21
     * 请求地址:/shell/car;age=12;name=张三
     */
@GetMapping("/shell/{path}")
public Map getMatrix(@MatrixVariable("age") Integer age,
                     @MatrixVariable("name") String name,
                     @PathVariable("path") String path){
    HashMap<String, Object> map = new HashMap<>();
    map.put("age",age);
    map.put("name",name);
    map.put("path",path);
    return map;
}
查看接口返回
/boos/zhang;age=20/wang;age=32
/**
     * 获取矩阵变量的参数
     * @author Songzx
     * @date 2022/7/21
     * 请求地址:/boos/zhang;age=20/wang;age=32
     */
@GetMapping("/boos/{boos1}/{boos2}")
public Map getMatrix2(@MatrixVariable(value = "age",pathVar = "boos1") Integer zhangAge,
                      @MatrixVariable(value = "age",pathVar = "boos2") Integer wangAge){
    HashMap<String, Object> map = new HashMap<>();
    map.put("zhangAge",zhangAge);
    map.put("wangAge",wangAge);
    return map;
}
接口返回

请求拦截和静态资源放行
操作步骤:
- 添加interceptor拦截器,实现handlerinterceptor接口
- 重写preHandle方法,从当前请求中获取session,从session中判断是否有用户信息
- 添加配置类,将拦截器添加到容器中
- 配置类实现WebMvcConfigurer接口,并重写addInterceptors方法,添加要拦截和放行的地址
代码示例
1.添加interceptor拦截器,实现handlerinterceptor接口
2.重写preHandle方法,从当前请求中获取session,从session中判断是否有用户信息
/**
 * @author songzx
 * @create 2022-07-22
 * 使用拦截器做登录检查
 */
public class LoginInterceptor implements handlerinterceptor {
    @Override
    public boolean preHandle(HttpServletRequest request, HttpServletResponse response, Object handler) throws Exception {
        HttpSession session = request.getSession();
        // 从session中获取是否有userBean
        Object userBean = session.getAttribute("userBean");
        // 如果有表示已经登录,拦截器放行
        if(userBean != null){
            return true;
        }
        // 拿到转发器,重新转发到登录页面
        request.getRequestdispatcher("/login").forward(request,response);
        // 否则返回false
        return false;
    }

    @Override
    public void postHandle(HttpServletRequest request, HttpServletResponse response, Object handler, ModelAndView modelAndView) throws Exception {
        handlerinterceptor.super.postHandle(request, response, handler, modelAndView);
    }

    @Override
    public void afterCompletion(HttpServletRequest request, HttpServletResponse response, Object handler, Exception ex) throws Exception {
        handlerinterceptor.super.afterCompletion(request, response, handler, ex);
    }
}
4.配置类实现WebMvcConfigurer接口,并重写addInterceptors方法,添加要拦截和放行的地址
- addInterceptor 表示添加拦截器,传入我们上面定义的拦截器实例
- addpathPatterns 表示添加要拦截的路径,/** 表示拦截所有请求
- excludePathPatterns 表示设置不拦截那些路径,/css/** 表示不拦截以css开头的所有请求
/**
 * 拦截器,实现 WebMvcConfigurer 接口
 * @author songzx
 * @create 2022-07-22
 */
@Configuration
public class WebConfig implements WebMvcConfigurer {

    @Override
    public void addInterceptors(InterceptorRegistry registry) {
        registry.addInterceptor(new LoginInterceptor())
                .addpathPatterns("/**")
                .excludePathPatterns("/","/login","/css/**","/js/**","/fonts/**","/images/**");
    }
}
添加完成后,在访问了除了 / 和 /login 页面外,其他页面都会被拦截器拦截,判断是否登录,如果未登录则强制跳转到登录页面
单文件上传和多文件上传
前端页面请求
<form th:action="@{/saveForm}" enctype="multipart/form-data" method="post">
    <label>邮箱</label>
    <input type="email" name="email">
    <label>姓名</label>
    <input type="text" name="name">
    <label>头像</label>
    <input type="file" name="photo">
    <label>生活照</label>
    <input type="file" multiple name="photos">
    <input type="submit">
</form>
添加saveForm接口
package com.szx.boot04webadmin.controller;

import lombok.extern.slf4j.Slf4j;
import org.springframework.stereotype.Controller;
import org.springframework.web.bind.annotation.GetMapping;
import org.springframework.web.bind.annotation.PostMapping;
import org.springframework.web.bind.annotation.RequestParam;
import org.springframework.web.bind.annotation.RequestPart;
import org.springframework.web.multipart.multipartfile;

import java.io.File;
import java.io.IOException;

/**
 * @author songzx
 * @create 2022-07-24 16:32
 */
@Slf4j
@Controller
public class SaveFormController {
    @PostMapping("/saveForm")
    public String saveForm(@RequestParam("email") String email,
                           @RequestParam("name") String name,
                           @RequestPart("photo") multipartfile photo,
                           @RequestPart("photos") multipartfile[] photos) throws IOException {

        log.info("邮箱=>{},姓名=>{},头像大小=>{},生活照个数=>{}",email,name,photo.getSize(),photos.length);

        // 判断头像是否为空
        if(!photo.isEmpty()){
            // 获取文件名称
            String filename = photo.getoriginalFilename();
            // 使用transferTo方法将文件转存到 D/images 文件夹下
            photo.transferTo(new File("D:\\images\\"+filename));
        }

        if(photos.length > 0){
            for (multipartfile file : photos) {
                if(!file.isEmpty()){
                    // 获取文件名称
                    String filename = file.getoriginalFilename();
                    // 使用transferTo方法将文件转存到 D/images 文件夹下
                    file.transferTo(new File("D:\\images\\"+filename));
                }
            }
        }

        return "main";
    }
}
查看打印

打开 D/images 文件夹,我们上传的文件都会保存在这个文件夹内

spring:
  servlet:
    multipart:
      max-file-size: 10MB # 单个文件的最大大小
      max-request-size: 100MB # 多个文件上传时一共限制的最大文件大小
默认错误处理机制
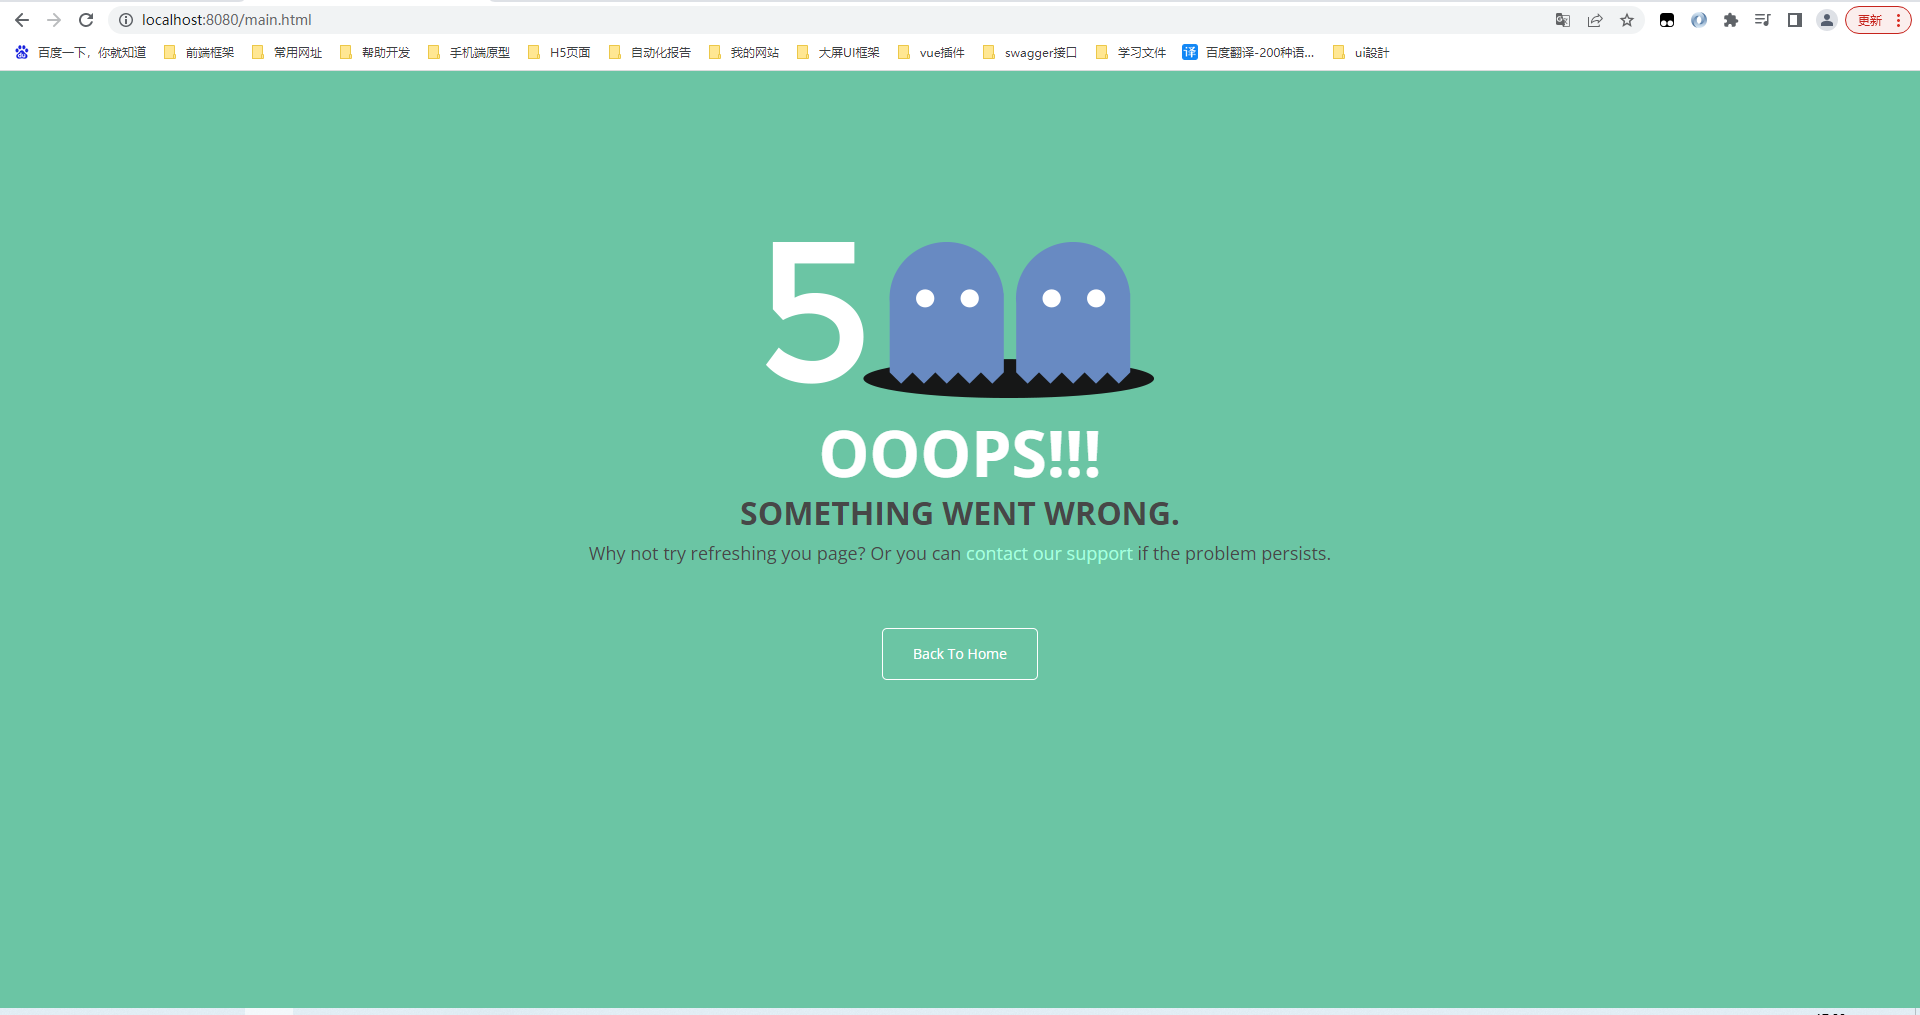
默认情况下,SpringBoot提供 /error 处理所有错误的映射。对于机器客户端,它将生成一个 JSON 响应,其中包含错误信息,Http状态和异常消息的详细信息。对于浏览器,则响应一个错误页面

还有500页面如下

在 templates 文件夹下添加 error 文件夹,里面放上两个页面


定制化的常见方式
- 修改配置文件
- xxxxCustimuzer
- 编写自定义的配置类,xxxConfiguration; + @Bean 替换、增加容器中默认组件,视图解析器
- Web应用,编写一个配置类实现,WebMvcConfigurer 即可定制化web功能。 + @Bean 给容器中扩展一些组件
数据访问
基本数据访问操作
导入jdbc依赖,导入之后会自动帮我们引入数据源,jdbc,事务
<dependency>
    <groupId>org.springframework.boot</groupId>
    <artifactId>spring-boot-starter-data-jdbc</artifactId>
</dependency>
这里没有自动帮我们导入数据库驱动,这是因为SpringBoot并不知道我们用的是什么数据库,这里我们用MysqL来作为我们的数据库
打开 spring-boot-dependencies 搜索 MysqL.version,发现SpringBoot有帮我们维护了MysqL驱动的版本,我们只需引入MysqL驱动即可

<dependency>
    <groupId>MysqL</groupId>
    <artifactId>mysql-connector-java</artifactId>
</dependency>
添加配置项,yml中密码要使用双引号括起来
spring:
  datasource:
    driver-class-name: com.MysqL.cj.jdbc.Driver
    username: root
    password: "abc123"
    url: jdbc:MysqL://localhost:3306/spring_boot_test
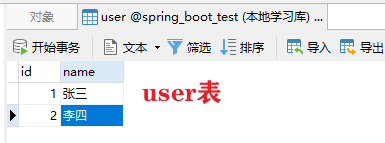
然后再 spring_boot_test 库中新建一个 user 表,增加如下数据
编写测试方法
@Slf4j
@SpringBoottest
class Boot04WebadminApplicationTests {
    @Autowired
    JdbcTemplate jdbcTemplate;
    @Test
    void contextLoads() {
        Integer total = jdbcTemplate.queryForObject("select count(*) from user", Integer.class);
        log.info("数据总数->{}", total);
    }
}
运行效果

使用Druid数据源
自定义的方式使用Druid
Druid官方文档:https://github.com/alibaba/druid
中文地址:https://github.com/alibaba/druid/wiki/%E5%B8%B8%E8%A7%81%E9%97%AE%E9%A2%98
导入依赖
<dependency>
    <groupId>com.alibaba</groupId>
    <artifactId>druid</artifactId>
    <version>1.1.6</version>
</dependency>
自定义我们自己的DataSource,新建一个MyDruidDataSourceController,当我们在容器中定义了一个DataSource类型的bean,则SpringBoot中默认的数据源就不会再生效了
@Configuration
public class MyDruidDataSourceController {
    // 当我们在容器中定义了一个DataSource类型的bean,则SpringBoot中默认的数据源就不会再生效了
    @Bean
    @ConfigurationProperties("spring.datasource")
    public DataSource driudDataSource(){
        DruidDataSource druidDataSource = new DruidDataSource();
        return druidDataSource;
    }
}
然后来测试当前容器中的DataSource类型
@Slf4j
@SpringBoottest
class Boot04WebadminApplicationTests {
    @Autowired
    JdbcTemplate jdbcTemplate;
    @Autowired
    DataSource dataSource;
    @Test
    void contextLoads() {
        Integer total = jdbcTemplate.queryForObject("select count(*) from user", Integer.class);
        //=> 2
        log.info("数据总数->{}", total);
        //=> class com.alibaba.druid.pool.DruidDataSource
        log.info("dataSource类型->{}",dataSource.getClass());
    }
}

通过测试结果可以看到当前的数据源已经是我们自己定义的Druid数据源
使用Druid数据源的监控功能
@Bean
@ConfigurationProperties("spring.datasource")
public DataSource driudDataSource() throws sqlException {
    DruidDataSource druidDataSource = new DruidDataSource();
    // 打开Druid的监控统计功能
    druidDataSource.setFilters("stat");
    return druidDataSource;
}
2.使用Druid的内置监控页面
内置监控页面是一个Servlet,配置 StatViewServlet
在自定义DataSource的Controller中添加如下bean,/druid/* 表示我们要在那个路径下映射监控页面,固定写法,不能更改
@Bean
public ServletRegistrationBean statViewServlet(){
    StatViewServlet statViewServlet = new StatViewServlet();
    ServletRegistrationBean<StatViewServlet> registrationBean = new ServletRegistrationBean<>(statViewServlet, "/druid/*");

    return registrationBean;
}
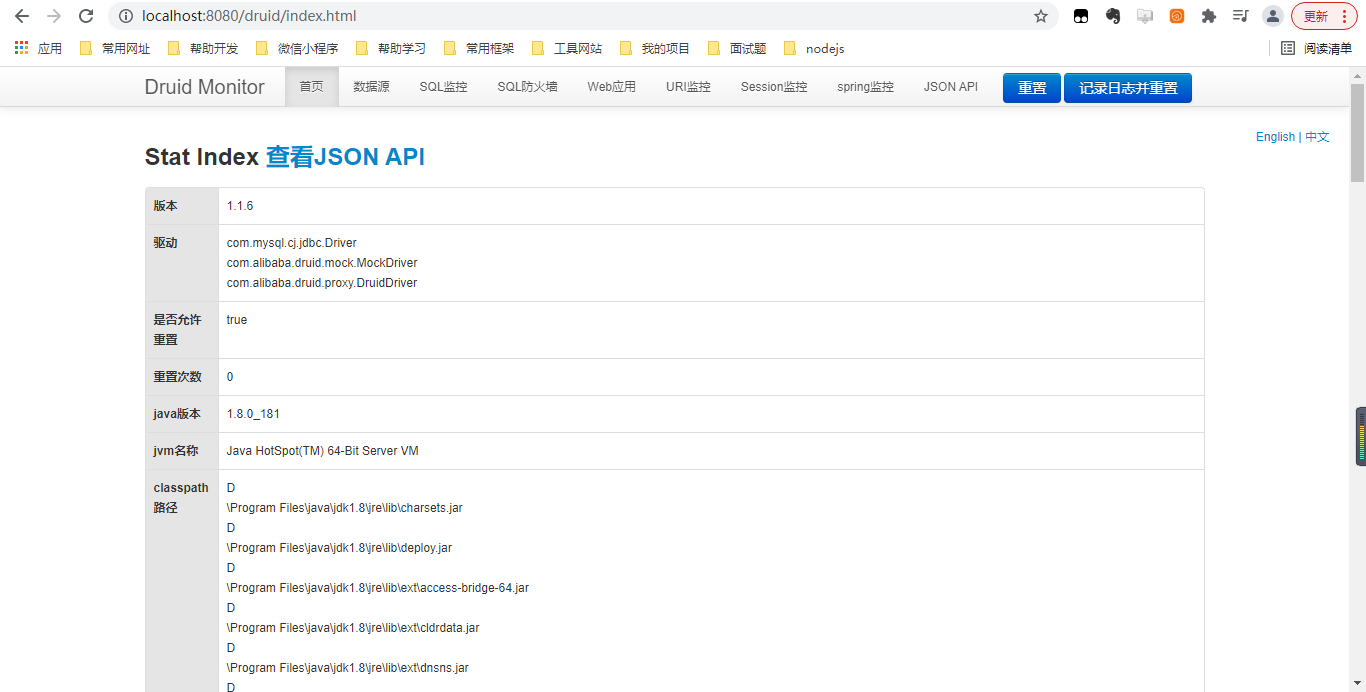
然后启动SpringBoot项目,访问 /druid,即可看到Druid监控页面
@Autowired
JdbcTemplate jdbcTemplate;

@GetMapping("/druidsql")
public String getUserTotal(){
    Integer total = jdbcTemplate.queryForObject("select count(*) from user", Integer.class);
    return total.toString();
}

开启Web应用监控功能
/**
 * 配置Web应用监控
 * @return
 */
@Bean
public FilterRegistrationBean webStatFilter(){
    WebStatFilter webStatFilter = new WebStatFilter();
    FilterRegistrationBean<WebStatFilter> registrationBean = new FilterRegistrationBean<>(webStatFilter);
    // 设置要拦截的路径
    registrationBean.setUrlPatterns(Arrays.asList("/*"));
    // 设置不拦截的路径
    registrationBean.addInitParameter("exclusions","*.js,*.gif,*.jpg,*.png,*.css,*.ico,/druid/*");
    return registrationBean;
}
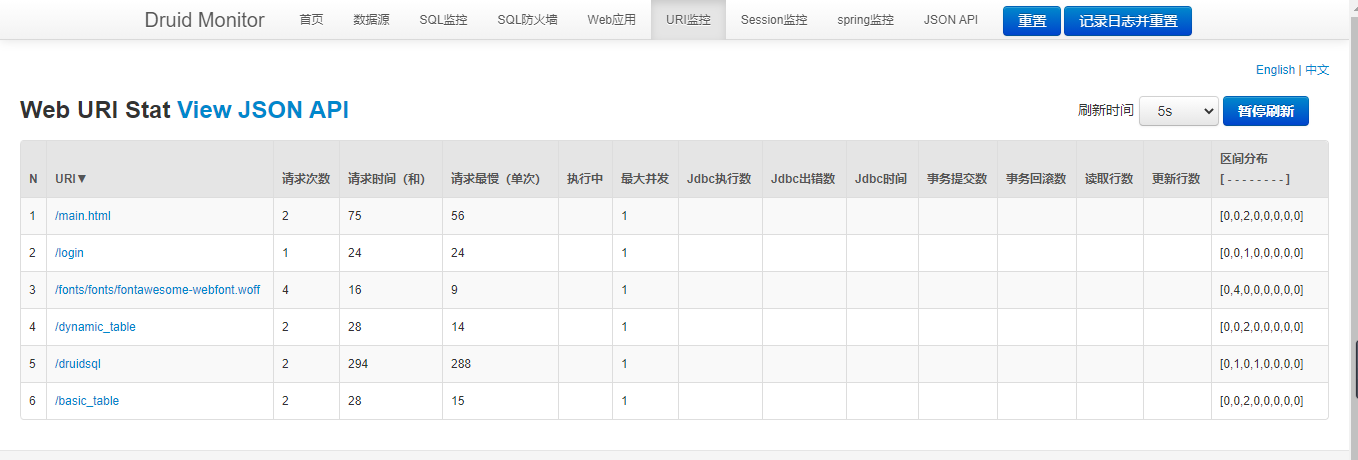
设置完成后就可以监控我们的页面跳转。启动项目,跳转页面时的状态都可以在这里看到
开启sql防火墙功能
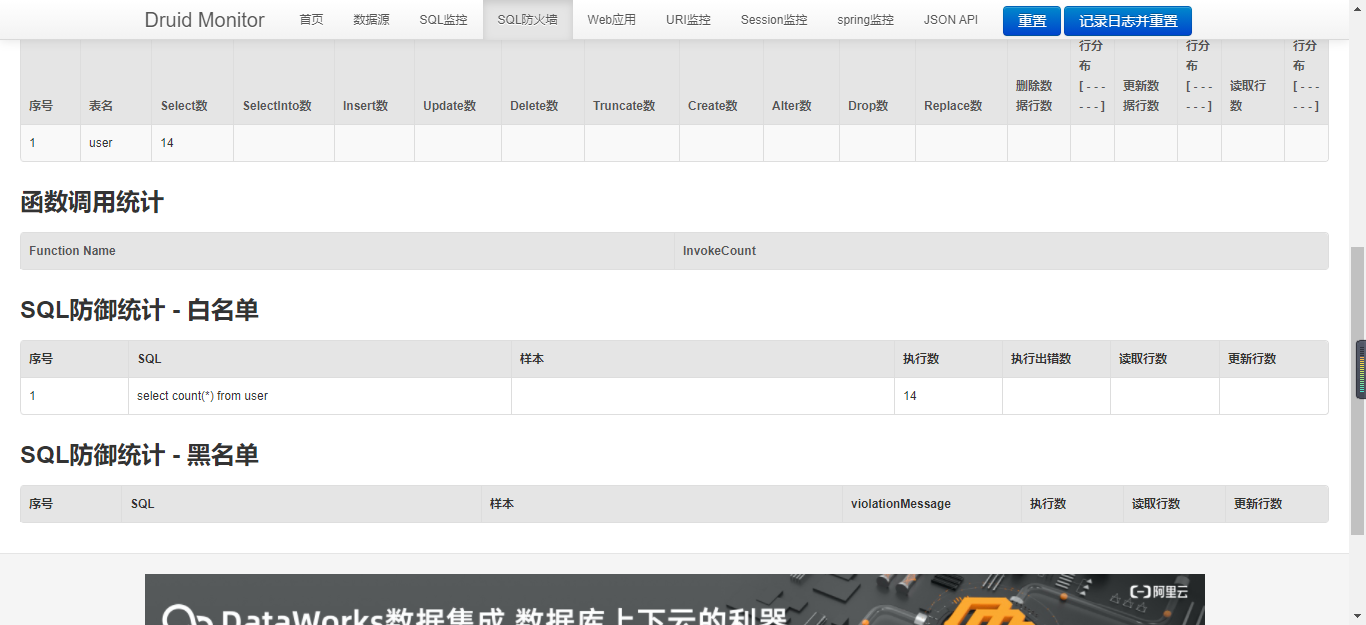
在DruidDataSource实例中往filters属性上添加一个值wall即可
@Bean
@ConfigurationProperties("spring.datasource")
public DataSource driudDataSource() throws sqlException {
    DruidDataSource druidDataSource = new DruidDataSource();
    // stat:打开Druid的监控统计功能
    // wall:打开Druid的sql防火墙功能
    druidDataSource.setFilters("stat,wall");
    return druidDataSource;
}
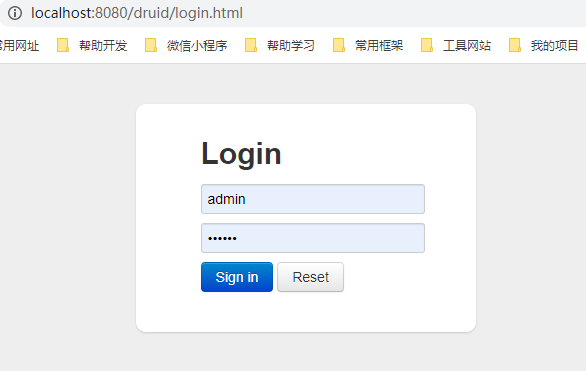
添加密码访问
我们不希望每个人都可以随意看到这个监控页面,可以设置账号密码来访问监控页面
在 ServletRegistrationBean 添加两个初始化参数即可
@Bean
public ServletRegistrationBean statViewServlet(){
    StatViewServlet statViewServlet = new StatViewServlet();
    ServletRegistrationBean<StatViewServlet> registrationBean = new ServletRegistrationBean<>(statViewServlet, "/druid/*");
    registrationBean.addInitParameter("loginUsername","admin");
    registrationBean.addInitParameter("loginPassword","admin");
    return registrationBean;
}
start方式配置druid
首先导入依赖
<dependency>
   <groupId>com.alibaba</groupId>
   <artifactId>druid-spring-boot-starter</artifactId>
   <version>1.1.17</version>
</dependency>
yml配置实例
spring:
  datasource:
    username: root
    password: "abc123"
    url: jdbc:MysqL://localhost:3306/spring_boot_test
    driver-class-name: com.MysqL.cj.jdbc.Driver
    druid:
      aop-patterns: com.szx.*  #监控SpringBean
      filters: stat,wall     # 底层开启功能,stat(sql监控),wall(防火墙)

      stat-view-servlet: # 配置监控页功能
        enabled: true
        login-username: admin
        login-password: admin
        resetEnable: false

      web-stat-filter: # 监控web
        enabled: true
        urlPattern: /*
        exclusions: '*.js,*.gif,*.jpg,*.png,*.css,*.ico,/druid/*'

      filter:
        stat: # 对上面filters里面的stat的详细配置
          slow-sql-millis: 1000
          logSlowsql: true
          enabled: true
        wall:
          enabled: true
          config:
            drop-table-allow: false # 是否拦截删库操作
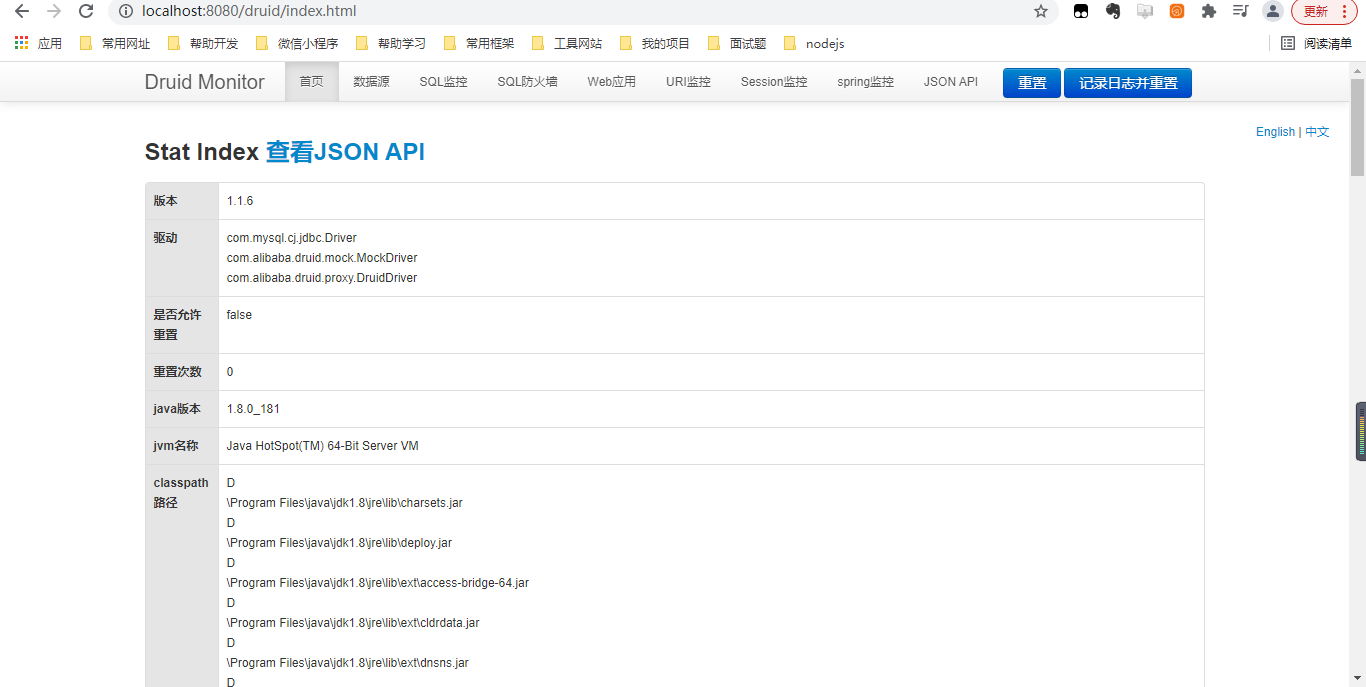
配置完成后启动应用,Druid监控功能正常使用
整合Mybatis
github文档:https://github.com/mybatis
配置版
导入mybatis官方start
<dependency>
    <groupId>org.mybatis.spring.boot</groupId>
    <artifactId>mybatis-spring-boot-starter</artifactId>
    <version>2.2.2</version>
</dependency>
新建UserBen对应数据库中的user表
@Data
public class User {
    Integer id;
    String name;
}
新建mapper.UserMapper.java接口,定义一个根据id查询user的方法
注意:mapper类必须标注@Mapper注解,才能被SpringBoot扫描并识别
@Mapper
public interface UserMapper {

    User getUser(Integer id);
}
新建UserService,自动注入UserMapper接口
@Service
public class UserServer {
    @Autowired
    UserMapper userMapper;

    public User getUser(Integer id){
        return userMapper.getUser(id);
    }
}
然后在配置文件中新建 mapper.UserMapper.xml,映射UserMapper接口
<?xml version="1.0" encoding="UTF-8" ?>
<!DOCTYPE mapper
        PUBLIC "-//mybatis.org//DTD Mapper 3.0//EN"
        "http://mybatis.org/dtd/mybatis-3-mapper.dtd">
<mapper namespace="com.szx.boot04webadmin.mapper.UserMapper">

    <!--User getUser(Integer id);-->
    <select id="getUser" resultType="com.szx.boot04webadmin.bean.User">
        select * from user where id = #{id}
    </select>

</mapper>
mybatis:
  mapper-locations: classpath:mapper/*.xml # 声明mapper映射文件的位置
  configuration:
    map-underscore-to-camel-case: true # 开启驼峰式命名
上述配置完成之后,新建一个UserController测试sql
@RestController
public class UserController {
    @Autowired
    UserServer userServer;

    @GetMapping("/getUserById")
    public User getUser(@RequestParam("id") Integer id){
        User user = userServer.getUser(1);
        return user;
    }
}
启动服务,浏览器访问 http://localhost:8080/getUserById?id=1

注解版
1.新建一个cart表
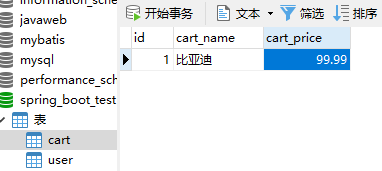
2.编写对应的CartBean
@Data
public class Cart {
    Integer id;
    String cartName;
    Double cartPrice;
}
3.添加mapper接口映射
直接将查询sql通过@Select注解放在方法上,省略mapper.xml 文件的编写
@Mapper
public interface CartMapper {
    @Select("select * from cart where id = #{id}")
    public Cart getCartById(Integer id);
}
4.添加service使用CartMapper接口返回Cart
@Service
public class CartService {
    @Autowired
    CartMapper cartMapper;

    public Cart getCartById(Integer id){
        return cartMapper.getCartById(id);
    }
}
5.编写CartController,添加get请求
@RestController
public class CartController {
    @Autowired
    CartService cartService;

    @GetMapping("getCartById")
    public Cart getCartById(@RequestParam("id") Integer id){
        return cartService.getCartById(id);
    }
}
6.启动项目,浏览器访问 http://localhost:8080/getCartById?id=1 查看效果

混合版
当有写sql语句过长不能很好的在注解中使用时,可以使用混合方式,将sql继续写在mapper文件中
例如往Cart表中添加数据
@Mapper
public interface CartMapper {
    /**
     * 查询数据
     * @param id
     * @return
     */
    @Select("select * from cart where id = #{id}")
    Cart getCartById(Integer id);

    /**
     * 添加Cart数据
     * @param cart
     * @return
     */
    Integer addCart(Cart cart);
}
新建CartMapper.xml接口映射文件
<?xml version="1.0" encoding="UTF-8" ?>
<!DOCTYPE mapper
        PUBLIC "-//mybatis.org//DTD Mapper 3.0//EN"
        "http://mybatis.org/dtd/mybatis-3-mapper.dtd">
<mapper namespace="com.szx.boot04webadmin.mapper.CartMapper">
    <!--Integer addCart(Cart cart);-->

    <insert id="addCart" useGeneratedKeys="true" keyProperty="id">
        insert into cart values(null,#{cartName},#{cartPrice})
    </insert>

</mapper>
在service中调用接口
package com.szx.boot04webadmin.server;

import com.szx.boot04webadmin.bean.Cart;
import com.szx.boot04webadmin.mapper.CartMapper;
import org.springframework.beans.factory.annotation.Autowired;
import org.springframework.stereotype.Service;

/**
 * @author songzhengxiang
 * @create 2022-07-30 11:13
 */
@Service
public class CartService {
    @Autowired
    CartMapper cartMapper;

    public Cart getCartById(Integer id){
        return cartMapper.getCartById(id);
    }

    public Integer addCart(Cart cart){
        return cartMapper.addCart(cart);
    }

}
在controller中增加post请求
@PostMapping("cart")
public Integer addCart(@RequestBody Cart cart){
    cartService.addCart(cart);
    return cart.getId();
}
启动服务,发送post请求

注解属性配置
在xml中定义的 useGeneratedKeys,keyProperty 等属性也可以通过注解的方式来实现
@Insert("insert into cart values(null,#{cartName},#{cartPrice})")
@Options(useGeneratedKeys = true,keyProperty = "id")
Integer addCart(Cart cart);
整合mybatis-plus
github地址:https://github.com/baomidou/mybatis-plus
中文文档地址:https://baomidou.com/
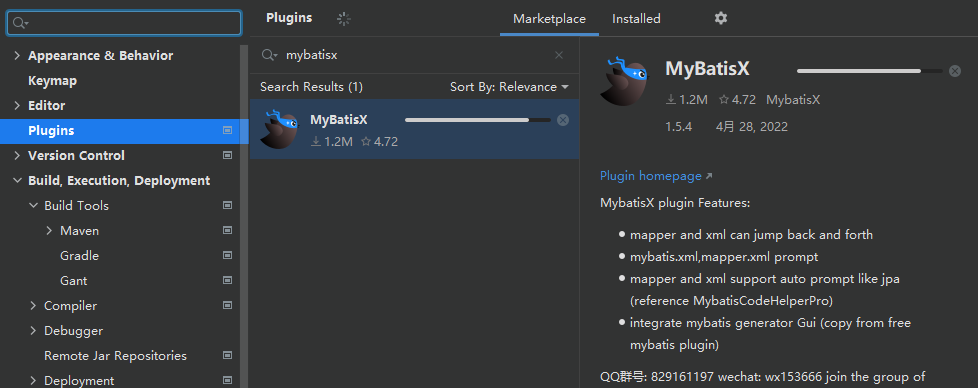
idea插件安装
搜索mybatisx安装即可
快速上手
引入依赖
<dependency>
    <groupId>com.baomidou</groupId>
    <artifactId>mybatis-plus-boot-starter</artifactId>
    <version>3.5.2</version>
</dependency>
引入依赖后,mybatis-plus自动帮我们完成如配置
- sqlSessionFactory自动配置好。底层是使用容器中默认的数据源
- mapperLocations自动配置好,有默认值。
classpath*:/mapper/**/*.xml;任意包的类路径下的所有mapper文件下任意路径的所有xml都是sql映射文件,建议以后的sql映射文件都放在mapper文件夹下 - 容器中也自动配置好的sqlSessionTemplate
- @Mapper 标注的接口也会被自动配置扫描;建议直接@MapperScan(“com.xxx.xxx.mapper”)批量扫描
优点:
- 只需要我们的mapper继承BaseMapper就可以拥有crud的能力
首先新建一张表,并插入原始数据
DROP TABLE IF EXISTS plus_user;

CREATE TABLE plus_user
(
    id BIGINT(20) NOT NULL COMMENT '主键ID',
    name VARCHAR(30) NULL DEFAULT NULL COMMENT '姓名',
    age INT(11) NULL DEFAULT NULL COMMENT '年龄',
    email VARCHAR(50) NULL DEFAULT NULL COMMENT '邮箱',
    PRIMARY KEY (id)
);

DELETE FROM plus_user;

INSERT INTO plus_user (id, name, age, email) VALUES
(1, 'Jone', 18, 'test1@baomidou.com'),
(2, 'Jack', 20, 'test2@baomidou.com'),
(3, 'Tom', 28, 'test3@baomidou.com'),
(4, 'Sandy', 21, 'test4@baomidou.com'),
(5, 'Billie', 24, 'test5@baomidou.com');
然后新建plususerBean
@Data
public class PlusUser {
    Integer id;
    String name;
    Integer age;
    String email;
}
然后新建PlusUserMapper,继承BaseMapper后会有一些基本的增删改查方法可以直接使用
/**
 * @author songzhengxiang
 * @create 2022-07-30 14:34
 * 继承BaseMapper,添加泛型类型,指明我们要操作的Bean
 */
@Mapper
public interface PlusUserMapper extends BaseMapper<PlusUser> {

}
接着新建PlusUserService,使用selectById根据id查询数据
@Service
public class PlusUserService {
    @Autowired
    PlusUserMapper plusUserMapper;

    public PlusUser getUserInfo(Integer id){
        PlusUser plusUser = plusUserMapper.selectById(id);
        System.out.println(plusUser);
        return plusUser;
    }
}
新建 PlusUserController 新建get请求
@RestController
public class PlusUserController {
    @Autowired
    PlusUserService plusUserService;

    @GetMapping("/plususer")
    public PlusUser getPlusUser(@RequestParam("id") Integer id){
        return plusUserService.getUserInfo(id);
    }
}
启动项目,浏览器访问http://localhost:8080/plususer?id=1查看返回的数据

@TableName指定数据库名称
mybatis-plus默认回去数据库中找和类名相同的数据表,另外我们也可以指定数据表名称,使用@TableName来指定表名
@Data
@TableName("plus_user")
public class PlusUser {
    Integer id;
    String name;
    Integer age;
    String email;
}
分页显示数据
开始之前需要添加分页插件,在容器中添加 MybatisPlusInterceptor 类
/**
 * @author songzhengxiang
 * @create 2022-07-30 15:40
 */
@Configuration
public class MyBatisConfig {
    /**
     * 新的分页插件,一缓和二缓遵循mybatis的规则,需要设置 MybatisConfiguration#useDeprecatedExecutor = false 避免缓存出现问题(该属性会在旧插件移除后一同移除)
     */
    @Bean
    public MybatisPlusInterceptor mybatisPlusInterceptor() {
        MybatisPlusInterceptor interceptor = new MybatisPlusInterceptor();
        // 指明数据库类型,避免查询之前都去查询一遍数据库类型,从而提高查询效率
        PaginationInnerInterceptor innerInterceptor = new PaginationInnerInterceptor(DbType.MysqL);
        // 设置最大单页的数据限制,500表示一页最多返回500条数据,-1表示不限制
        innerInterceptor.setMaxLimit(500L);
        interceptor.addInnerInterceptor(innerInterceptor);
        return interceptor;
    }
}
正常情况下,我们会先封装一个接口,然后通过service调用接口中的方法。所以接下来我们来规范一下代码的调用逻辑
1.新建一个PlusUserDao接口,让这个接口继承MybatisPlus中的IService接口,IService接口是带泛型的,传递过去我们定义的PlusUser
/**
 * 定义一个接口继承IService,添加一个泛型,声明我们要操作那个Bean
 * @author songzhengxiang
 * @create 2022-07-30 15:07
 */
public interface PlusUserDao extends IService<PlusUser>{
}
2.新建PlusUserImpl的接口实现类,同时继承MybatisPlus的ServiceImpl接口实现类
/**
 * 继承ServiceImpl,并实现PlusUserDao接口
 * ServiceImpl类有两个泛型,第一个是定义的mapper,第二个是我们要操作的bean
 * @author songzhengxiang
 * @create 2022-07-30 15:10
 */
@Service
public class PlusUserImpl extends ServiceImpl<PlusUserMapper, PlusUser> implements PlusUserDao {
}
这样操作继承完后,我们就拥有了操作plus_user这张表的一些基本增删改查方法
/**
 * 分页获取plus_user表的数据
 */
@GetMapping("/plususer/{pageNum}/{pageSize}")
public Page getPlusUserByPage(@PathVariable("pageNum") Integer pageNum,@PathVariable("pageSize") Integer pageSize) {
    // 构造分页函数
    Page<PlusUser> page = new Page<>(pageNum, pageSize);
    // 调用page进行分页
    Page<PlusUser> userPage = plusUserImpl.page(page,null);
    return userPage;
}
启动项目,浏览器访问 http://localhost:8080/plususer/1/2 查看返回的数据

删除用户
public Map deletePlusUser(@RequestBody Map map){
    Integer id = (Integer) map.get("id");
    boolean b = plusUserImpl.removeById(id);
    HashMap<String, Object> hashMap = new HashMap<>();
    hashMap.put("code",200);
    hashMap.put("success",b);
    hashMap.put("msg",b ? "删除成功" : "删除失败");
    return hashMap;
}
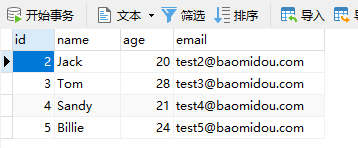
发送请求,删除id为1的数据

整合redis
快速上手
导入依赖
 <dependency>
     <groupId>org.springframework.boot</groupId>
     <artifactId>spring-boot-starter-data-redis</artifactId>
</dependency>
spring:
    redis:
        url: redis://localhost:6379 # redis 本地连接地址
编写测试方法,通过键值对的方式往redis中存储一个数据,然后读取并返回
@RestController
public class RedisController {
    @Autowired
    StringRedistemplate redistemplate;

    @GetMapping("/getredisval")
    public String getRedisVal(){
        ValueOperations<String, String> opsForValue = redistemplate.opsForValue();
        opsForValue.set("hello","word");
        return opsForValue.get("hello");
    }
}
启动项目,浏览器访问 http://localhost:8080/getredisval 查看返回

打开redis客户端(Another Redis Desktop Manager),查看保存的数据

小案例,统计接口访问次数
package com.szx.boot04webadmin.interceptor;

import org.springframework.beans.factory.annotation.Autowired;
import org.springframework.data.redis.core.StringRedistemplate;
import org.springframework.data.redis.core.ValueOperations;
import org.springframework.stereotype.Component;
import org.springframework.web.servlet.handlerinterceptor;

import javax.servlet.http.HttpServletRequest;
import javax.servlet.http.HttpServletResponse;

/**
 * @author songzhengxiang
 * @create 2022-07-30 21:53
 */
@Component
public class Redisinlnterceptor implements handlerinterceptor {
    @Autowired
    StringRedistemplate redistemplate;

    @Override
    public boolean preHandle(HttpServletRequest request, HttpServletResponse response, Object handler) throws Exception {
        // 获取本次的请求地址
        String uri = request.getRequestURI();

        ValueOperations<String, String> opsForValue = redistemplate.opsForValue();
        // 设置这个key自动递增
        opsForValue.increment(uri);

        // 默认全部放行
        return true;
    }
}
/**
 * 拦截器,实现 WebMvcConfigurer 接口
 * @author songzx
 * @create 2022-07-22 14:39
 */
@Configuration
public class WebConfig implements WebMvcConfigurer {

    @Autowired
    Redisinlnterceptor redisinlnterceptor;

    @Override
    public void addInterceptors(InterceptorRegistry registry) {
        registry.addInterceptor(new LoginInterceptor())
                .addpathPatterns("/**")
                .excludePathPatterns("/","/login","/css/**","/js/**","/fonts/**","/images/**");

        // 添加定义的redis路径拦截器
        registry.addInterceptor(redisinlnterceptor)
                .addpathPatterns("/**")
                .excludePathPatterns("/","/login","/css/**","/js/**","/fonts/**","/images/**");
    }
}
在 /main.html 接口中从redis获取请求的接口次数,并添加到model中
// 前提是自动注入redistemplate
@Autowired
StringRedistemplate redistemplate;

@GetMapping("/main.html")
public String mainPage(HttpSession session,Model model){
    ValueOperations<String, String> opsForValue = redistemplate.opsForValue();
    String mainCount = opsForValue.get("/main.html");
    String sqlCount = opsForValue.get("/druidsql");

    model.addAttribute("mainCount",mainCount);
    model.addAttribute("sqlCount",sqlCount);

    return "main";
}
然后在 main.html 页面中通过 thymeleaf 将数据渲染出来
<div class="state-value">
    <div class="value" th:text="${mainCount}">230</div>
    <div class="title">mainCount</div>
</div>

<div class="state-value">
    <div class="value" th:text="${sqlCount}">3490</div>
    <div class="title">sqlCount</div>
</div>
启动项目,我们来分别访问几次首页和/druidsql,查看页面数据变化

通过redis客户端也可以看到数据情况

单元测试
常用测试方法
- @Test 表示方法是测试方法
- @displayName 为测试类或者测试方法添加一个名称,在方法执行后可以看到自定义的方法名称。方便查找
- @BeforeEach 表示每个测试方法开始之前执行
- @AfterEach 表示每个测试方法结束后执行
- @BeforeAll 表示所有测试方法开始之前执行,必须是一个静态方法
- @Afterall 表示所有测试方法结束后执行,必须是一个静态方法
- @RepeatedTest 表示可以重复执行的方法,接收一个参数表示重复执行的次数
- @disabled 表示这个测试方法已失效
- @Timeout(500) 表示这个方法如果运行时间超过500毫秒就抛出异常,要设置unit表示时间类型,MILLISECONDS表示毫秒
@Slf4j
// 添加@SpringBoottset注解表示这个是springboot中整合的注解
@SpringBoottest
// 为测试类或者测试方法设置展示的名称
@displayName("测试类001")
public class MySpringBoottset {

    // 只要我们使用了@SpringBoottest注解,就可以获取容器中的相关类
    @Autowired
    JdbcTemplate jdbcTemplate;

    // 普通@Test注解
    @Test
    @displayName("测试方法:test001")
    public void test1(){
        System.out.println(1);
        System.out.println(jdbcTemplate);
    }

    // @BeforeEach 表示每个测试方法开始之前执行
    @BeforeEach
    public void testBeforeEach(){
        System.out.println("测试方法开始执行");
    }

    // @AfterEach 表示每个测试方法结束后执行
    @AfterEach
    public void testAfterEach(){
        System.out.println("测试方法结束后执行");
    }

    // @BeforeAll 表示所有测试方法开始之前执行,必须是一个静态方法
    @BeforeAll
    public static void testBeforeAll(){
        System.out.println("所有测试方法开始之前");
    }

    // @Afterall 表示所有测试方法结束后执行,必须是一个静态方法
    @Afterall
    public static void testAfterall(){
        System.out.println("所有测试方法结束后执行");
    }

    // RepeatedTest 表示可以重复执行的方法,接收一个参数表示重复执行的次数
    @RepeatedTest(5)
    public void testRepeatedTest(){
        System.out.println("重复执行的测试方法");
    }

    // @disabled 表示这个测试方法已失效
    @disabled
    @Test
    public void testdisabled(){
        System.out.println("这个方法被失效");
    }

    // @Timeout(500) 表示这个方法如果运行时间超过500毫秒就抛出异常
    // 要设置unit表示时间类型,MILLISECONDS表示毫秒
    @Timeout(value = 500,unit = TimeUnit.MILLISECONDS)
    @Test
    public void testTimeout() throws InterruptedException {
        Thread.sleep(501);
        System.out.println("延迟输出"); //=> testTimeout() timed out after 500 milliseconds
    }

}
断言测试
| 方法 | 说明 |
|---|---|
| assertEquals | 判断两个对象或者原始类型是否相等 |
| assertNotEquals | 判断两个对象或者原始类型是否不相等 |
| assertSame | 判断两个对象指向的是否是同一个地址 |
| assertNotSame | 判断两个对象指向的不是同一个地址 |
| assertTrue | 判断给定的运算是否返回true |
| assertFalse | 判断给定的运算是否返回true |
| assertNull | 判断结果是否返回null |
| assertNotNull | 判断结果不是null |
代码示例
package com.szx.boot04webadmin;

import org.junit.jupiter.api.Assertions;
import org.junit.jupiter.api.displayName;
import org.junit.jupiter.api.Test;
import org.springframework.boot.test.context.SpringBoottest;

import java.util.Date;

/**
 * 断言测试
 * @author songzhengxiang
 * @create 2022-08-01 22:48
 */
@SpringBoottest
public class AssertionTest {
    int cat(int a,int b){
        return a + b;
    }

    @displayName("assertEquals判断两个对象或者原始类型是否相等")
    @Test
    public void testAsserEquals(){
        Assertions.assertEquals(5,cat(3,3),"结果不是5");
    }

    @displayName("assertNotEquals判断两个对象或者原始类型是否不相等")
    @Test
    public void testAssertNotEquals(){
        Assertions.assertNotEquals(5,cat(3,3),"结果竟然是5?");
    }

    @displayName("assertSame判断两个对象指向的是否是同一个地址")
    @Test
    public void testAssertSame(){
        Assertions.assertSame(new Date(),new Date(),"两个对象指向的不是一个地址");
    }

    @displayName("assertNotSame判断两个对象指向的不是同一个地址")
    @Test
    public void testAssertNotSame(){
        Assertions.assertNotSame(new Date(),new Date(),"两个对象指向的竟然是是一个地址");
    }

    @displayName("assertTrue判断给定的运算是否返回true")
    @Test
    public void testArrestTrue(){
        Assertions.assertTrue(1>5,"结果不是true");
    }

    @displayName("assertFalse判断给定的运算是否返回true")
    @Test
    public void testAssertFalse(){
        Assertions.assertFalse(1>5,"结果不是false");
    }

    @displayName("assertNull判断结果是否返回null")
    @Test
    public void testAssertNull(){
        Assertions.assertNull(null,"结果不是null");
    }

    @displayName("assertNotNull判断结果不是null")
    @Test
    public void testAssertNotNull(){
        Assertions.assertNotNull(null,"结果是null");
    }
}
前置条件 assumptions
Assumptions.assumeTrue 前置条件判断,如果前置条件不成功,则代码不会继续往下执行
@SpringBoottest
public class TestAssumptions {

    @Test
    void testassumption(){
        Assumptions.assumeTrue(false,"结果返回的不是true");
        System.out.println("如果上面的前置条件没有通过,则不会继续往下执行");
    }
}
参数化测试
首先在方法上标注 @ParameterizedTest 注解表示这是一个参数化测试方法
利用 @ValueSource 等注解,指定参数,我们将可以使用不同的参数进行多次单元测试,而不需要每新增一个参数就要新增一个测试方法,省去了很多的冗余代码
| 注解名称 | 含义 |
|---|---|
| @ValueSource | 为参数化测试指定入参来源,支持八大基础类以及String类型,Class类型 |
| @NullSource | 表示为参数化测试方法提供一个null入参 |
| @EnumSource | 提供一个枚举入参 |
| @CsvFileSource | 从指定的csv文件中读取内容获取参数作为入参 |
| @MethodSource | 读取指定的方法的返回值作为入参,注意必须返回一个流,并且是静态方法 |
@ParameterizedTest
@displayName("参数化测试")
@ValueSource(ints = {1,2,3})
void testValueSource(int i){
    System.out.println(i);
}

@ParameterizedTest
@displayName("参数化测试")
@MethodSource("getSystem")
void testValueSource2(String str){
    System.out.println(str);
}
指标监控
快速上手
未来每一个微服务在云上部署以后,我们都需要对其进行监控、追踪、审计、控制等。SpringBoot就抽取了Actuator场景,使得我们每个微服务快速引用即可获得生产级别的应用监控、审计等功能。
导入依赖
<dependency>
      <groupId>org.springframework.boot</groupId>
      <artifactId>spring-boot-starter-actuator</artifactId>
</dependency>
management:
  endpoints:
    enabled-by-default: true #暴露所有端点信息
    web:
      exposure:
        include: '*'  #以web方式暴露
然后可以通过访问如下页面来查看各项监控信息
http://localhost:8080/actuator/configprops
http://localhost:8080/actuator/metrics
http://localhost:8080/actuator/metrics/jvm.gc.pause
Boot Admin Serve
我们可以使用这个框架快速搭建一个可视化的监控面板,github 地址 https://github.com/codecentric/spring-boot-admin
首先新建一个 java web 项目
然后引入依赖
<dependency>
    <groupId>de.codecentric</groupId>
    <artifactId>spring-boot-admin-starter-server</artifactId>
    <version>2.5.1</version>
</dependency>
然后将 @EnableAdminServer 注解添加到启动类上
@SpringBootApplication
@EnableAdminServer
public class Boot05AdminServerApplication {

    public static void main(String[] args) {
        SpringApplication.run(Boot05AdminServerApplication.class, args);
    }

}
<dependency>
    <groupId>de.codecentric</groupId>
    <artifactId>spring-boot-admin-starter-client</artifactId>
    <version>2.5.1</version>
</dependency>
然后再客户端项目中添加如下配置
spring:
    boot:
      admin:
        client:
          url: http://localhost:8888 # 表示要把我们的监控信息推送给那个地址去显示
          instance:
            prefer-ip: true
    application:
      name: boot04-webadmin
然后分别启动要监控的项目和监控面板项目
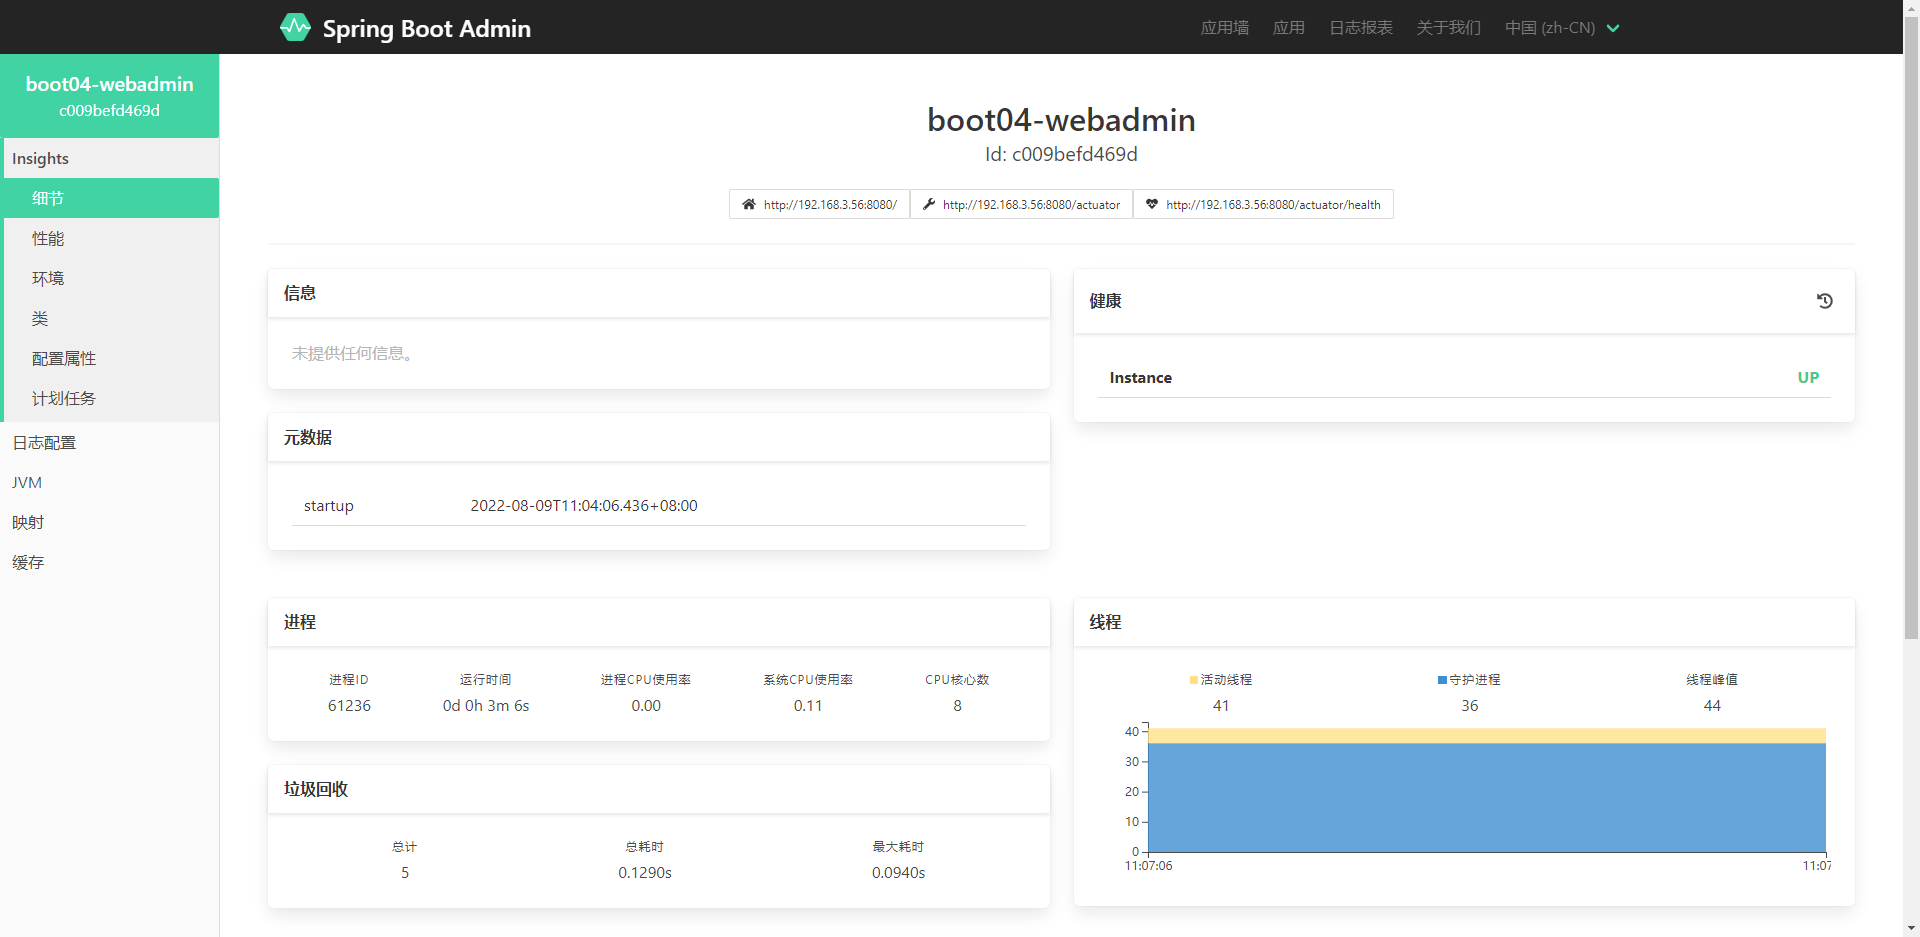
这是在浏览器访问 http://localhost:8888/ 就可以查看我们项目的各项信息

profiles的使用
环境切换
在实际开发场景中,我们会有多套环境,例如在本地测试环境连接测试库,生产环境则使用生产库。我们可以使用 profiles 来快速的切换不同环境
首先分别新建如下两个文件
- application-dev.yml
- application-uat.yml
写入如下内容
# application-dev.yml
product:
  name: dev-张三
# application-uat.yml
product:
  name: uat-李四
我们可以在 application 配置文件上通过 application-xxx 的方式自定义环境配置
然后再主配置文件中声明要使用的环境名称,没有声明环境名称的配置文件就是主配置文件,主配置文件在任何环境下都会生效
server.port=8888
# 声明当前的环境名称
spring.profiles.active=uat
编写一个 ProductController
@RestController
public class Product {

    @Value("${product.name}")
    String name;

    @GetMapping("/product")
    public String getName(){
        return name;
    }
}
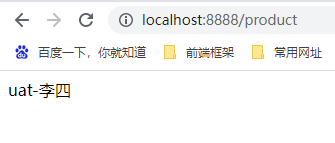
启动项目,访问 http://localhost:8888/product 查看接口返回
在uat环境下,使用的是uat配置文件
# 声明当前的环境名称
spring.profiles.active=dev
重启项目再次访问,返回值会不同

@Profile注解
public interface user {
    void setName();
    void setAge();
}
然后编写两个类来实现这个接口
Boos
@Profile("uat")
@ConfigurationProperties(prefix = "product")
@Component
@Data
public class Boos implements user{
    String name;
    Integer age;

    @Override
    public void setName() {

    }

    @Override
    public void setAge() {

    }
}
Student
@Data
@Component
@ConfigurationProperties(prefix = "product")
@Profile("dev")
public class Student implements user{
    private String name;
    private Integer age;

    @Override
    public void setName() {

    }

    @Override
    public void setAge() {

    }
}
修改 Product
@RestController
public class Product {

    @Autowired
    user userimpl;

    @GetMapping("/product")
    public user getName(){
        return userimpl;
    }
}
我们可以根据不同的环境,来实现一个接口返回不同的user实现类


配置环境组
我们可以让多个环境同时生效
首先新建一个 application-test.yml 文件
product:
  weight: 59kg
# 设置环境组,可以让多个环境同时生效
spring.profiles.group.mygroup[0]=dev
spring.profiles.group.mygroup[1]=test

# 指定让那个配置组生效
spring.profiles.active=mygroup
在 Student 中添加 weight 字段
@Data
@Component
@ConfigurationProperties(prefix = "product")
@Profile("dev")
public class Student implements user{
    private String name;
    private Integer age;
    private String weight;

    @Override
    public void setName() {

    }

    @Override
    public void setAge() {

    }
}
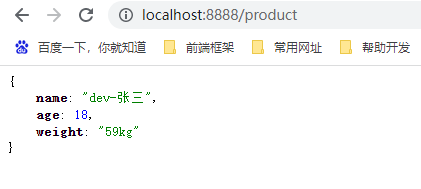
启动项目,查看返回。通过结果可以看出,dev 和 test 两个环境都生效
配置文件的优先级
配置文件的查找位置
配置文件的加载顺序
优先级从低到高:
- 当前jar包内部的 application 和 application.yml
- 当前jar包内部的 application-(profile).properties 和 application-(profile).yml
- 引用的外部jar包的 application.properties 和 application.yml
- 引用的外部jar包的 application-(profile).properties 和 application-(profile).yml
总结:指定环境优先,外部优先,后面的可以覆盖前面的同名配置项目
自定义start
首先新建两个Module
- szx-hello-spring-boot-start
- szx-hello-spring-boot-start-autoconfigure
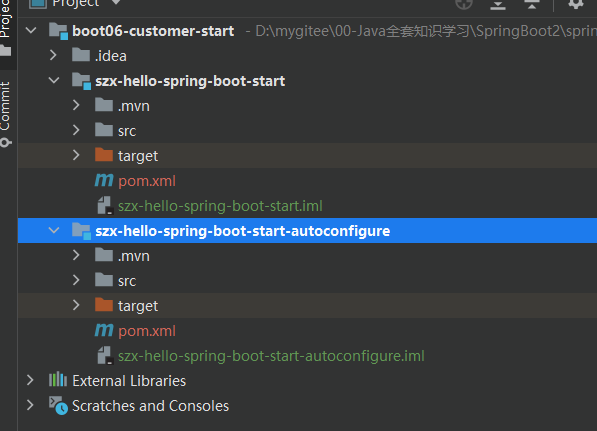
在szx-hello-spring-boot-start中引入szx-hello-spring-boot-start-autoconfigure

然后在szx-hello-spring-boot-start-autoconfigure中新建service.HelloService,默认不要放在容器中
package com.example.szxhellospringbootstartautoconfigure.service;

import com.example.szxhellospringbootstartautoconfigure.bean.HelloPropretes;
import org.springframework.beans.factory.annotation.Autowired;

/**
 * @author songzx
 * @create 2022-08-15 15:20
 */
public class HelloService {
    @Autowired
    HelloPropretes helloPropretes;

    public String sayHello(String name){
        return helloPropretes.getPrefix() + ": " + name + " >" + helloPropretes.getSuffix();
    }
}
这里用到了 helloPropretes,新建bean.helloPropretes
package com.example.szxhellospringbootstartautoconfigure.bean;

import org.springframework.boot.context.properties.ConfigurationProperties;

/**
 * @author songzx
 * @create 2022-08-15 15:30
 */
@ConfigurationProperties("hello")
public class HelloPropretes {
    String prefix;
    String suffix;

    public String getPrefix() {
        return prefix;
    }

    public void setPrefix(String prefix) {
        this.prefix = prefix;
    }

    public String getSuffix() {
        return suffix;
    }

    public void setSuffix(String suffix) {
        this.suffix = suffix;
    }
}
然后新建 auto.HelloAutoConfiguration
package com.example.szxhellospringbootstartautoconfigure.auto;

import com.example.szxhellospringbootstartautoconfigure.bean.HelloPropretes;
import com.example.szxhellospringbootstartautoconfigure.service.HelloService;
import org.springframework.boot.autoconfigure.condition.ConditionalOnMissingBean;
import org.springframework.boot.context.properties.EnableConfigurationProperties;
import org.springframework.context.annotation.Bean;
import org.springframework.context.annotation.Configuration;

/**
 * @author songzx
 * @create 2022-08-15 15:36
 */
@Configuration
@EnableConfigurationProperties(HelloPropretes.class)
public class HelloAutoConfiguration {

    @Bean
    @ConditionalOnMissingBean(HelloService.class)
    public HelloService helloService(){
        HelloService helloService = new HelloService();
        return helloService;
    }
}
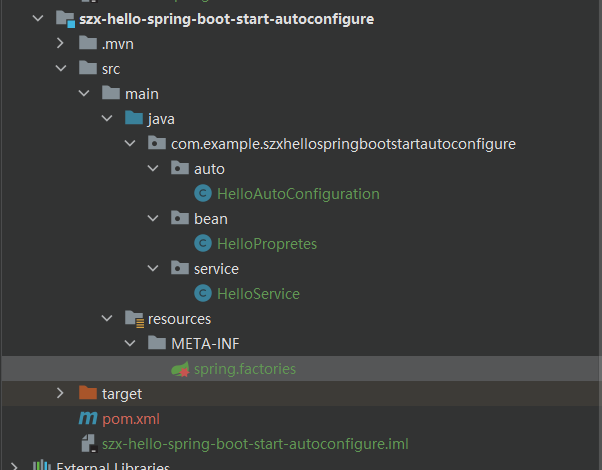
接着在 resources 文件夹下新建 meta-inf/spring.factories
org.springframework.boot.autoconfigure.EnableAutoConfiguration=\
  com.example.szxhellospringbootstartautoconfigure.auto.HelloAutoConfiguration
szx-hello-spring-boot-start-autoconfigure 的目录结构如下
然后将两个项目安装到本地,分别执行一下 clean,install

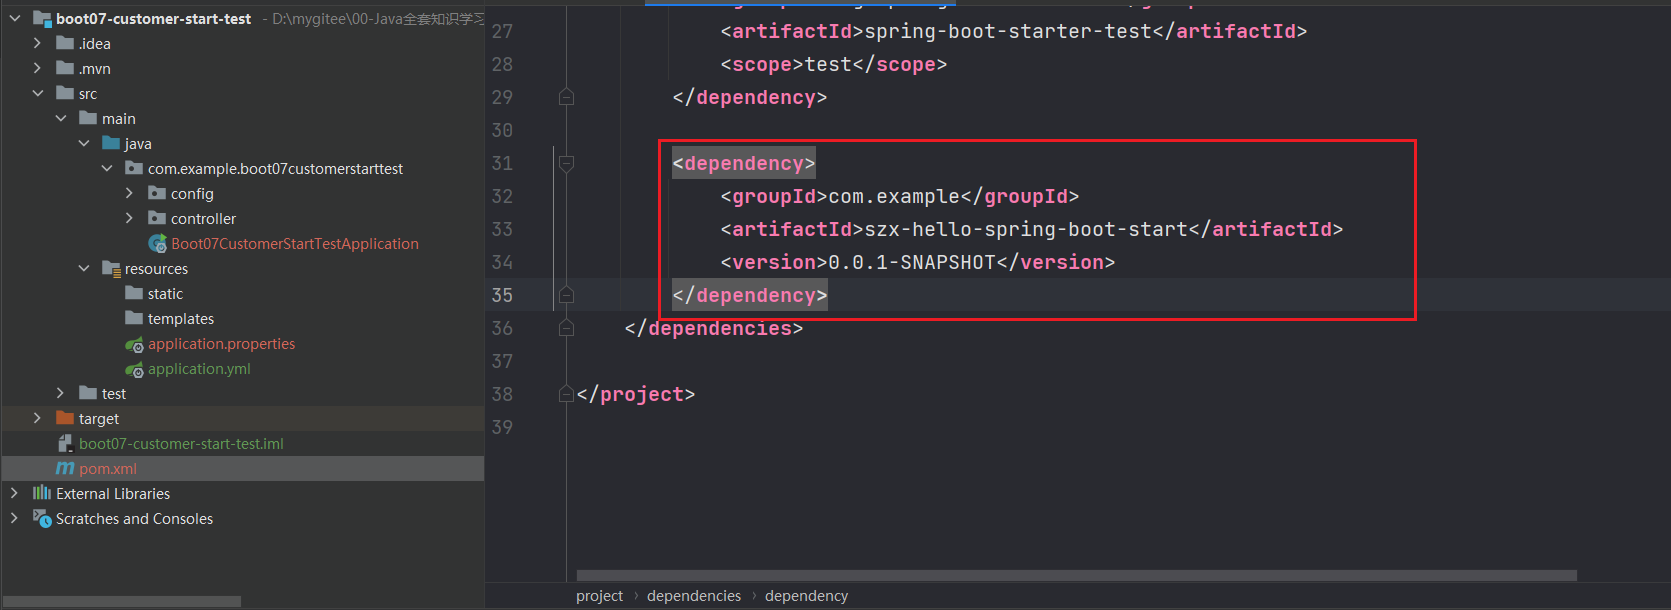
然后新建一个测试项目 boot07-customer-start-test,引入 szx-hello-spring-boot-start
新建 controller.HelloController
package com.example.boot07customerstarttest.controller;

import com.example.szxhellospringbootstartautoconfigure.service.HelloService;
import org.springframework.beans.factory.annotation.Autowired;
import org.springframework.web.bind.annotation.GetMapping;
import org.springframework.web.bind.annotation.RestController;

/**
 * @author songzx
 * @create 2022-08-15 15:55
 */
@RestController
public class HelloController {

    @Autowired
    HelloService helloService;

    @GetMapping("/hello")
    public String sayHello(){
       return helloService.sayHello("张三");
    }
}
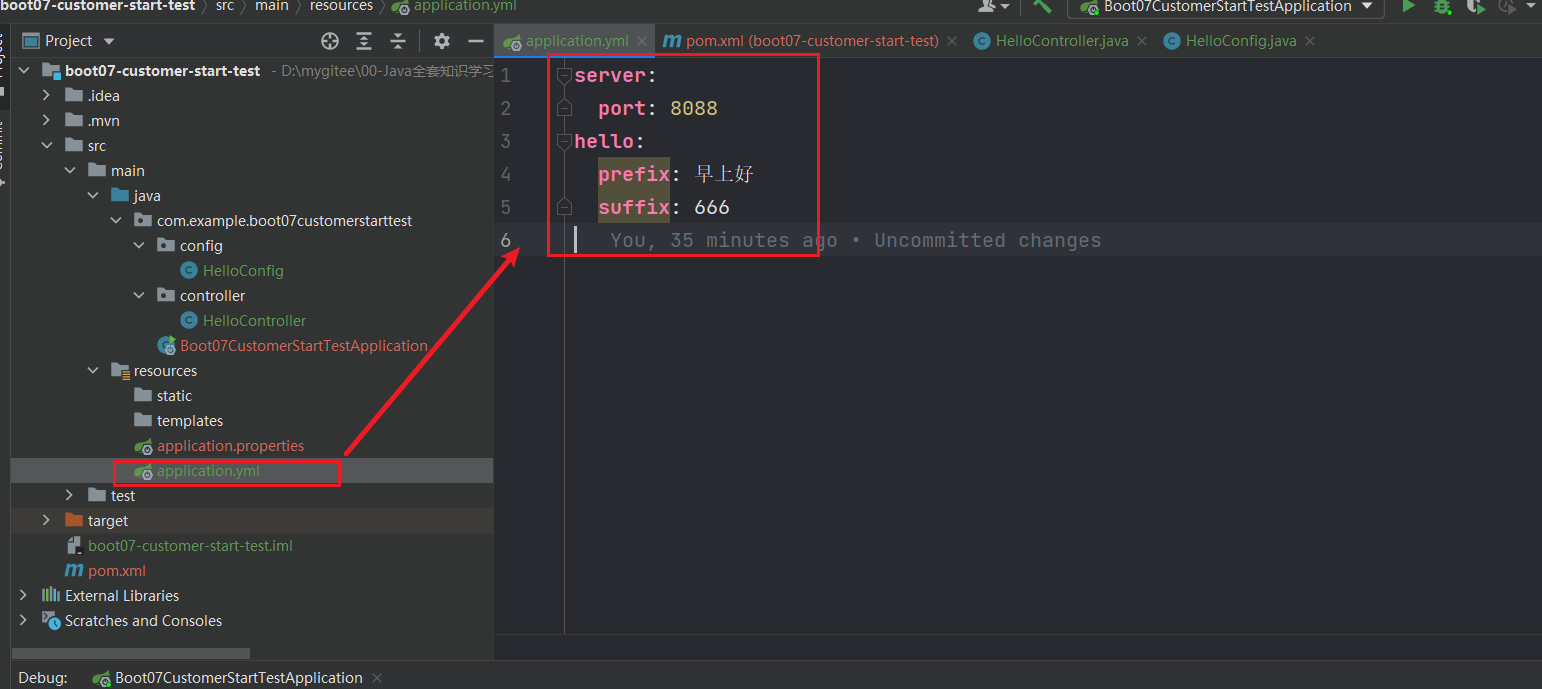
启动项目,访问 http://localhost:8088/hello,结果可以看到成功引入

如果我们在容器中注册了一个 HelloService,则不会再使用引入的HelloService
package com.example.boot07customerstarttest.config;


import com.example.szxhellospringbootstartautoconfigure.service.HelloService;
import org.springframework.context.annotation.Bean;
import org.springframework.context.annotation.Configuration;

/**
 * @author songzx
 * @create 2022-08-15 16:07
 */
@Configuration
public class HelloConfig {

    @Bean
    public HelloService helloService(){
        System.out.println("进入自己的HelloService");
        return new HelloService();
    }
}
重启项目,观察控制台打印

至此,我们自定义 start 就完成了。
实战案例
文件上传到腾讯云COS
官方文档:https://cloud.tencent.com/document/product/436/10199
首先导入依赖
<!--腾讯云cos相关依赖-->
<dependency>
    <groupId>com.qcloud</groupId>
    <artifactId>cos_api</artifactId>
    <version>5.6.89</version>
</dependency>
<!--接收文件-->
<dependency>
    <groupId>commons-fileupload</groupId>
    <artifactId>commons-fileupload</artifactId>
    <version>1.3.1</version>
</dependency>
package com.szx.boot03tengxunyun.server;

import com.qcloud.cos.COSClient;
import com.qcloud.cos.ClientConfig;
import com.qcloud.cos.auth.BasicCOSCredentials;
import com.qcloud.cos.auth.COSCredentials;
import com.qcloud.cos.exception.CosClientException;
import com.qcloud.cos.exception.CosServiceException;
import com.qcloud.cos.http.HttpProtocol;
import com.qcloud.cos.model.*;
import com.qcloud.cos.region.Region;
import com.szx.boot03tengxunyun.bean.CosBean;
import org.springframework.beans.factory.annotation.Autowired;
import org.springframework.beans.factory.annotation.Value;
import org.springframework.boot.context.properties.ConfigurationProperties;
import org.springframework.stereotype.Component;
import org.springframework.stereotype.Service;
import org.springframework.web.multipart.multipartfile;

import java.io.File;
import java.io.IOException;
import java.text.SimpleDateFormat;
import java.util.Date;
import java.util.List;

/**
 * @author songzx
 * @create 2022-07-19 11:28
 */
@Service
public class FileServer {
    // 1 初始化用户身份信息(secretId, secretKey)。
    // SECRETID和SECRETKEY请登录访问管理控制台 https://console.cloud.tencent.com/cam/capi 进行查看和管理
    String secretId = "";
    String secretKey = "";
    String filePath = "https://blogimages-1257342648.cos.ap-shanghai.myqcloud.com/"; // 文件基础路径
    String bucketName = "blogimages-1257342648"; // 指定文件将要存放的存储桶

    COSCredentials cred = new BasicCOSCredentials(secretId, secretKey);
    // 2 设置 bucket 的地域, COS 地域的简称请参照 https://cloud.tencent.com/document/product/436/6224
    // clientConfig 中包含了设置 region, https(默认 http), 超时, 代理等 set 方法, 使用可参见源码或者常见问题 Java SDK 部分。
    Region region = new Region("ap-shanghai"); // ap-shanghai 表示上海
    ClientConfig clientConfig = new ClientConfig(region);

    public String upload(multipartfile multipartfile) throws IOException {
        String filename = multipartfile.getoriginalFilename();
        // 这里建议设置使用 https 协议
        // 从 5.6.54 版本开始,默认使用了 https
        clientConfig.setHttpProtocol(HttpProtocol.https);
        // 3 生成 cos 客户端。
        COSClient cosClient = new COSClient(cred, clientConfig);

        //这里文件名用了当前时间 防止重复,可以根据自己的需要来写
        SimpleDateFormat sdf = new SimpleDateFormat("yyyy-MM-dd");
        String[] fileNames= filename.split("\\.");
        String name = fileNames[0]+ sdf.format(new Date())+ filename.substring(filename.lastIndexOf("."), filename.length());
        // 指定文件上传到 COS 上的路径,即对象键。例如对象键为folder/picture.jpg,则表示将文件 picture.jpg 上传到 folder 路径下
        String key = "javaUpload/" + name;
        PutObjectRequest putObjectRequest = new PutObjectRequest(bucketName, key, multipartfile.getInputStream(),null);
        // 执行上传方法
        cosClient.putObject(putObjectRequest);
        // 返回线上地址
        return filePath + key;
    }
}
package com.szx.boot03tengxunyun.bean;

import java.util.HashMap;

/**
 * @author songzx
 * @create 2022-07-19 15:36
 */
public class Msg {
    int code; // 接口响应状态码,500 异常,200 OK
    String message; // 接口返回的信息
    HashMap<String,Object> data = new HashMap<>(); // 接口实际返回的内容

    /**
     * 接口成功返回方法
     * @author Songzx
     * @date 2022/7/2
     */
    public static Msg success(){
        Msg msg = new Msg();
        msg.setCode(200);
        msg.setMessage("成功");
        return msg;
    }

    /**
     * 接口失败返回方法
     * @author Songzx
     * @date 2022/7/2
     */
    public static Msg error(){
        Msg msg = new Msg();
        msg.setCode(500);
        msg.setMessage("失败");
        return msg;
    }

    /**
     * 可以链式调用的add方法
     * @author Songzx
     * @date 2022/7/2
     */
    public Msg add(String key,Object data){
        this.getData().put(key,data);
        return this;
    }

    public int getCode() {
        return code;
    }

    public void setCode(int code) {
        this.code = code;
    }

    public String getMessage() {
        return message;
    }

    public void setMessage(String message) {
        this.message = message;
    }

    public HashMap<String, Object> getData() {
        return data;
    }

    public void setData(HashMap<String, Object> data) {
        this.data = data;
    }

    public Msg(int code, String message, HashMap<String, Object> data) {
        this.code = code;
        this.message = message;
        this.data = data;
    }

    public Msg() {
    }
}
编写一个 FileController,调用 FileServer 中的 upload 方法
@RestController
public class FileController {
    @Autowired
    FileServer fileServer;

    @RequestMapping(value = "/upload",method = RequestMethod.POST)
    // 这里接收到的 file 名称是前端传递过来的文件参数名称
    public Msg uploadFile(@RequestParam("file") multipartfile multipartfile){
        try {
            String filePath = fileServer.upload(multipartfile);
            return Msg.success().add("fileUrl",filePath);
        } catch (IOException e) {
            e.printstacktrace();
        }
        return Msg.error();
    }
}
然后前端通过 post 方式调用 /upload 接口,同时传递文件过来。前端代码如下,使用了 ElementUI 中的文件上传组件
<template>
  <div>
    <el-upload class="upload-demo" drag action="/upload" multiple>
      <i class="el-icon-upload"></i>
      <div class="el-upload__text">将文件拖到此处,或<em>点击上传</em></div>
    </el-upload>
  </div>
</template>
运行效果:

登录腾讯云控制台,访问对象存储模块,查看 javaUpload 文件夹下的内容

版权声明:本文内容由互联网用户自发贡献,该文观点与技术仅代表作者本人。本站仅提供信息存储空间服务,不拥有所有权,不承担相关法律责任。如发现本站有涉嫌侵权/违法违规的内容, 请发送邮件至 dio@foxmail.com 举报,一经查实,本站将立刻删除。


