

day2-node.js
1-创建基本的web服务器四部曲
-
导入http模块
-
创建web服务器实例
-
为服务器实例绑定request事件,监听客户端的请求
-
启动服务器
const http = require('http')//1.
const server = http.createServer()//2.
server.on('request',(req,res) =>
console.log('Someone visit our web server'))//3.
server.listen(8080,() =>
console.log('server running at http://127.0.0.1:8080'))//4.
2-request监听事件的req与res参数
3-中文乱码问题
-
res.setHeader() 方法,设置 Content-Type 响应头,解决中文乱码问题
res.setHeader('Content-Type','text/html; charset=utf-8')
4.-根据不同的url响应不同的html内容
-
设置 Content-Type 响应头,防止中文乱码
-
使用res.end()把内容响应给客户端
server.on('request',(req,res) => {
    //1.获取请求的URL地址
    const url = req.url
    //2.设置默认的响应内容 404 Not found
    let content = '<h1>404 Not found</h1>'
    //3.判断用户请求的是否为 / 或 /index.html 首页
    if (url==='/' || url==='/index.html') {
        content = '<h1>首页</h1>'
        //4.判断用户请求的是否为 /about.html 关于首页
    }else if (url==='/about.html') {
        content = '<h1>关于首页</h1>'
    }
    //5.设置 Content-Type 响应头,防止中文乱码
    res.setHeader('Content-Type','text/html; charset=utf-8')
    //6.使用res.end()把内容响应给客户端
    res.end(content)
})
5-clock时钟web服务器
//1.1导入http模块
const http = require('http')
//1.2导入fs模块
const fs = require('fs')
//1.3导入path模块
const path = require('path')

//2.1创建web服务器
const server = http.createServer()
//2.2监听web服务器的request事件
server.on('request',(req,res) => {
    //3.1获取到客户端请求的URL地址
        //  /clock/index.html
        //  /clock/index.css
        //  /clock/index.js
    const url = req.url
    //3.2把请求的URL地址映射为具体文件的存放路径
    //*** 将3.2的实现方式修改如下 ***
    // const fpath = path.join(__dirname,url)
    //5.1预定义一个空白的文件存放路径
    let fpath = ''
    if (url==='/') {
        fpath = path.join(__dirname,'./clock/index.html')
    }else{
        fpath = path.join(__dirname,'./clock',url)
    }
    //4.1根据映射过来的文件路径读取文件的内容
    fs.readFile(fpath,'utf-8',(err,dataStr) => {
        //4.2 读取失败,向客户端响应固定的“错误消息”
        if(err) return res.end('404 Not fount')
        //4.3 读取成功,将读取成功的内容,响应给客户端
        res.end(dataStr)
    })
})
//2.3启动服务器
server.listen(8080,() => console.log('Server running at http://127.0.0.1:8080'))
6-模块化的分类
7-require() 方法注意事项
8-module对象
-
我们可以通过module.exports对象向外暴露一些数据
-
向 module.exports 对象上挂载 username、age 属性
const age = 20 module.exports.username = 'zs' module.exports.age = age -
向 module.exports 对象上挂载 sayHello 方法
module.exports.sayHello = function () { console.log('Hello!') } -
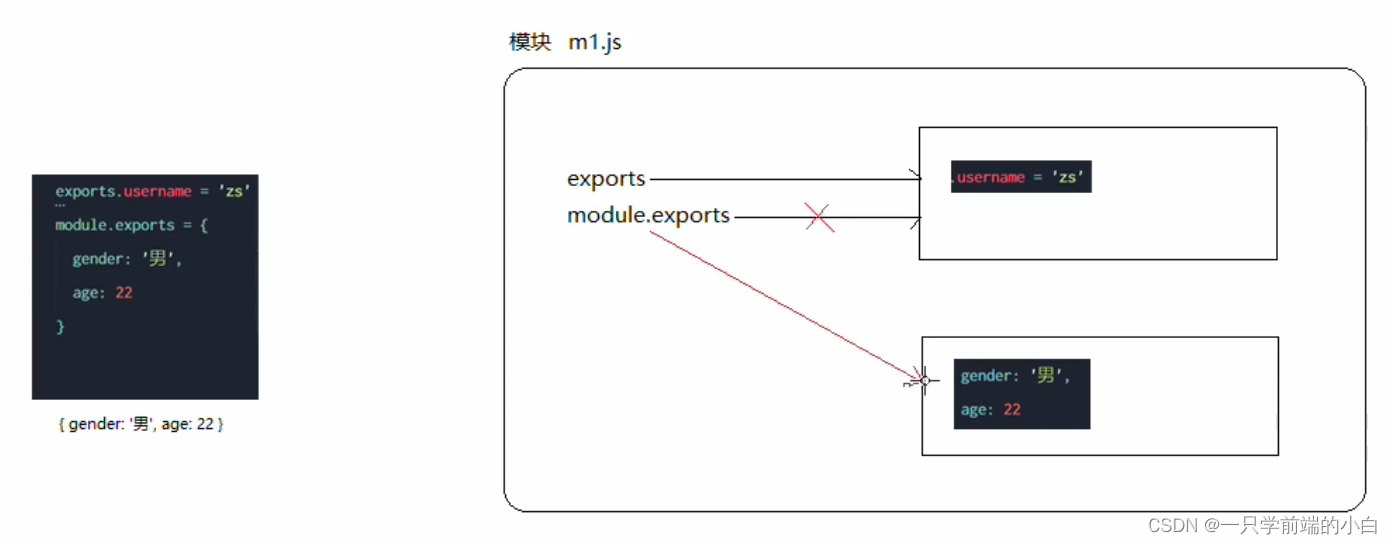
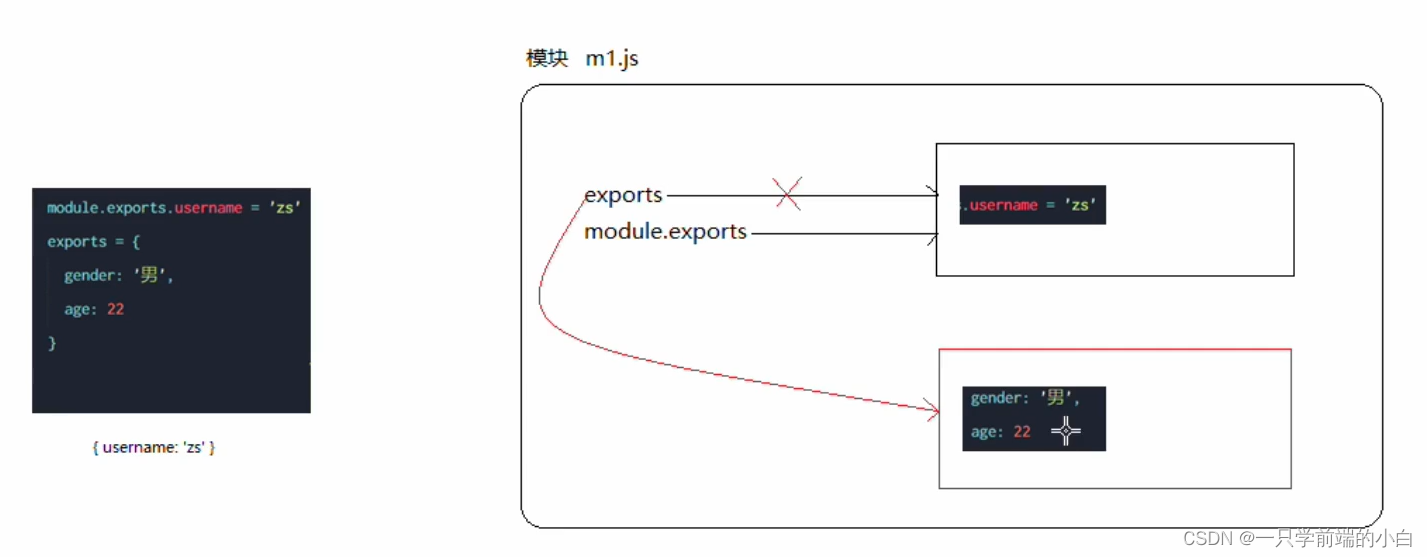
使用require() 方法导入模块时,导入的结果,永远以 module.exports 指向的对象为准
module.exports = { nickname:'小黑', sayHi(){ console.log('Hi!') } } -
终端输出结果

9-exports对象
-
exports对象与module.exports指向同一个对象
console.log(exports === module.exports)//true const username = 'zs' module.exports.username = username exports.age = 20 exports.sayHello = function () { console.log('大家好!') } -
注:向外共享的结果,永远都是 module.exports 所指向的对象

10-module.exports对象与exports对象注意事项
- 案例1:修改module.exports对象指向
- 案例2:修改exports对象指向
- 案例3:对module.exports对象与exports对象指向都进行修改

11-包(第三方模块)
-
包是由第三方个人或者团队开发的,免费供所有人使用
-
包是基于内置模块封装出来的,提供了更高级、更方便的API,极大的提高了开发效率
-
我们可以通过 https://www.npmjs.com 搜索到任何你需要的包
-
包的下载命令
//在项目中安装指定名称的包
//命令:npm install 完整的包名称
//简写:npm i 完整的包名称
//安装指定版本的包@+版本号
//命令:npm i moment@2.22.2
12-使用moment包对时间格式化
-
安装 moment 包

-
导入 moment 包
//注意:导入的名称,就是装包时候的名称 const moment = require('moment') -
调用 moment 包的API
const dt = moment().format('YYYY-MM-DD HH:mm:ss')
console.log(dt);//2022-08-24 17:18:13
原文地址:https://www.jb51.cc/wenti/3282148.html
版权声明:本文内容由互联网用户自发贡献,该文观点与技术仅代表作者本人。本站仅提供信息存储空间服务,不拥有所有权,不承担相关法律责任。如发现本站有涉嫌侵权/违法违规的内容, 请发送邮件至 dio@foxmail.com 举报,一经查实,本站将立刻删除。

