

环境准备:
系统平台	IP
centos7		192.168.8.164

需要安装的服务:
httpd-2.4
MysqL-5.7
PHP8
1、安装Apache
1、依赖包
安装依赖包:
yum install -y expat-devel
yum install -y gcc gcc-c++
yum -y install openssl-devel libtool make
2、安装epel包
yum install -y https://dl.fedoraproject.org/pub/epel/epel-release-latest-7.noarch.rpm
yum clean all    //清理缓存
yum makecache  	 //重新建立缓存
yum groupinstall -y "Development Tools" // 安装开发工具包
yum groups mark install -y "Development Tools"
useradd -r -M -s /sbin/nologin apache
4、下载并解压
1.下载
wget --no-check-certificate https://mirrors.tuna.tsinghua.edu.cn/apache/httpd/httpd-2.4.54.tar.gz
wget --no-check-certificate https://mirrors.tuna.tsinghua.edu.cn/apache/apr/apr-1.7.0.tar.gz
wget --no-check-certificate https://mirrors.tuna.tsinghua.edu.cn/apache/apr/apr-util-1.6.1.tar.gz
wget http://jaist.dl.sourceforge.net/project/pcre/pcre/8.33/pcre-8.33.tar.gz

2.解压缩:
tar -xvf httpd-2.4.54.tar.gz -C /usr/local/src/
tar -xvf apr-1.7.0.tar.gz -C /usr/local/src/
tar -xvf apr-util-1.6.1.tar.gz -C /usr/local/src/
tar -xvf pcre-8.33.tar.gz -C /usr/local/src/
5、编译安装apr,注释掉R M " RM “RM"cfgfile”,避免发生未知错误
cd /usr/local/src/apr-1.7.0
sed -i 's/$RM "$cfgfile"/# $RM "$cfgfile"/g' ./configure
./configure --prefix=/usr/local/apr
make && make install
6、编译安装apr-util
cd /usr/local/src/apr-util-1.6.1
./configure --prefix=/usr/local/apr-util --with-apr=/usr/local/apr/bin/apr-1-config
make && make install
7、编译安装pcre-8.33
cd /usr/local/src/pcre-8.33/
./configure  --prefix=/usr/local/pcre
make && make install
8、编译安装httpd-2.4.54
cd /usr/local/src/httpd-2.4.54/
./configure --prefix=/usr/local/apache \
--enable-so \
--enable-ssl \
--enable-cgi \
--enable-rewrite \
--with-zlib \
--with-pcre=/usr/local/pcre \
--with-apr=/usr/local/apr/ \
--with-apr-util=/usr/local/apr-util/ \
--enable-modules=most \
--enable-mpms-shared=all \
--with-mpm=prefork

make -j 2 && make install
1.安装报错1
报错1:apr-util-1.6.1 报错xml/apr_xml.c:35:19: Fatal error: expat.h: No such file or directory
原因:缺少expat库
解决:yum install expat-devel -y

1.安装报错2
报错2:pcre-8.33 报错configure: error: You need a C++ compiler for C++ support.
原因:缺少c++环境
解决:yum install -y gcc gcc-c++

报错3:
[root@szb conf]# systemctl restart httpd
Process 23436 (httpd) of user 0 killed by SIGSEGV - dumping core
原因:因为升级PHP7.4版本,配置中LoadModule PHP5_module modules/libPHP5.so注释掉
解决:添加LoadModule PHP7_module modules/libPHP7.so即可
- 安装后配置修改
1.添加环境变量
echo 'export PATH=/usr/local/apache/bin:$PATH' > /etc/profile.d/httpd.sh
source /etc/profile.d/httpd.sh

2.添加头文件默认的软连接
ln -s /usr/local/apache/include/ /usr/include/httpd

3.添加man帮助文件数据--可以使用 man 来查询该软件的在线文件
(默认情况下man 会去搜寻 /usr/local/man (/usr/local/share/man)下面的说明文件)
vim /etc/man_db.conf
MANPATH_MAP     /usr/local/sbin         /usr/local/apache/man

4.取消注释,使用服务器主机名
vim /usr/local/apache/conf/httpd.conf  // 服务器用于辨识自己的主机名和端口号,主要用于创建重定向URL
ServerName www.example.com:80

5、启动apache服务及校验端口
[root@szb include]# apachectl start
[root@szb include]# ss -ntl
State       Recv-Q Send-Q       Local Address:Port        Peer Address:Port
LISTEN      0      128                  :::80             :::*

6.配置开机自启动
cp /usr/lib/systemd/system/sshd.service /usr/lib/systemd/system/httpd.service
vim /usr/lib/systemd/system/httpd.service
[Unit]
Description=httpd server daemon
Documentation=man:httpd(8)
After=network.target

[Service]
Type=forking
ExecStart=/usr/local/apache/bin/apachectl start
ExecStop=/usr/local/apache/bin/apachectl stop
ExecReload=/bin/kill -HUP $MAINPID

[Install]
WantedBy=multi-user.target

systemctl daemon-reload
systemctl enable --Now httpd
systemctl status httpd.service	# 校验状态
结果:Loaded: loaded (/usr/lib/systemd/system/httpd.service; enabled;
2、安装MysqL
1.安装依赖包
yum -y install ncurses-devel openssl-devel openssl cmake mariadb-devel
2.下载安装包 - - MysqL-5.7.34
MySQL官网下载地址
wget https://downloads.MysqL.com/archives/get/p/23/file/MysqL-5.7.34-el7-x86_64.tar.gz
tar -xvf MysqL-5.7.34-el7-x86_64.tar.gz -C /usr/local/src/ && cd /usr/local/
mv MysqL-5.7.34-el7-x86_64/ MysqL

3.创建用户和组
useradd -r -M -s /sbin/nologin MysqL
4.添加环境变量
echo 'PATH=/usr/local/MysqL/bin:$PATH' > /etc/profile.d/MysqL.sh
source /etc/profile.d/MysqL.sh
vim /etc/man_db.conf
MANPATH_MAP     /usr/local/sbin         /usr/local/MysqL/man
ln -s /usr/local/MysqL/include/ /usr/include/MysqL
vim /etc/ld.so.conf.d/MysqL.conf
/usr/local/MysqL/lib
ldconfig
6.创建数据存放目录
mkdir -p /data/MysqL && chown -R MysqL.MysqL /data/MysqL
- 初始化数据库
/usr/local/MysqL/bin/MysqLd --initialize-insecure --user MysqL --datadir /data/MysqL
vim /etc/my.cnf
[MysqLd]
datadir=/data/MysqL
socket=/data/MysqL/MysqL.sock
basedir=/usr/local/MysqL
port=3306
symbolic-links=0
user=MysqL
skip-name-resolve   # 禁止域名解析,

[MysqLd_safe]
log-error=/data/MysqL/MysqL.log		# 此路径必须存在,不然会报错
pid-file=/data/MysqL/MysqL.pid
9.配置服务启动脚本
1.修改服务配置信息
vim /usr/local/MysqL/support-files/MysqL.server
basedir=/usr/local/MysqL
datadir=/data/MysqL

2.开启自启动服务
cp /usr/lib/systemd/system/httpd.service /usr/lib/systemd/system/MysqLd.service
vim /usr/lib/systemd/system/MysqLd.service
[Unit]
Description=MysqL server daemon
After=network.target

[Service]
Type=forking
ExecStart=/usr/local/MysqL/support-files/MysqL.server start
ExecStop=/usr/local/MysqL/support-files/MysqL.server stop
ExecReload=/bin/kill -HUP $MAINPID

[Install]
WantedBy=multi-user.target
10.启动MysqL服务
systemctl daemon-reload
systemctl enable --Now MysqLd
3、安装PHP
1、安装依赖包
yum -y install PHP-MysqLnd libxml2-devel bzip2-devel libmcrypt-devel sqlite-devel.x86_64 libcurl-devel libpng-devel libjpeg-devel libpng-devel openldap-devel freetype-devel gmp-devel readline-devel libxslt-devel mhash-devel

yum -y install libxml2 libxml2-devel openssl openssl-devel bzip2 bzip2-devel libcurl libcurl-devel libicu-devel libjpeg libjpeg-devel libpng libpng-devel openldap-devel  pcre-devel freetype freetype-devel gmp gmp-devel libmcrypt libmcrypt-devel readline readline-devel libxslt libxslt-devel mhash mhash-devel
2、下载并解压缩
1、依赖包:oniguruma-6.9.7
wget https://github.com/kkos/oniguruma/archive/v6.9.7.tar.gz -O oniguruma-6.9.7.tar.gz
tar -xvf oniguruma-6.9.4.tar.gz -C /usr/local/src

3、依赖包:libzip-1.2.0
yum remove libzip -y
wget https://libzip.org/download/libzip-1.2.0.tar.gz --no-check-certificate
tar -zxvf libzip-1.2.0.tar.gz

4、PHP-8.0.22主程序
wget https://www.PHP.net/distributions/PHP-8.0.22.tar.gz
tar -xvf PHP-8.0.22.tar.gz -C /usr/local/src

PHP7.4.30版本下载类似
wget https://www.PHP.net/distributions/PHP-7.4.30.tar.gz
3、编译安装
1、编译安装oniguruma
yum install -y autoconf automake libtool libsqlite3x-devel
cd /usr/local/src/oniguruma-6.9.7
./autogen.sh && ./configure --prefix=/usr --libdir=/lib64
需要有“--libdir=/lib64”参数,不然ldconfig找不到,PHP还是报错

2、编译安装libzip
cd /usr/local/src/libzip-1.2.0
./configure
make && make install
export PKG_CONfig_PATH="/usr/lib/pkgconfig/"
遇到报错6添加如下操作:
cd /etc/ld.so.conf.d/
vim libzip.conf
/usr/local/src/libzip-1.2.0/lib
ldconfig

3、编译安装PHP
cd /usr/local/src/PHP-8.0.22/ext/phar
cp phar.PHP phar.phar
cd /usr/local/src/PHP-8.0.22
./configure --prefix=/usr/local/PHP8 \
--with-config-file-path=/etc \
--with-openssl \
--with-pdo-MysqL=MysqLnd \
--with-config-file-scan-dir=/etc/PHP.d \
--with-freetype \
--with-jpeg \
--with-zlib-dir \
--with-curl \
--with-zip \
--with-MysqLi=MysqLnd \
--enable-fpm \
--enable-MysqLnd \
--enable-mbstring \
--enable-sockets \
--disable-fileinfo \
--disable-debug \
--disable-rpath \
--enable-shared \
--enable-soap \
--enable-bcmath \
--with-iconv \
--with-bz2 \
--enable-calendar \
--enable-exif  \
--enable-ftp \
--enable-gd \
--with-gettext \
--enable-pdo \
--with-readline \
--enable-shmop \
--enable-simplexml \
--with-pear \
--enable-pcntl \
--enable-posix

make -j 2 && make install
4、安装后配置
1、设置环境变量
echo 'export PATH=/usr/local/PHP8/bin:$PATH' > /etc/profile.d/PHP.sh
source /etc/profile.d/PHP.sh

2、校验
which PHP
PHP -v

3、配置文件
1)配置PHP.ini
cp -f /usr/local/src/PHP-8.0.22/PHP.ini-production /etc/PHP.ini    # 最重要的PHP配置文件

2)配置PHP-fpm(PHP管理工具)
	1>PHP-fpm启动脚本
cp /usr/local/src/PHP-8.0.22/sapi/fpm/init.d.PHP-fpm /etc/init.d/PHP-fpm
chmod +x /etc//init.d/PHP-fpm
	2>PHP-fpm配置文件
cd /usr/local/PHP8/etc/
cp PHP-fpm.conf.default PHP-fpm.conf
cp PHP-fpm.d/www.conf.default PHP-fpm.d/www.conf


4、配置启动服务PHP-fpm
cp /usr/lib/systemd/system/MysqLd.service /usr/lib/systemd/system/PHP-fpm.service
vim /usr/lib/systemd/system/PHP-fpm.service
[Unit]
Description=PHP server daemon
After=network.target

[Service]
Type=forking
ExecStart=/etc/init.d/PHP-fpm start
ExecStop=/etc/init.d/PHP-fpm stop
ExecReload=/bin/kill -HUP $MAINPID

[Install]
WantedBy=multi-user.target

5、 开机自启动
systemctl daemon-reload
systemctl enable --Now PHP-fpm
ss -ntla | grep 9000
ps aux | grep PHP
报错
报错1:源码编译 PHP 遇到缺失 No package sqlite3 found 问题
原因:缺少依赖包
解决:yum install -y sqlite-devel.x86_64


报错2:源码编译 PHP 遇到缺失 No package 'libcurl' found 问题
原因:缺少依赖包
解决:yum install -y libcurl-devel

报错3:源码编译 PHP 遇到缺失 No package 'libpng' found 问题
原因:缺少依赖包
解决:yum install -y libpng-devel

报错4:
No package 'oniguruma' found
Consider adjusting the PKG_CONfig_PATH environment variable if you
installed software in a non-standard prefix.
Alternatively, you may set the environment variables LIBZIP_CFLAGS
and LIBZIP_LIBS to avoid the need to call pkg-config.
See the pkg-config man page for more details.
原因:已经安装,但是PHP还是会报错,ldconfig找不到
解决办法:./configure --prefix=/usr --libdir=/lib64
需要有“--libdir=/lib64”参数,不然ldconfig找不到,PHP还是报错

报错5:
configure: error: Package requirements (libzip >= 0.11 libzip != 1.3.1 libzip != 1.7.0) were not met:
Requested 'libzip >= 0.11' but version of libzip is 0.10.1
原因:libzip提示版本太低,yum自带的是0.10
解决办法:
yum remove libzip -y
wget https://libzip.org/download/libzip-1.2.0.tar.gz --no-check-certificate
tar -zxvf libzip-1.2.0.tar.gz
cd libzip-1.2.0
./configure
make && make install
vim /etc/profile
export PKG_CONfig_PATH="/usr/lib/pkgconfig/"

或者:
rpm -Uvh http://rpms.remirepo.net/enterprise/remi-release-7.rpm
yum —enablerepo=remi install libzip5-devel

报错6:
error while loading shared libraries: libzip.so.5: cannot open shared object file: N
原因:ld提示找不到库文件,而库文件就在当前目录中,链接器ld默认的目录是/lib和/usr/lib,如果放在其他路径也可以,需要让ld知道库文件在哪里。
解决:
cd /etc/ld.so.conf.d/
vim libzip.conf
/usr/local/src/libzip-1.2.0/lib
ldconfig		# 更新/etc/ld.so.cache文件

报错7:
chmod: cannot access ‘ext/phar/phar.phar’: No such file or directory
make: [ext/phar/phar.phar] Error 1 (ignored)
原因:
解决办法:
cd /usr/local/src/PHP-8.0.22/ext/phar
cp phar.PHP phar.phar
以上三个软件就全部编译安装成功了,真的是PHP安装报错贼多,也贼耗时间
4、配置apache
1、FastCGI(动态应用相关的模块)的实现需要加载httpd2.4的两个模块
mod_proxy_fcgi.so (mod_proxy.so拓展)
mod_proxy.so
vim /usr/local/apache/conf/httpd.conf			// 取消注释
120 LoadModule proxy_module modules/mod_proxy.so
124 LoadModule proxy_fcgi_module modules/mod_proxy_fcgi.so
mkdir -p /usr/local/apache/htdocs/test
cd /usr/local/apache/htdocs/test
vim index.PHP
<?PHP
    PHPinfo();
?>
chown -R apache.apache /usr/local/apache/htdocs/
1、添加默认匹配的主页面
vim /usr/local/apache/conf/httpd.conf
<IfModule dir_module>
    DirectoryIndex index.html index.PHP			# 添加index.PHP
</IfModule>

2、搜索AddType,添加以下内容
AddType application/x-compress .Z
AddType application/x-gzip .gz .tgz
AddType application/x-httpd-PHP .PHP
AddType application/x-httpd-PHP-source .PHP

3、在配置文件的最后加入以下内容
<VirtualHost *:80>
     DocumentRoot "/usr/local/apache/htdocs/test"
     ServerName www.test.com
     ProxyRequests Off
     ProxyPassMatch ^/(.*\.PHP)$ fcgi://127.0.0.1:9000/usr/local/apache/htdocs/test/$1
     <Directory "/usr/local/apache/htdocs/test">
         Options none
         AllowOverride none
         Require all granted
     </Directory>
</VirtualHost>

4、重启服务
systemctl restart httpd
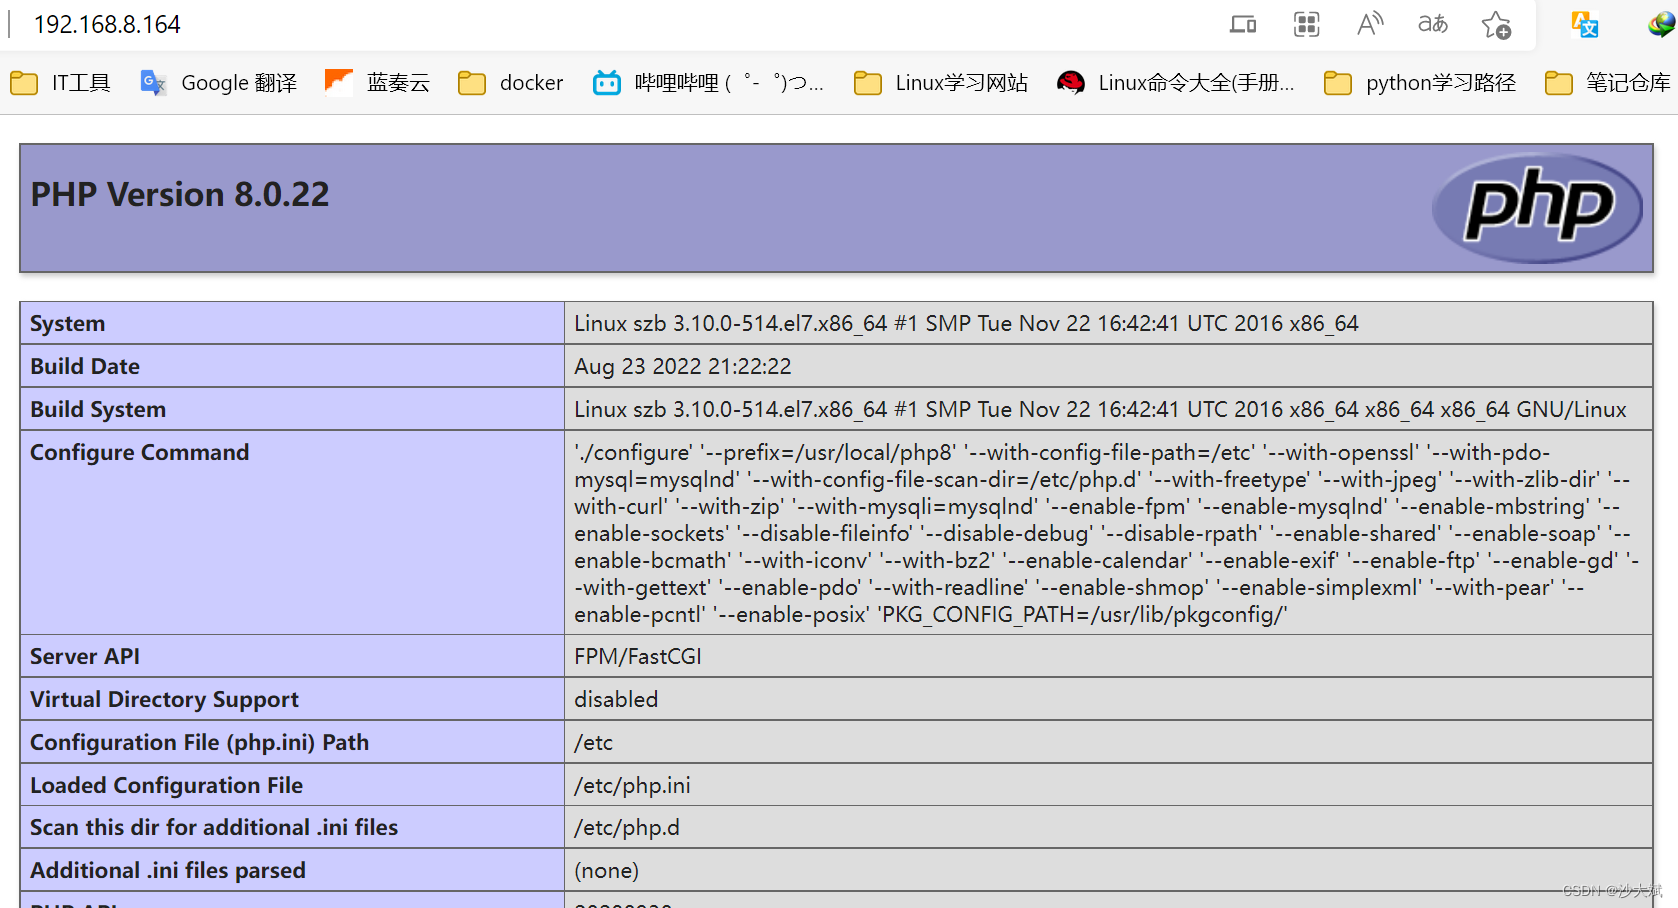
4、验证:
本地游览器输入:http://192.168.8.164/
原文地址:https://www.jb51.cc/wenti/3284467.html
版权声明:本文内容由互联网用户自发贡献,该文观点与技术仅代表作者本人。本站仅提供信息存储空间服务,不拥有所有权,不承担相关法律责任。如发现本站有涉嫌侵权/违法违规的内容, 请发送邮件至 dio@foxmail.com 举报,一经查实,本站将立刻删除。

