

2022年夏季《移动软件开发》实验报告
一、实验目标
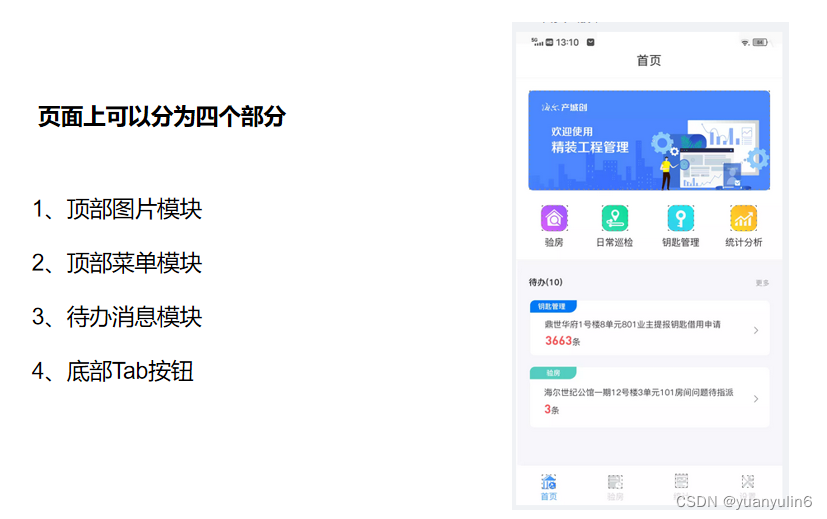
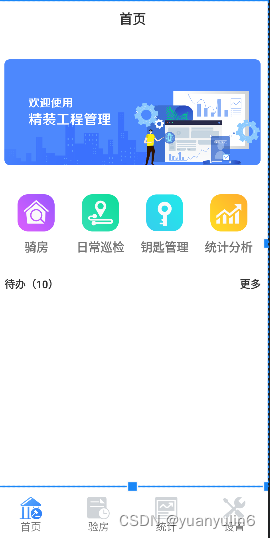
1.完成App的界面设计,效果如下:
二、实验步骤
列出实验的关键步骤、代码解析、截图。
1.准备工作
下载安装Android Studio,配置好相关的环境。
2.视图设计
1.首先要创建一个父布局,即linearLayou.
2.新建一个scrollView,用于上下滑动
3.在scrollView内部创建父布局
代码如下:
<?xml version="1.0" encoding="utf-8"?>
<LinearLayout xmlns:android="http://schemas.android.com/apk/res/android" android:layout_width="match_parent" android:layout_height="match_parent">
    <ScrollView
        android:layout_width="match_parent"
        android:layout_height="match_parent"
        android:orientation="horizontal"
        >

        <LinearLayout
            android:layout_width="match_parent"
            android:layout_height="match_parent"
            android:orientation="vertical">


        </LinearLayout>
    </ScrollView>


</LinearLayout>
<TextView
    android:layout_width="match_parent"
    android:layout_height="50dp"
    android:text="首页"
    android:textSize="18dp"
    android:textColor="#333"
    android:gravity="center"
    android:textStyle="bold">

</TextView>
加入图片
<ImageView
                android:layout_width="match_parent"
                android:layout_height="200dp"
                android:layout_marginRight="10dp"
                android:layout_marginLeft="10dp"
                android:src="@mipmap/test_img"/>
接下来是4个小图标和文本的区域。
我们先创建一个线性布局,然后把基本框架做好。
<LinearLayout
                android:layout_width="match_parent"
                android:layout_height="wrap_content"
                android:orientation="horizontal"
                android:weightSum="4"
                android:layout_marginRight="10dp"
                android:layout_marginLeft="10dp"
                >

                <LinearLayout
                    android:layout_width="0dp"
                    android:layout_height="100dp"
                    android:layout_weight="1"
                    android:orientation="vertical">
                    <ImageView
                        android:layout_width="50dp"
                        android:layout_height="50dp"
                        android:layout_marginTop="10dp"
                        android:layer_gravity="center_horizontal"
                        android:src="@mipmap/test_icon1"/>
                    <TextView
                        android:layout_width="match_parent"
                        android:layout_height="wrap_content"
                        android:text="骑房"
                        android:gravity="center"
                        android:layout_marginTop="10dp"
                        android:layout_marginRight="42dp"
                        android:textSize="16dp"
                        android:textStyle="bold"
                        />

                </LinearLayout>
完成四个图标后,效果如下:

接下来是做下面的待办的代码:
一样的套路,设置好边距,要注意scrollView组件下只能有一个组件,不然会报错。
<LinearLayout
                android:layout_width="match_parent"
                android:layout_height="wrap_content"
                android:orientation="horizontal"
                android:layout_marginTop="20dp">
                <TextView
                    android:layout_width="wrap_content"
                    android:layout_height="wrap_content"
                    android:text="待办(10)"
                    android:textStyle="bold"
                    android:textColor="#333"
                    android:layout_marginLeft="10dp"
                    android:layout_weight="1">

                </TextView>
                <TextView
                    android:layout_width="wrap_content"
                    android:layout_height="wrap_content"
                    android:text="更多"
                    android:textStyle="bold"
                    android:textColor="#333"
                    android:layout_marginLeft="10dp"
                    android:layout_marginRight="10dp"
                    >

                </TextView>


            </LinearLayout>
最后完成tabbar即可,注意tabbar应该在scorlview组件外,因为菜单栏不应该被一起滑动。
代码如下:
<LinearLayout
        android:layout_width="match_parent"
        android:layout_height="match_parent"
        android:orientation="horizontal"
        android:weightSum="4">


        <RelativeLayout
            android:layout_width="0dp"
            android:layout_height="match_parent"
            android:layout_weight="1">


            <ImageView
                android:id="@+id/img"
                android:layout_width="30dp"
                android:layout_height="30dp"
                android:layout_centerHorizontal="true"
                android:layout_marginLeft="20dp"
                android:layout_marginTop="15dp"
                android:background="@mipmap/test_icon3" />

            <TextView
                android:layout_width="match_parent"
                android:layout_height="wrap_content"
                android:gravity="center"
                android:text="首页"
                android:layout_below="@id/img"
                android:layout_centerHorizontal="true"/>


        </RelativeLayout>
        <RelativeLayout
            android:layout_width="0dp"
            android:layout_height="match_parent"
            android:layout_weight="1">


            <ImageView
                android:id="@+id/img2"
                android:layout_width="30dp"
                android:layout_height="30dp"
                android:layout_centerHorizontal="true"
                android:layout_marginLeft="20dp"
                android:layout_marginTop="15dp"
                android:background="@mipmap/daiban" />

            <TextView
                android:layout_width="match_parent"
                android:layout_height="wrap_content"
                android:gravity="center"
                android:text="验房"
                android:layout_below="@id/img2"
                android:layout_centerHorizontal="true"/>


        </RelativeLayout>
        <RelativeLayout
            android:layout_width="0dp"
            android:layout_height="match_parent"
            android:layout_weight="1">


            <ImageView
                android:id="@+id/img3"
                android:layout_width="30dp"
                android:layout_height="30dp"
                android:layout_centerHorizontal="true"
                android:layout_marginLeft="20dp"
                android:layout_marginTop="15dp"
                android:background="@mipmap/baobiao" />

            <TextView
                android:layout_width="match_parent"
                android:layout_height="wrap_content"
                android:gravity="center"
                android:text="统计"
                android:layout_below="@id/img3"
                android:layout_centerHorizontal="true"/>


        </RelativeLayout>
        <RelativeLayout
            android:layout_width="0dp"
            android:layout_height="match_parent"
            android:layout_weight="1">


            <ImageView
                android:id="@+id/img4"
                android:layout_width="30dp"
                android:layout_height="30dp"
                android:layout_centerHorizontal="true"
                android:layout_marginLeft="20dp"
                android:layout_marginTop="15dp"
                android:background="@mipmap/manage" />

            <TextView
                android:layout_width="match_parent"
                android:layout_height="wrap_content"
                android:gravity="center"
                android:text="设置"
                android:layout_below="@id/img4"
                android:layout_centerHorizontal="true"/>


        </RelativeLayout>

    </LinearLayout>
三、程序运行结果
四、问题总结与体会
遇到的问题
设计tabbar时,发现无法放在最下面。通过添加一层linear_layout解决。
心得体会
本次实验让我对于安卓开发有了一个进一步的了解,让我对于安卓的界面布局设计有了一定的理解,通过学习了布局方式(relative layer)和 基本组件(scroll view),让我对ui的布局设计有了更深的认识。
原文地址:https://www.jb51.cc/wenti/3284674.html
版权声明:本文内容由互联网用户自发贡献,该文观点与技术仅代表作者本人。本站仅提供信息存储空间服务,不拥有所有权,不承担相关法律责任。如发现本站有涉嫌侵权/违法违规的内容, 请发送邮件至 dio@foxmail.com 举报,一经查实,本站将立刻删除。

