目录
1 微服务基础知识
1.1 系统架构的演变
1.1.1 单体应用架构
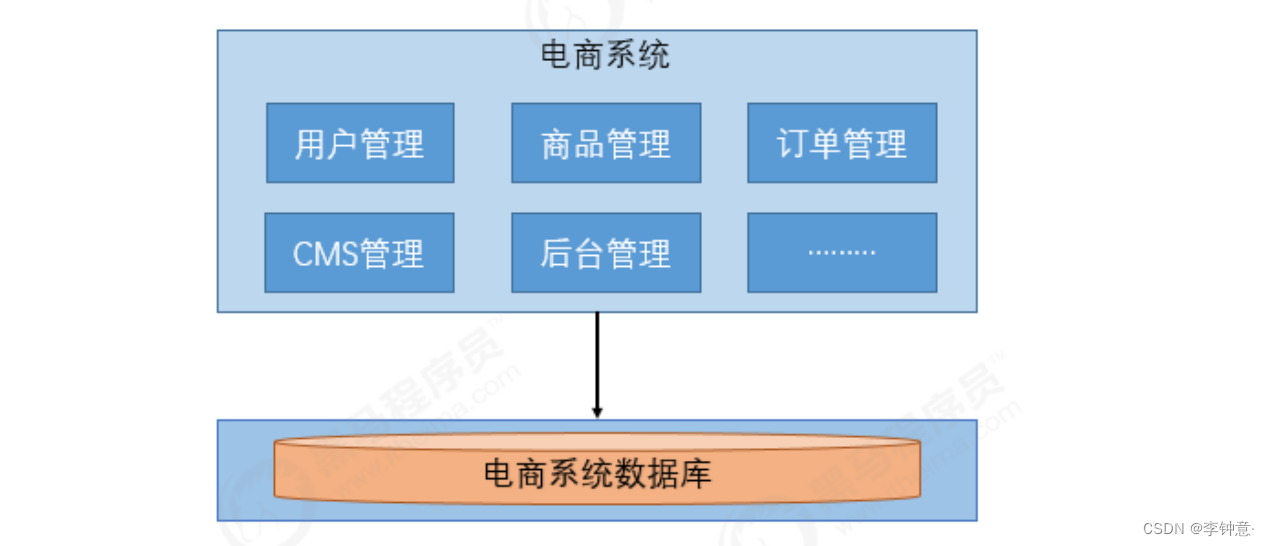
1.1.2 垂直应用架构
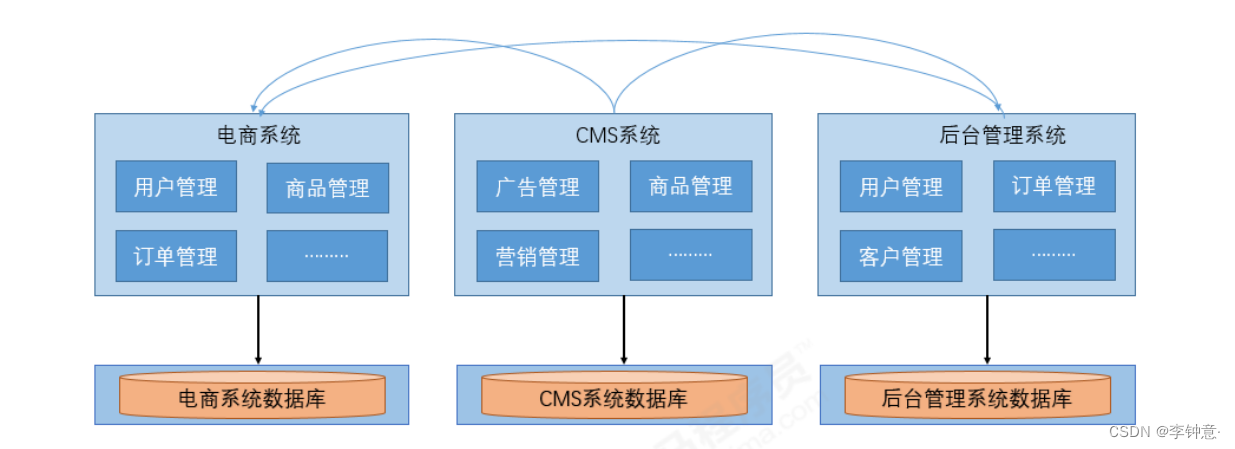
1.1.3 分布式SOA架构
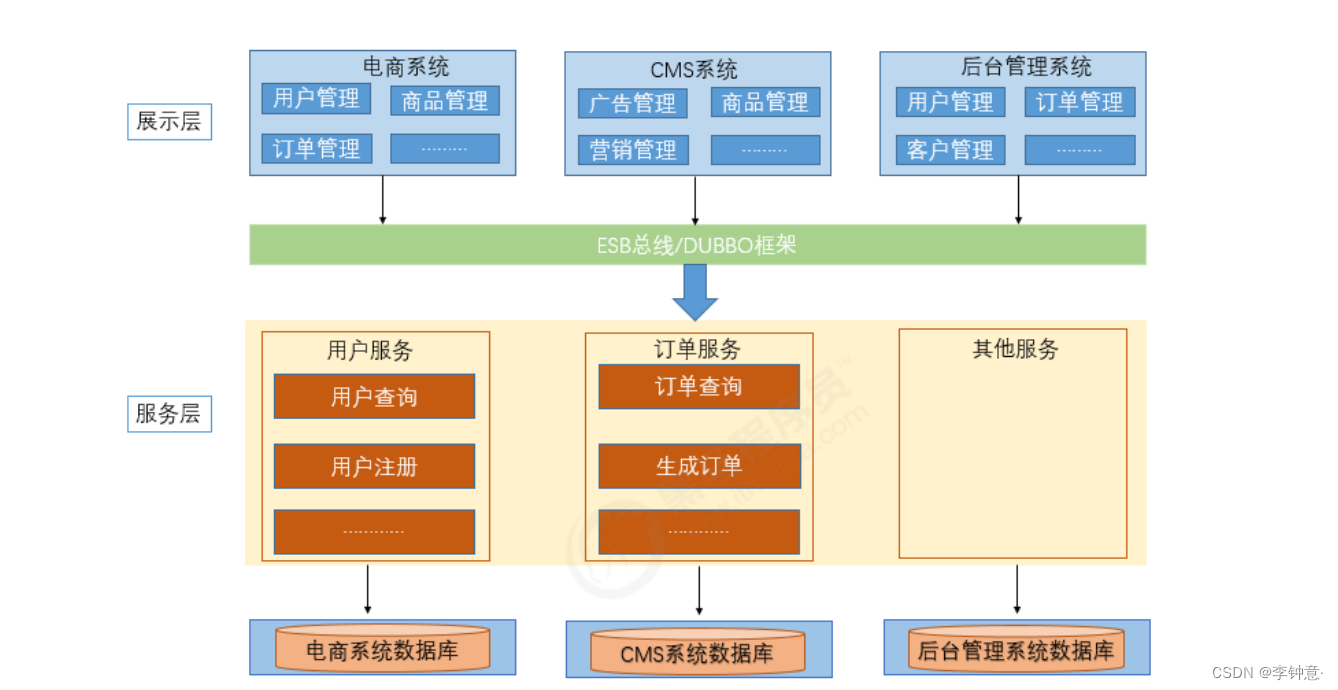
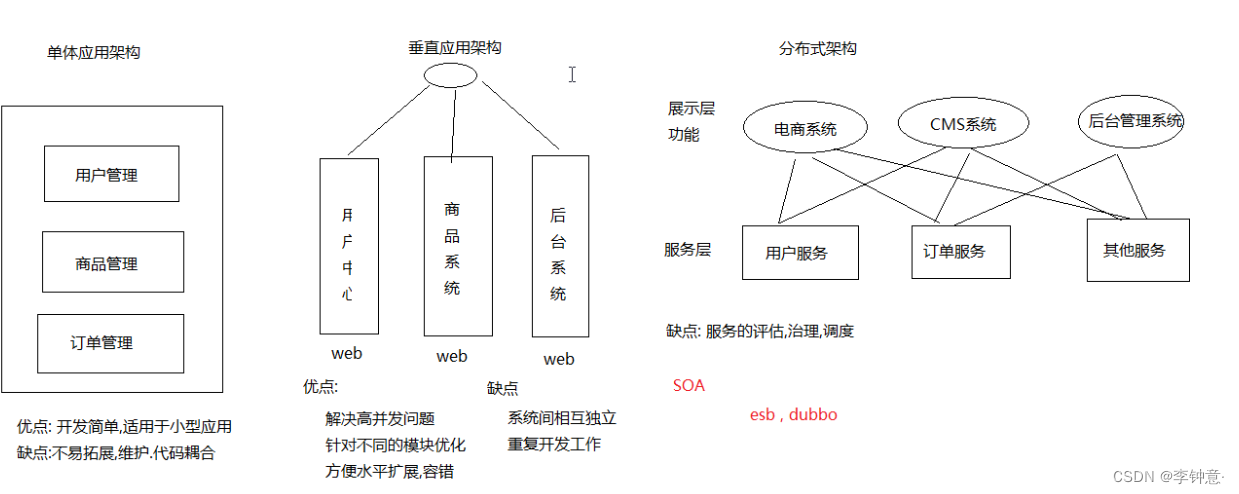
1.1.4 微服务架构

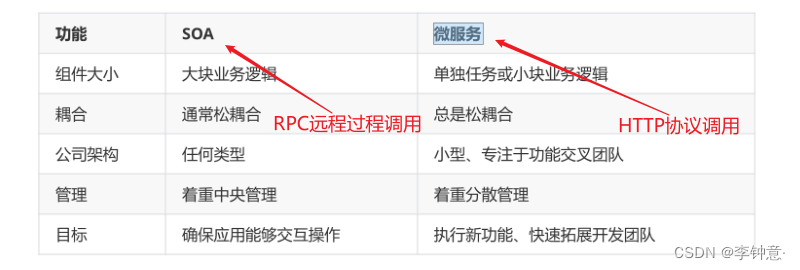
1.1.5 SOA与微服务的关系
1.2 分布式核心知识
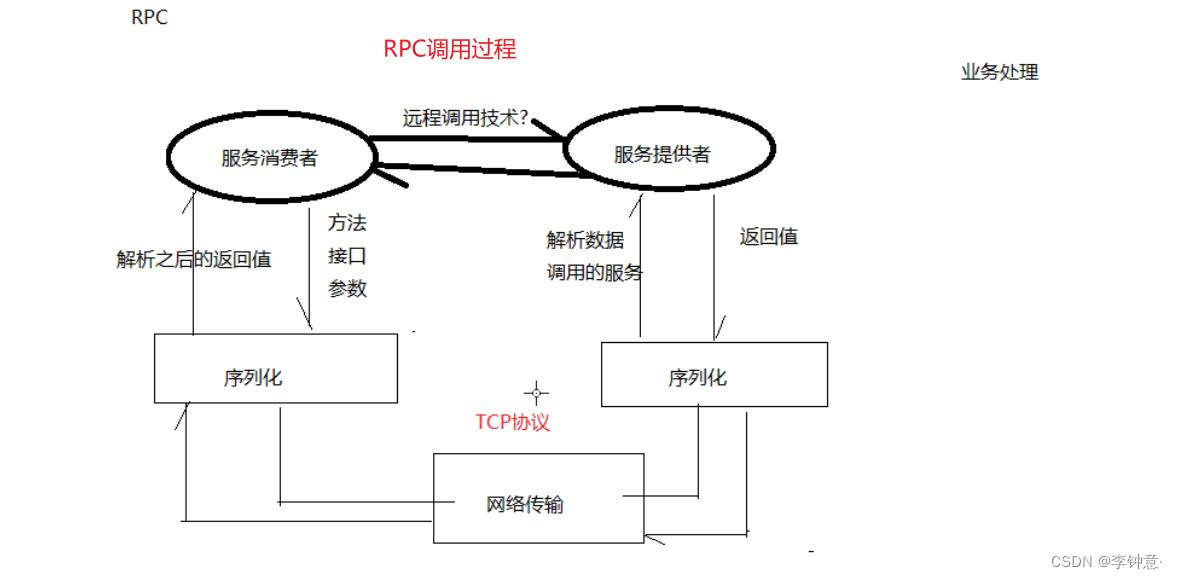
1.2.1 分布式中的远程调用
- 每一个URI代表一种资源;
- 客户端和服务器之间,传递这种资源的某种表现层;
- 客户端通过四个HTTP动词,对服务器端资源进行操作,实现"表现层状态转化"。

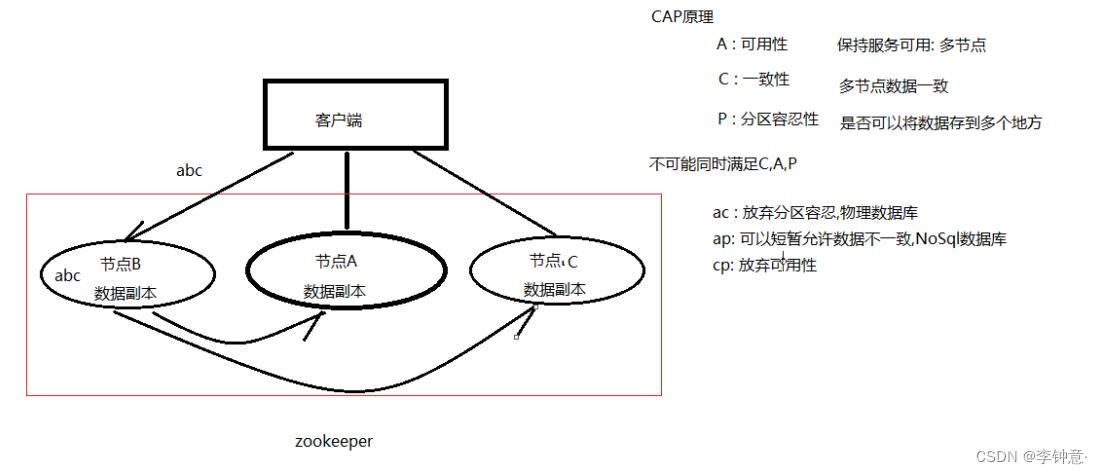
1.2.2 分布式中的CAP原理
- Consistency(一致性):数据一致更新,所有数据的变化都是同步的。
- Availability(可用性):在集群中一部分节点故障后,集群整体是否还能响应客户端的读写请求。
- Partition tolerance(分区容忍性):某个节点的故障,并不影响整个系统的运行。
- CA :放弃分区容错性,加强一致性和可用性,其实就是传统的关系型数据库的选择。
- AP :放弃一致性(这里说的一致性是强一致性),追求分区容错性和可用性,这是很多分布式系统设计时的选择,例如很多Nosql系统就是如此。
- CP :放弃可用性,追求一致性和分区容错性,基本不会选择,网络问题会直接让整个系统不可用。
1.3 常见微服务框架
1.3.1 SpringCloud
1.3.2 ServiceComb
Apache ServiceComb 是业界第一个Apache微服务顶级项目,是一个开源微服务解决方案,致力于帮助企业、用户和开发者将企业应用轻松微服务化上云,并实现对微服务应用的高效运维管理。其提供一站 式开源微服务解决方案,融合SDK框架级、0侵入ServiceMesh场景并支持多语言。
1.3.3 ZeroC ICE
2 SpringCloud概述
2.1 微服务中的相关概念
2.1.1 服务注册与发现
2.1.2 负载均衡
2.1.3 熔断
2.1.4 链路追踪
2.1.5 API网关
2.2 SpringCloud的介绍
2.3 SpringCloud的架构
2.3.1 SpringCloud中的核心组件
2.3.2 SpringCloud的体系结构
- 注册中心负责服务的注册与发现,很好将各服务连接起来
- 断路器负责监控服务之间的调用情况,连续多次失败进行熔断保护。
- API网关负责转发所有对外的请求和服务
- 配置中心提供了统一的配置信息管理服务,可以实时的通知各个服务获取最新的配置信息
- 链路追踪技术可以将所有的请求数据记录下来,方便我们进行后续分析
- 各个组件又提供了功能完善的dashboard监控平台,可以方便的监控各组件的运行状况
2.3 SpringCloud的架构
2.3.1 SpringCloud中的核心组件
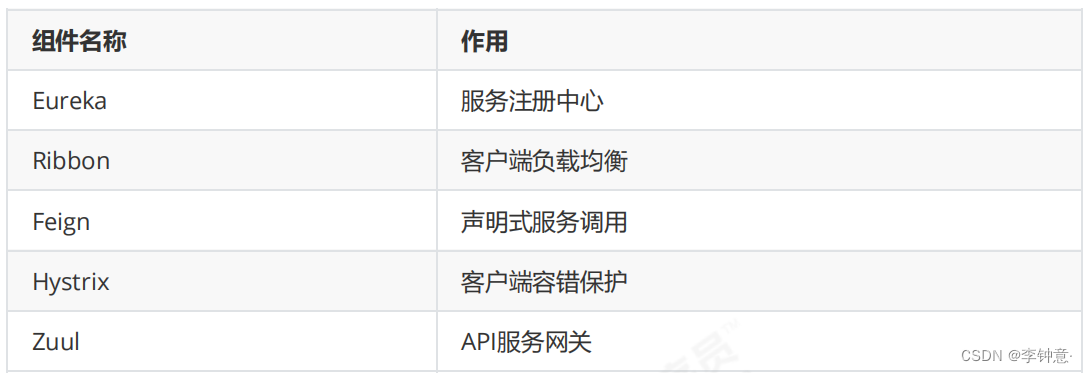
Spring Cloud Alibaba组件

Spring Cloud原生及其他组件

3 案例搭建
3.1 数据库表
CREATE TABLE `tb_user` (
 `id` int(11) NOT NULL AUTO_INCREMENT,
 `username` varchar(40) DEFAULT NULL COMMENT '用户名',
 `password` varchar(40) DEFAULT NULL COMMENT '密码',
 `age` int(3) DEFAULT NULL COMMENT '年龄',
 `balance` decimal(10,2) DEFAULT NULL COMMENT '余额',
 `address` varchar(80) DEFAULT NULL COMMENT '地址',
 PRIMARY KEY (`id`)
) ENGINE=InnoDB DEFAULT CHARSET=utf8CREATE TABLE `tb_product` (
`id` int(11) NOT NULL AUTO_INCREMENT,
`product_name` varchar(40) DEFAULT NULL COMMENT '名称',
`status` int(2) DEFAULT NULL COMMENT '状态',
`price` decimal(10,2) DEFAULT NULL COMMENT '单价',
`product_desc` varchar(255) DEFAULT NULL COMMENT '描述',
`caption` varchar(255) DEFAULT NULL COMMENT '标题',
`inventory` int(11) DEFAULT NULL COMMENT '库存',
PRIMARY KEY (`id`)
) ENGINE=InnoDB AUTO_INCREMENT=2 DEFAULT CHARSET=utf8CREATE TABLE `tb_order` (
`id` int(11) NOT NULL AUTO_INCREMENT,
`user_id` int(11) DEFAULT NULL COMMENT '用户id',
`product_id` int(11) DEFAULT NULL COMMENT '商品id',
`number` int(11) DEFAULT NULL COMMENT '数量',
`price` decimal(10,2) DEFAULT NULL COMMENT '单价',
`amount` decimal(10,2) DEFAULT NULL COMMENT '总额',
`product_name` varchar(40) DEFAULT NULL COMMENT '商品名',
`username` varchar(40) DEFAULT NULL COMMENT '用户名',
PRIMARY KEY (`id`)
) ENGINE=InnoDB DEFAULT CHARSET=utf8注意:MysqL创建数据库时设置字符集编码为utf8mb4,排序规则为utf8mb4_unicode_ci
create database test default character set utf8mb4 collate utf8mb4_unicode_ci;3.2 搭建环境
    <groupId>cn.itcast</groupId>
    <artifactId>spring_cloud_demo</artifactId>
    <packaging>pom</packaging>
    <version>1.0-SNAPSHOT</version>
    <modules>
        <module>product_service</module>
        <module>order_service</module>
        <module>eureka_server</module>
        <module>import_test</module>
    </modules>

    <parent>
        <groupId>org.springframework.boot</groupId>
        <artifactId>spring-boot-starter-parent</artifactId>
        <version>2.1.8.RELEASE</version>
    </parent>

    <properties>
        <project.build.sourceEncoding>UTF-8</project.build.sourceEncoding>
        <project.reporting.outputEncoding>UTF-8</project.reporting.outputEncoding>
        <java.version>1.8</java.version>
    </properties>

    <dependencies>
        <dependency>
            <groupId>org.springframework.boot</groupId>
            <artifactId>spring-boot-starter-web</artifactId>
        </dependency>
        <dependency>
            <groupId>org.springframework.boot</groupId>
            <artifactId>spring-boot-starter-logging</artifactId>
        </dependency>
        <dependency>
            <groupId>org.springframework.boot</groupId>
            <artifactId>spring-boot-starter-test</artifactId>
            <scope>test</scope>
        </dependency>

<!--        lombok省略get和set方法-->
        <dependency>
            <groupId>org.projectlombok</groupId>
            <artifactId>lombok</artifactId>
            <version>1.18.4</version>
            <scope>provided</scope>
        </dependency>
    </dependencies>

    <dependencyManagement>
        <dependencies>
            <dependency>
                <groupId>org.springframework.cloud</groupId>
                <artifactId>spring-cloud-dependencies</artifactId>
                <version>Greenwich.RELEASE</version>
                <type>pom</type>
                <scope>import</scope>
            </dependency>
        </dependencies>
    </dependencyManagement>

    <repositories>
        <repository>
            <id>spring-milestones</id>
            <name>Spring Milestones</name>
            <url>https://repo.spring.io/milestone</url>
            <snapshots>
                <enabled>false</enabled>
            </snapshots>
        </repository>
    </repositories>

    <build>
        <plugins>
            <plugin>
                <groupId>org.springframework.boot</groupId>
                <artifactId>spring-boot-maven-plugin</artifactId>
            </plugin>
        </plugins>
    </build>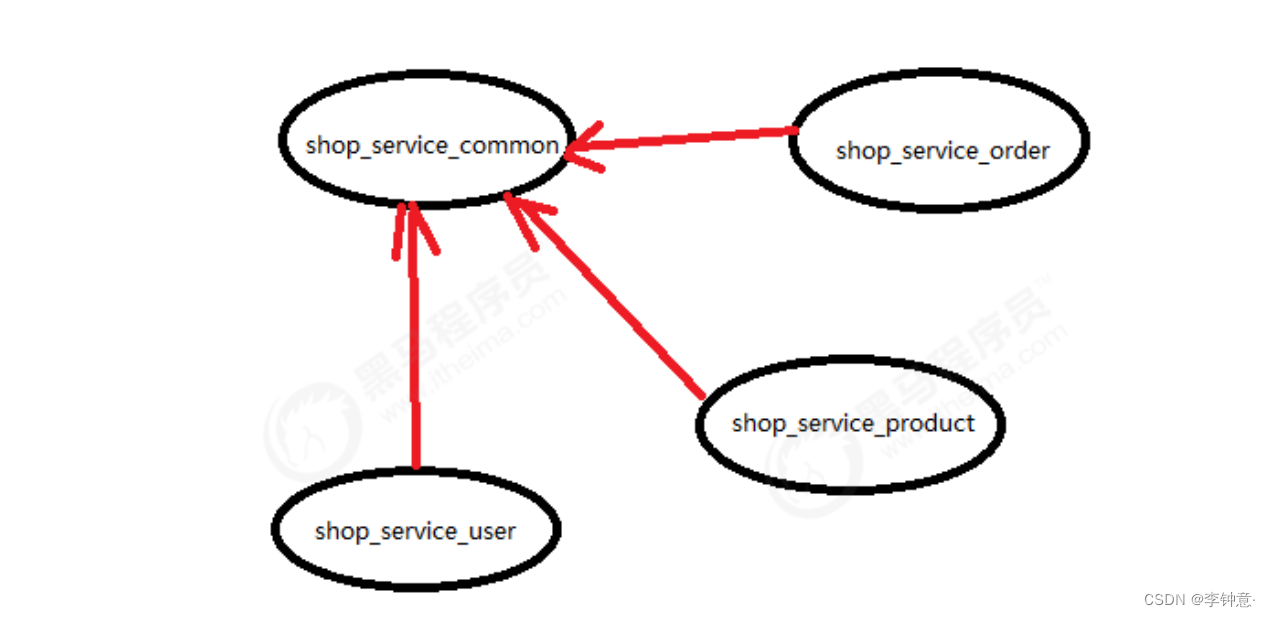
3.3 搭建商品微服务
3.3.1 编写实体类
在shop_service_common中创建 cn.awen.entity.Product 实体类,并配置。
@Data
@Entity
@Table(name="tb_product")
public class Product {
 @Id
 private Long id;
 private String productName;
 private Integer status;
 private BigDecimal price;
 private String productDesc;
 private String caption;
}3.3.2 编写dao接口
package cn.itcast.product.dao;

import cn.itcast.product.entity.Product;
import org.springframework.data.jpa.repository.JpaRepository;
import org.springframework.data.jpa.repository.JpaSpecificationExecutor;

/**
 * 接口继承
 */
public interface ProductDao extends JpaRepository<Product,Long>, JpaSpecificationExecutor<Product> {
}
3.3.3 编写service层
接口
package cn.itcast.product.service;

import cn.itcast.product.entity.Product;

public interface ProductService {

	/**
	 * 根据id查询
	 */
	Product findById(Long id);

	/**
	 * 保存
	 */
	void save(Product product);
	/**
	 * 更新
	 */
	void update(Product product);
	/**
	 * 删除
	 */
	void delete(Long id);
}
实现类
package cn.itcast.product.service.impl;

import cn.itcast.product.dao.ProductDao;
import cn.itcast.product.entity.Product;
import cn.itcast.product.service.ProductService;
import org.springframework.beans.factory.annotation.Autowired;
import org.springframework.stereotype.Service;

@Service
public class ProductServiceImpl implements ProductService {

	@Autowired
	private ProductDao productDao;

	@Override
	public Product findById(Long id) {
		return productDao.findById(id).get();
	}

	@Override
	public void save(Product product) {
		productDao.save(product);
	}

	@Override
	public void update(Product product) {
		productDao.save(product);
	}

	@Override
	public void delete(Long id) {
		productDao.deleteById(id);
	}
}
3.3.4 编写web层
@RestController
@RequestMapping("/product")
public class ProductController {
 @Autowired
 private ProductService productService;
 @GetMapping
 public List findAll() {
 return productService.findAll();
 }
 @GetMapping("/{id}")
 public Product findById(@PathVariable Long id) {
 return productService.findById(id);
 }
 @PostMapping
 public String save(@RequestBody Product product) {
 productService.save(product);
 return "保存成功";
 }
 @PutMapping("/{id}")
 public String update(@RequestBody Product product) {
 productService.update(product);
 return "修改成功";
 }
 @DeleteMapping("/{id}")
 public String delete(Long id) {
 productService.delete(id);
 return "删除成功";
 }
}
3.3.5 配置启动类
package cn.itcast.product;

import org.springframework.boot.SpringApplication;
import org.springframework.boot.autoconfigure.SpringBootApplication;
import org.springframework.boot.autoconfigure.domain.EntityScan;
import org.springframework.cloud.client.discovery.EnablediscoveryClient;
import org.springframework.cloud.netflix.eureka.EnableEurekaClient;

@SpringBootApplication
@EntityScan("cn.itcast.product.entity")

public class ProductApplication {

	public static void main(String[] args) {
		SpringApplication.run(ProductApplication.class,args);
	}
}
3.3.6 配置yml文件
server:
  port: 9011 #端口
spring:
  application:
    name: service-product #服务名称
  datasource:
    driver-class-name: com.MysqL.jdbc.Driver
    url: jdbc:MysqL://localhost:3306/shop?useUnicode=true&characterEncoding=utf8
    username: root
    password: 111111
  jpa:
    database: MysqL
    show-sql: true
    open-in-view: true
3.4 其他微服务

3.5 服务调用
3.5.1 RestTemplate介绍
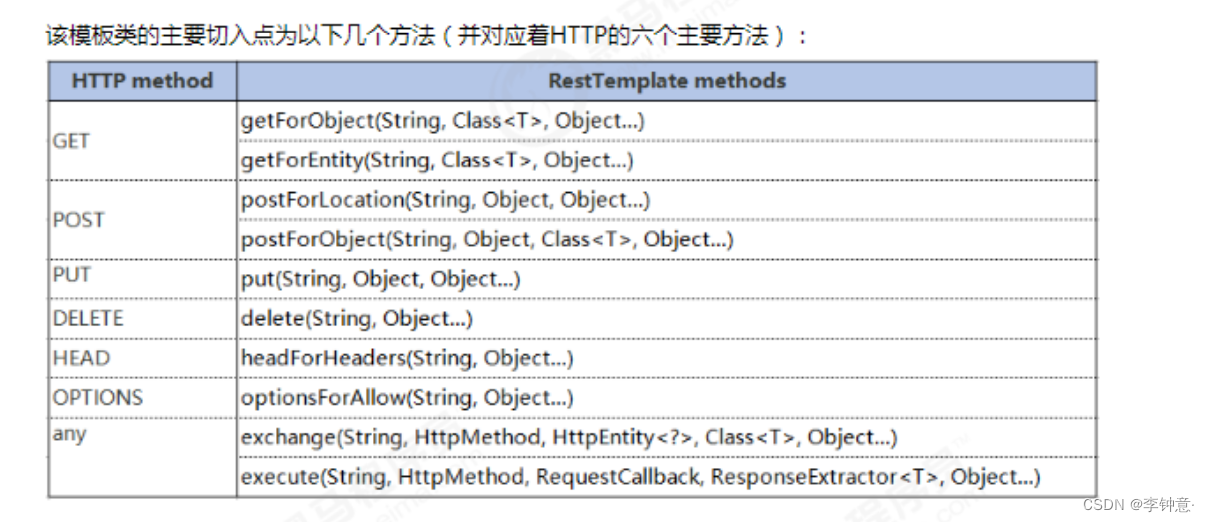
3.5.2 RestTemplate方法介绍
3.5.3 通过RestTemplate调用微服务
package cn.itcast.order;

import org.springframework.boot.SpringApplication;
import org.springframework.boot.autoconfigure.SpringBootApplication;
import org.springframework.boot.autoconfigure.domain.EntityScan;
import org.springframework.cloud.client.loadbalancer.LoadBalanced;
import org.springframework.context.annotation.Bean;
import org.springframework.web.client.RestTemplate;

@SpringBootApplication
@EntityScan("cn.itcast.order.entity")
public class OrderApplication {

	/**
	 * 使用spring提供的RestTemplate发送http请求到商品服务
	 *      1.创建RestTemplate对象交给容器管理
	 *      2.在使用的时候,调用其方法完成操作 (getXX,postxxx)
	 * * @LoadBalanced : 是ribbon提供的负载均衡的注解
	 */
	@LoadBalanced
	@Bean
	public RestTemplate restTemplate() {
		return new RestTemplate();
	}

	public static void main(String[] args) {
		SpringApplication.run(OrderApplication.class,args);
	}
}
package cn.itcast.order.controller;

import cn.itcast.order.entity.Product;
import org.springframework.beans.factory.annotation.Autowired;
import org.springframework.web.bind.annotation.PathVariable;
import org.springframework.web.bind.annotation.RequestMapping;
import org.springframework.web.bind.annotation.RequestMethod;
import org.springframework.web.bind.annotation.RestController;
import org.springframework.web.client.RestTemplate;

@RestController
@RequestMapping("/order")
public class OrderController {

	//注入restTemplate对象
	@Autowired
	private RestTemplate restTemplate;

	/**
	 * 参数:商品id
	 *  通过订单系统,调用商品服务根据id查询商品信息
	 *      1.需要配置商品对象
	 *      2.需要调用商品服务
	 *  使用java中的urlconnection,httpclient,okhttp
	 */
	@RequestMapping(value = "/buy/{id}",method = RequestMethod.GET)
	public Product findById(@PathVariable Long id) {
		Product product = null;
		//如何调用商品服务?
		product = restTemplate.getForObject("http://127.0.0.1:9001/product/1",Product.class);
		return product;
	}


}
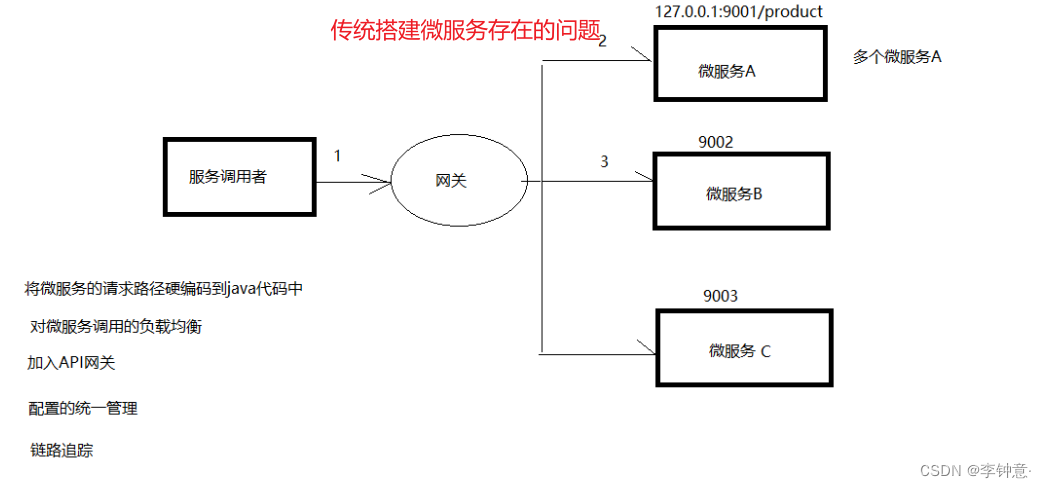
3.5.4 硬编码存在的问题
3 服务注册Eureka基础
3.1 微服务的注册中心
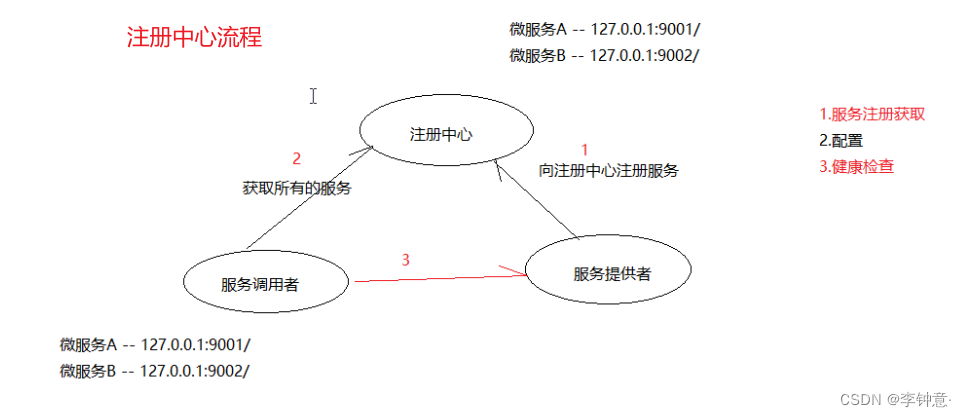
3.1.1 注册中心的主要作用
- 检测服务提供者的健康情况。

3.2 Eureka的概述
3.2.1 Eureka的基础知识
3.2.2 Eureka的交互流程与原理
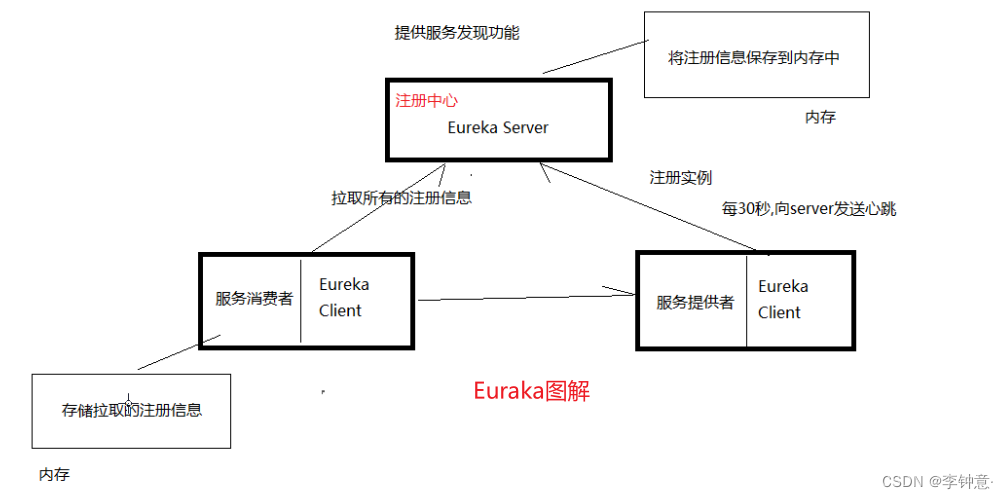
- Eureka Client是一个Java客户端,用于简化与Eureka Server的交互;
- Eureka Server提供服务发现的能力,各个微服务启动时,会通过Eureka Client向Eureka Server进行注册自己的信息(例如网络信息),Eureka Server会存储该服务的信息;微服务启动后,会周期性地向Eureka Server发送心跳(默认周期为30秒)以续约自己的信息。如果Eureka Server在一定时间内没有接收到某个微服务节点的心跳,Eureka Server将会注销该微服务节点(默认90秒);
- 每个Eureka Server同时也是Eureka Client,多个Eureka Server之间通过复制的方式完成服务注册表的同步;
- Eureka Client会缓存Eureka Server中的信息。即使所有的Eureka Server节点都宕掉,服务消费者依然可以使用缓存中的信息找到服务提供者。
- 综上,Eureka通过心跳检测、健康检查和客户端缓存等机制,提高了系统的灵活性、可伸缩性和可用性。
3.3 搭建Eureka注册中心
3.3.1 搭建Eureka服务中心
<!--引入euraka坐标-->
    <dependencies>
        <dependency>
            <groupId>org.springframework.cloud</groupId>
            <artifactId>spring-cloud-starter-netflix-eureka-server</artifactId>
        </dependency>
    </dependencies>
server:
  port: 9000 #端口
#配置eureka server
eureka:
  instance:
    hostname: localhost
  client:
    register-with-eureka: false #是否将自己注册到注册中心
    fetch-registry: false #是否从eureka中获取注册信息
    service-url: #配置暴露给Eureka Client的请求地址
      defaultZone: http://${eureka.instance.hostname}:${server.port}/eureka/
package cn.itcast.eureka;

import org.springframework.boot.SpringApplication;
import org.springframework.boot.autoconfigure.SpringBootApplication;
import org.springframework.cloud.netflix.eureka.server.EnableEurekaServer;


@SpringBootApplication
//激活eureakaserver
@EnableEurekaServer
public class EurekaServerApplication {

	public static void main(String[] args) {
		SpringApplication.run(EurekaServerApplication.class,args);
	}
}
3.3.2 服务注册中心管理后台

3.4 服务注册到Eureka注册中心
3.4.1 商品服务注册
        <!--引入EurekaClient-->
        <dependency>
            <groupId>org.springframework.cloud</groupId>
            <artifactId>spring-cloud-starter-netflix-eureka-client</artifactId>
</dependency>#配置Eureka
eureka:
client:
service-url:
defaultZone: http://localhost:9000/eureka/ #多个eurekaserver之间用,隔开
instance:
prefer-ip-address: true #使用ip地址注册package cn.itcast.eureka;
import org.springframework.boot.SpringApplication;
import org.springframework.boot.autoconfigure.SpringBootApplication;
import org.springframework.cloud.netflix.eureka.server.EnableEurekaServer;
@SpringBootApplication
//激活eureakaserver
@EnableEurekaServer
public class EurekaServerApplication {
public static void main(String[] args) {
SpringApplication.run(EurekaServerApplication.class,args);
}
}
3.4.2 订单服务注册
3.4.3 用户服务注册
3.5 Eureka中的自我保护
3.6 Eureka中的元数据
@RequestMapping(value = "/buy/{id}",method = RequestMethod.GET)
public Product findById(@PathVariable Long id) {
/**
* 注入discoveryClient :
* springcloud提供的获取原数组的工具类
* 调用方法获取服务的元数据信息
*
*/
//调用discoveryClient方法
//已调用服务名称获取所有的元数据
List<ServiceInstance> instances = discoveryClient.getInstances("service-product");
//获取唯一的一个元数据
ServiceInstance instance = instances.get(0);
//根据元数据中的主机地址和端口号拼接请求微服务的URL
Product product = null;
//如何调用商品服务?
product = restTemplate.getForObject("http://"+instance.getHost()+":"+instance.getPort()+"/product/1",Product.class);
return product;4 服务注册Eureka高级
4.1 Eureka Server 高可用集群
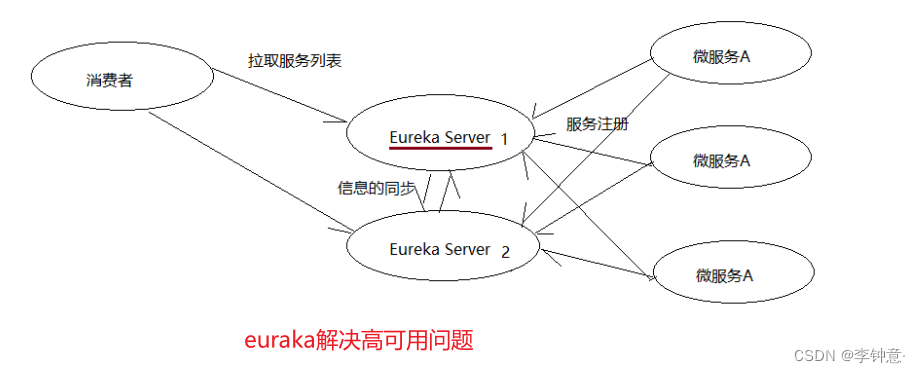
4.1.1 搭建 Eureka Server高可用集群
#模拟两个EurekaServer
#端口9000 8000
#两个server相互注册
#配置eureka server
spring:
application:
name: eureka-server
server:
port: 9000 #端口
eureka:
instance:
hostname: localhost
client:
register-with-eureka: true#是否将自己注册到注册中心
fetch-registry: true#是否从eureka中获取注册信息
service-url: #配置暴露给Eureka Client的请求地址
defaultZone: http://127.0.0.1:8000/eureka/
#模拟两个EurekaServer
#端口9000 8000
#两个server相互注册
#配置eureka server
spring:
application:
name: eureka-server
server:
port: 8000 #端口
eureka:
instance:
hostname: localhost
client:
register-with-eureka: true#是否将自己注册到注册中心
fetch-registry: true#是否从eureka中获取注册信息
service-url: #配置暴露给Eureka Client的请求地址
defaultZone: http://127.0.0.1:9000/eureka/
#配置Eureka
eureka:
client:
service-url:
defaultZone: http://localhost:9000/eureka/,http://localhost:8000/eureka/4.2 Eureka中的常见问题
#配置Eureka
eureka:
instance:
preferIpAddress: true
lease-expiration-duration-in-seconds: 10 #eureka client发送心跳给server端后,续
约到期时间(默认90秒)
lease-renewal-interval-in-seconds: 5 #发送心跳续约间隔在Eureka Server的管控台中,显示的服务实例名称默认情况下是微服务定义的名称和端口。为了更好的对所有服务进行定位,微服务注册到Eureka Server的时候可以手动配置示例ID。配置方式如下:
#配置Eureka
eureka:
instance:
prefer-ip-address: true #使用ip地址注册
instance-id: ${spring.cloud.client.ip-address}:${server.port} #向注册中心中注册服务id4.2.4 自我保护
统计十五分钟内心跳比例是否低于85%,如果是则开启自我保护模式,不在对宕机的服务进行剔除。
#配置eureka server
eureka:
server:
enable-self-preservation: false #关闭自我保护
eviction-interval-timer-in-ms: 4000 #剔除服务间隔4.3 Eureka源码解析
4.3.1 SpringBoot中的自动装载
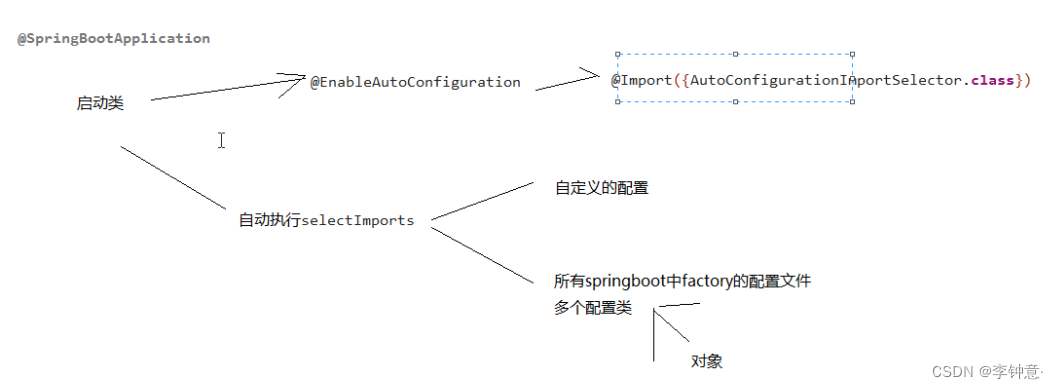
5 Ereka替换方案Consul
5.1 Eureka闭源的影响
5.1.1 Eureka闭源影响
5.1.2 Eureka的替换方案
5.2 什么是consul
5.2.1 consul 概述
5.2.2 consul与Eureka的区别
5.2.3 consul的下载与安装
consul agent -dev -client=0.0.0.0http://127.0.0.1:85005.3 consul的基本使用
5.3.1 服务注册与发现
5.3.2 Consul的KV存储
5.4 基于consul的服务注册
5.4.1 案例准备
<!--springcloud 提供的对基于consul的服务发现-->
<dependency>
<groupId>org.springframework.cloud</groupId>
<artifactId>spring-cloud-starter-consul-discovery</artifactId>
</dependency>
<!--actuator的健康检查-->
<dependency>
<groupId>org.springframework.boot</groupId>
<artifactId>spring-boot-starter-actuator</artifactId>
</dependency>5.4.2 配置服务注册
###开始配置consul的服务注册
cloud:
consul:
host: 127.0.0.1 #consul服务器的主机地址
port: 8500 #consul服务器的ip地址
discovery:
#是否需要注册
register: true
#注册的实例ID (唯一标志)
instance-id: ${spring.application.name}-1
#服务的名称
service-name: ${spring.application.name}
#服务的请求端口
port: ${server.port}
#指定开启ip地址注册
prefer-ip-address: true
#当前服务的请求ip
ip-address: ${spring.cloud.client.ip-address}5.4.3 在控制台中查看服务列表
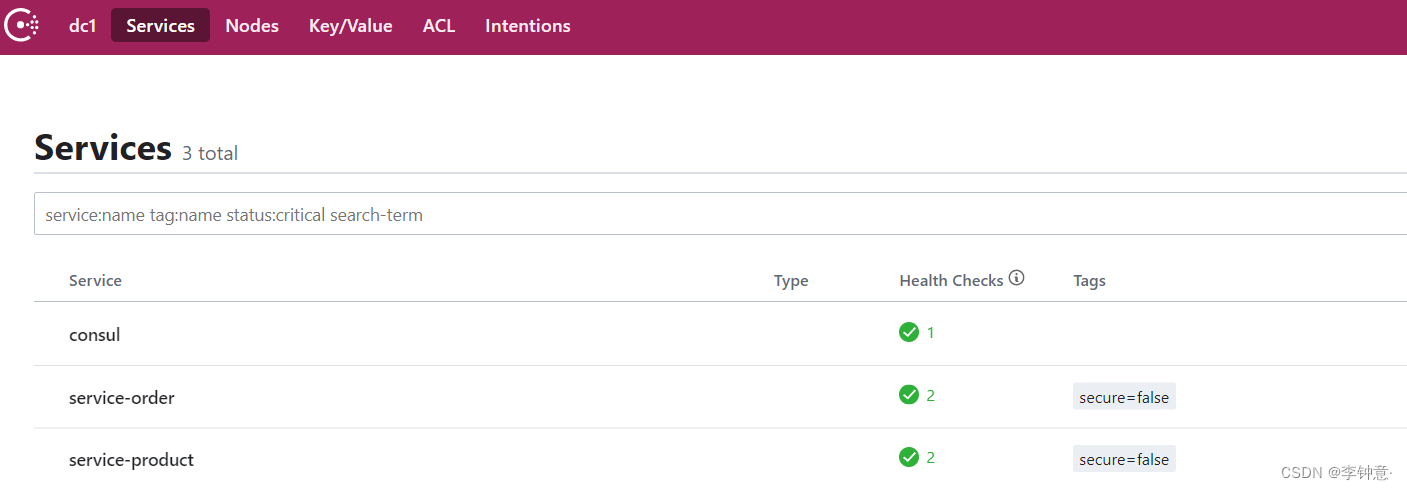
5.5 基于consul的服务发现

5.6 consul高可用集群
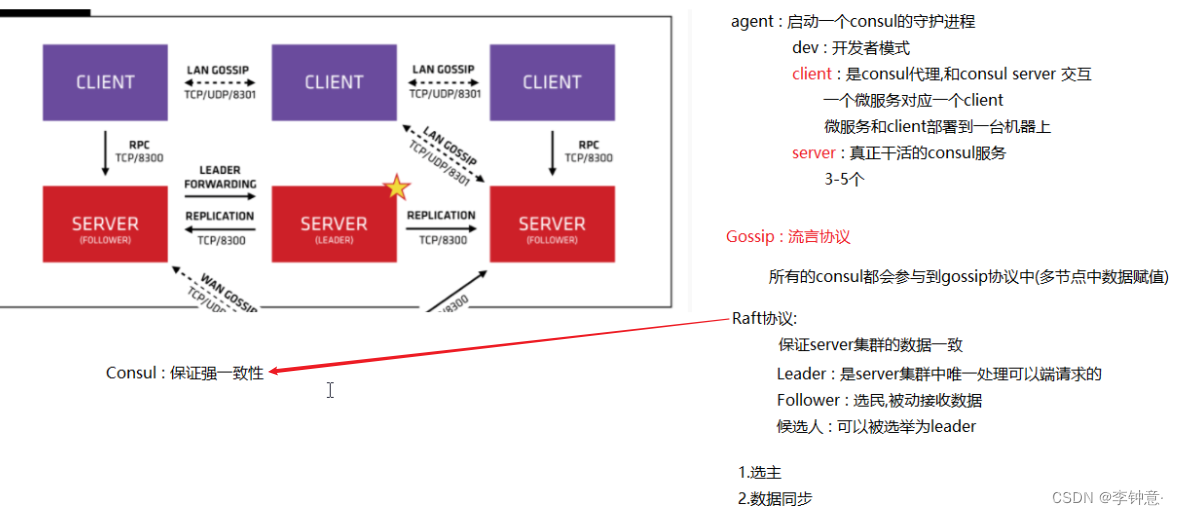
5.6.1 Consul的核心知识
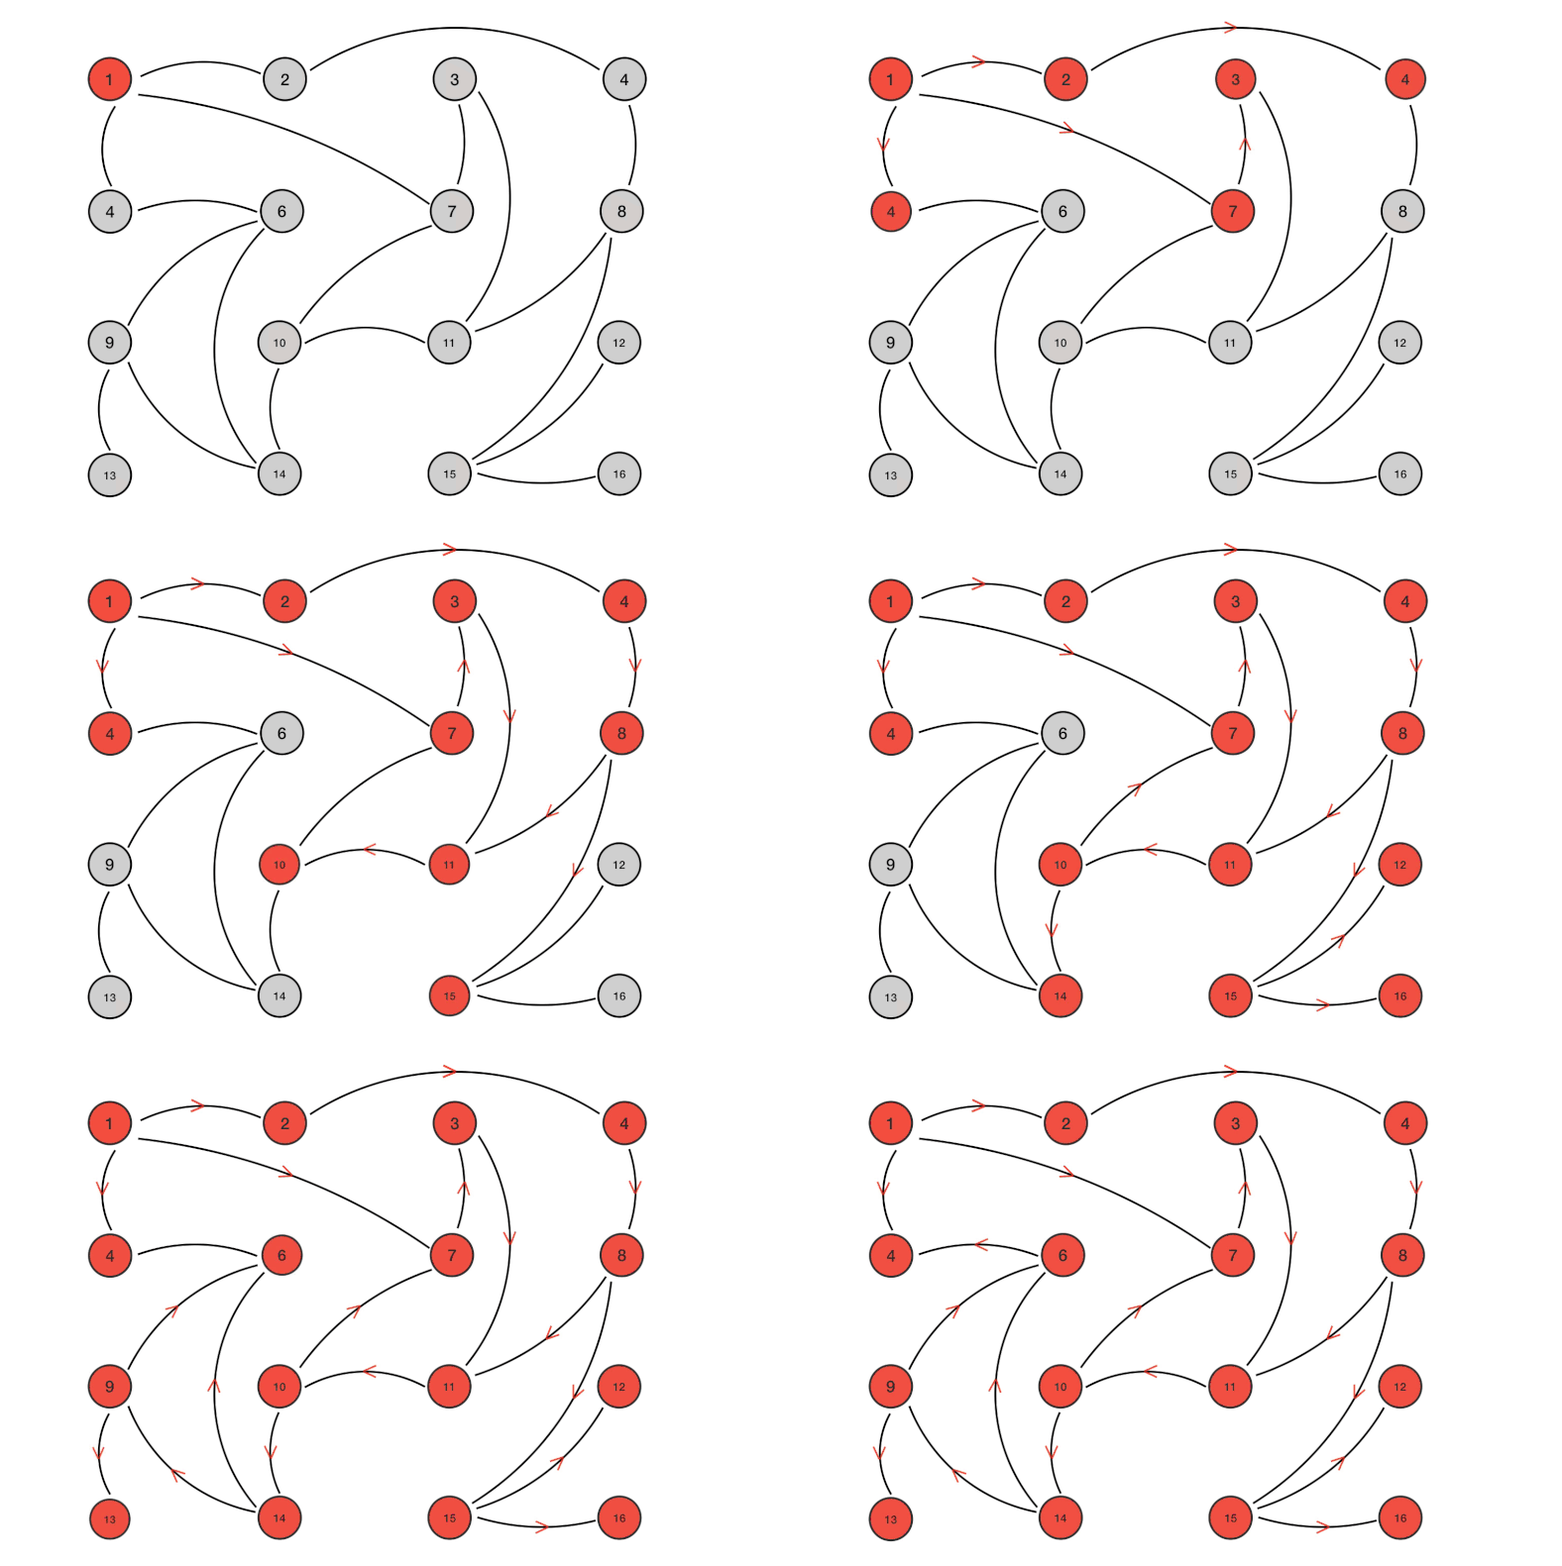
RAFT一致性算法
为了实现集群中多个ConsulServer中的数据保持一致性,consul使用了基于强一致性的RAFT算法。
5.6.2 Consul 集群搭建
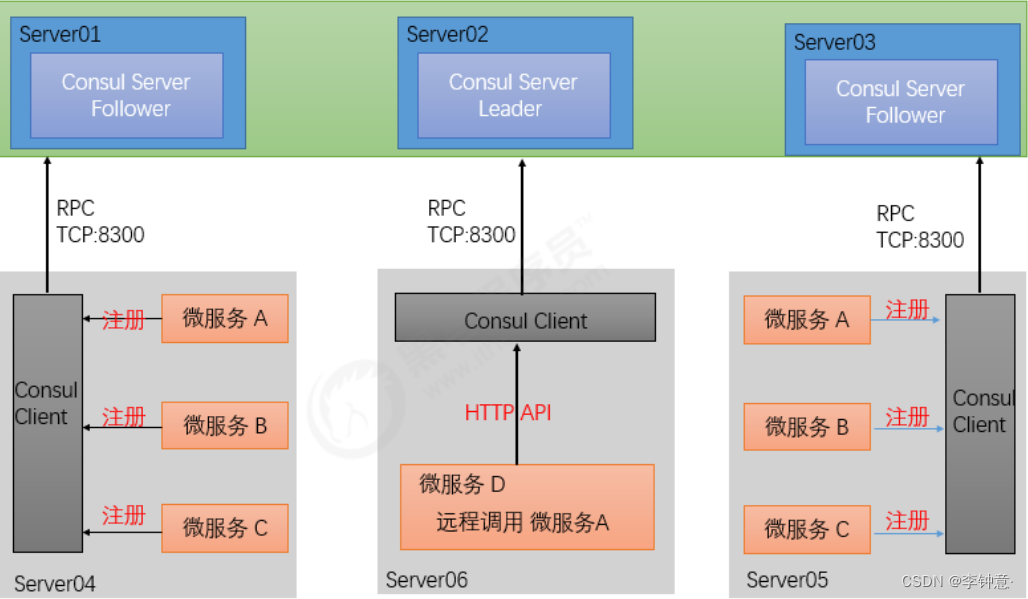
首先需要有一个正常的Consul集群,有Server,有leader。这里在服务器Server1、Server2、Server3上分别部署了Consul Server。(这些服务器上最好只部署Consul程序,以尽量维护Consul Server的稳定。
(1)准备环境

- Agent 以 client 模式启动的节点。在该模式下,该节点会采集相关信息,通过 RPC 的方式向server 发送。Client模式节点有无数个,官方建议搭配微服务配置
- Agent 以 server 模式启动的节点。一个数据中心中至少包含 1 个 server 节点。不过官方建议使用3 或 5 个 server 节点组建成集群,以保证高可用且不失效率。server 节点参与 Raft、维护会员信息、注册服务、健康检查等功能。
##从官网下载最新版本的Consul服务
wget https://releases.hashicorp.com/consul/1.5.3/consul_1.5.3_linux_amd64.zip
##使用unzip命令解压
unzip consul_1.5.3_linux_amd64.zip
##将解压好的consul可执行命令拷贝到/usr/local/bin目录下
cp consul /usr/local/bin
##测试一下
consul##登录s1虚拟机,以server形式运行
consul agent -server -bootstrap-expect 3 -data-dir /etc/consul.d -node=server-1
-bind=192.168.74.101 -ui -client 0.0.0.0 &
##登录s2 虚拟机,以server形式运行
consul agent -server -bootstrap-expect 2 -data-dir /etc/consul.d -node=server-2
-bind=192.168.74.102 -ui -client 0.0.0.0 &
##登录s3 虚拟机,以server形式运行
consul agent -server -bootstrap-expect 2 -data-dir /etc/consul.d -node=server-3
-bind=192.168.74.103 -ui -client 0.0.0.0 &##在本地电脑中使用client形式启动consul
consul agent -client=0.0.0.0 -data-dir /etc/consul.d -node=client-1server:以server身份启动。
- -bootstrap-expect:集群要求的最少server数量,当低于这个数量,集群即失效。
- -data-dir:data存放的目录,更多信息请参阅consul数据同步机制
- -node:节点id,在同一集群不能重复。
- -client:客户端的ip地址(0.0.0.0表示不限制)
- & :在后台运行,此为linux脚本语法
(3)每个节点加入集群
在s2,s3,s4 服务其上通过consul join 命令加入 s1中的consul集群中。
##加入consul集群
consul join 192.168.74.101(4)测试

5.6.3 Consul 常见问题
- 注销任意节点和服务:/catalog/deregister
- 注销当前节点的服务:/agent/service/deregister/:service_id
- 在集群环境下,健康检查是由服务注册到的Agent来处理的,那么如果这个Agent挂掉了,那么此节点的健康检查就处于无人管理的状态。
- consul members从实际应用看,节点上的服务可能既要被发现,又要发现别的服务,如果节点挂掉了,仅提供被发现的功能实际上服务还是不可用的。当然发现别的服务也可以不使用本机节点,可以通过访问一个Nginx实现的若干Consul节点的负载均衡来实现。
6 服务调用Ribbon入门
6.2 Ribbon概述
6.2.1 什么是Ribbon
6.2.2 Ribbon的主要作用
(1)服务调用
基于Ribbon实现服务调用,是通过拉取到的所有服务列表组成(服务名-请求路径的)映射关系。借助RestTemplate 最终进行调用。
(3)超时与重试
6.3 基于Ribbon实现服务调用
6.3.1 坐标依赖
6.3.2 工程改造
/**
* 基于ribbon的形式调用远程微服务
* 1.使用@LoadBalanced声明RestTemplate
* 2.使用服务名称替换ip地址
*/
@RequestMapping(value = "/buy/{id}",method = RequestMethod.GET)
public Product findById(@PathVariable Long id) {
Product product = null;
product = restTemplate.getForObject("http://service-product/product/1",Product.class);
return product;
}(2)服务消费者
package cn.itcast.order;
import org.springframework.boot.SpringApplication;
import org.springframework.boot.autoconfigure.SpringBootApplication;
import org.springframework.boot.autoconfigure.domain.EntityScan;
import org.springframework.cloud.client.loadbalancer.LoadBalanced;
import org.springframework.context.annotation.Bean;
import org.springframework.web.client.RestTemplate;
@SpringBootApplication
@EntityScan("cn.itcast.order.entity")
public class OrderApplication {
/**
* 使用spring提供的RestTemplate发送http请求到商品服务
* 1.创建RestTemplate对象交给容器管理
* 2.在使用的时候,调用其方法完成操作 (getXX,postxxx)
* * @LoadBalanced : 是ribbon提供的负载均衡的注解
*/
@LoadBalanced
@Bean
public RestTemplate restTemplate() {
return new RestTemplate();
}
public static void main(String[] args) {
SpringApplication.run(OrderApplication.class,args);
}
}
6.3.3 代码测试
6.4 基于Ribbon实现负载均衡
6.4.1 什么是负载均衡
6.4.2 客户端负载均衡与服务端负载均衡

6.4.3 搭建多服务实例
server:
port: 9011 #端口
spring:
application:
name: service-product #服务名称
datasource:
driver-class-name: com.MysqL.jdbc.Driver
url: jdbc:MysqL://localhost:3306/shop?useUnicode=true&characterEncoding=utf8
username: root
password: 123456
jpa:
database: MysqL
show-sql: true
open-in-view: true
#配置Eureka
eureka:
  client:
    service-url:
      defaultZone: http://localhost:9000/eureka/ #多个eurekaserver之间用,隔开
  instance:
    prefer-ip-address: true #使用ip地址注册
instance-id: ${spring.cloud.client.ip-address}:${server.port} #向注册中心中注册服务id
server:
  port: 9001 #端口
spring:
  application:
    name: service-product #服务名称
  datasource:
    driver-class-name: com.MysqL.jdbc.Driver
    url: jdbc:MysqL://localhost:3306/shop?useUnicode=true&characterEncoding=utf8
    username: root
    password: 123456
  jpa:
    database: MysqL
    show-sql: true
    open-in-view: true
#配置Eureka
eureka:
  client:
    service-url:
      defaultZone: http://localhost:9000/eureka/ #多个eurekaserver之间用,隔开
  instance:
    prefer-ip-address: true #使用ip地址注册
    instance-id: ${spring.cloud.client.ip-address}:${server.port} #向注册中心中注册服务id
6.4.4 负载均衡策略
- com.netflix.loadbalancer.RoundRobinRule :以轮询的方式进行负载均衡。
- com.netflix.loadbalancer.Randomrule :随机策略
- com.netflix.loadbalancer.RetryRule :重试策略。
- com.netflix.loadbalancer.WeightedResponseTimeRule :权重策略。会计算每个服务的权重,越高的被调用的可能性越大。
- com.netflix.loadbalancer.BestAvailableRule :最佳策略。遍历所有的服务实例,过滤掉故障实例,并返回请求数最小的实例返回。
- com.netflix.loadbalancer.AvailabilityFilteringRule :可用过滤策略。过滤掉故障和请求数超过阈值的服务实例,再从剩下的实力中轮询调用。
#修改ribbon的负载均衡策略   服务名 -  ribbon - NFLoadBalancerRuleClassName : 策略
service-product:
  ribbon:
NFLoadBalancerRuleClassName: com.netflix.loadbalancer.Randomrule6.5 基于Ribbon实现超时与重试
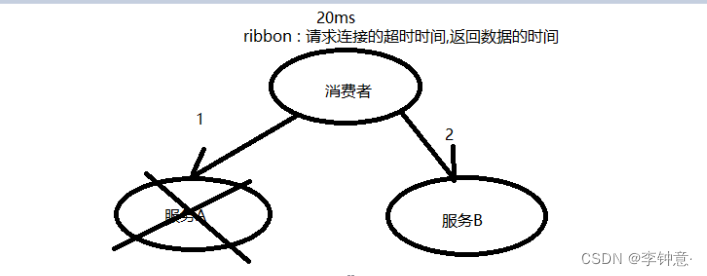
6.5.1 引入spring的重试坐标
        <!--        引入重试的坐标-->
        <dependency>
            <groupId>org.springframework.retry</groupId>
            <artifactId>spring-retry</artifactId>
        </dependency>
6.5.2 在消费者appllication.yal中配置
#修改ribbon的负载均衡策略   服务名 -  ribbon - NFLoadBalancerRuleClassName : 策略
service-product:
  ribbon:
    ConnectTimeout: 250 # Ribbon的连接超时时间
    ReadTimeout: 1000 # Ribbon的数据读取超时时间
    OkToRetryOnAllOperations: true # 是否对所有操作都进行重试
    MaxAutoRetriesNextServer: 1 # 切换实例的重试次数
    MaxAutoRetries: 1 # 对当前实例的重试次数
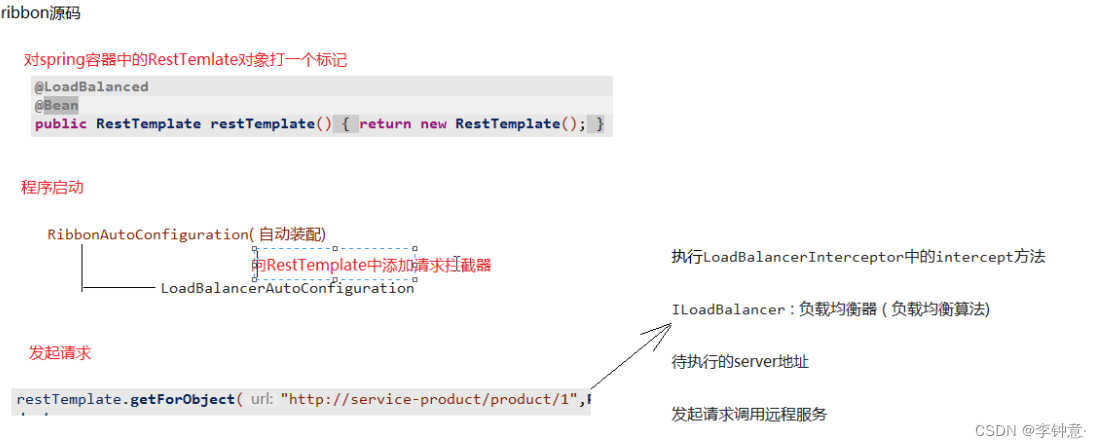
6.6 Ribbon中负载均衡的源码解析
版权声明:本文内容由互联网用户自发贡献,该文观点与技术仅代表作者本人。本站仅提供信息存储空间服务,不拥有所有权,不承担相关法律责任。如发现本站有涉嫌侵权/违法违规的内容, 请发送邮件至 dio@foxmail.com 举报,一经查实,本站将立刻删除。


