STM32温度监控
基于STM32单片机DS18B20温度监控报警仿真设计
(Proteus仿真+程序+原理图+pcb)
Proteus仿真版本:proteus 8.9
原理图:Altium Designer
程序编译器:keil 5
编程语言:C语言
设计编号:C0054
功能要求
运用所学知识,完成基于STM32的温控系统设计。基本功能包括
注意:
本设计是proteus仿真设计,并未做实物验证,意味着不确定源程序和原理图是否能在实物上正常使用,可能有BUG,故原理图及PCB仅供参考。
仿真图
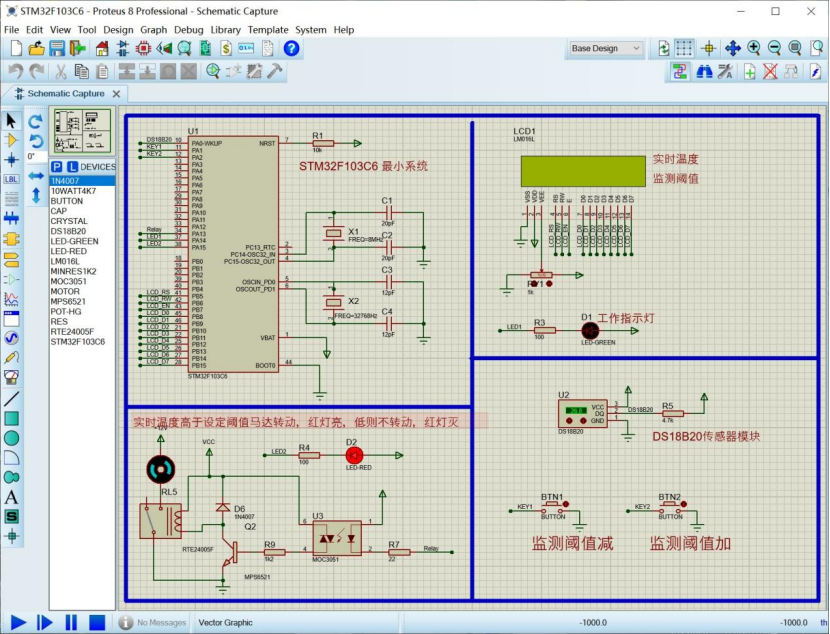
开始仿真:LCD屏显示实时温度和检测值,同时工作指示灯点亮。
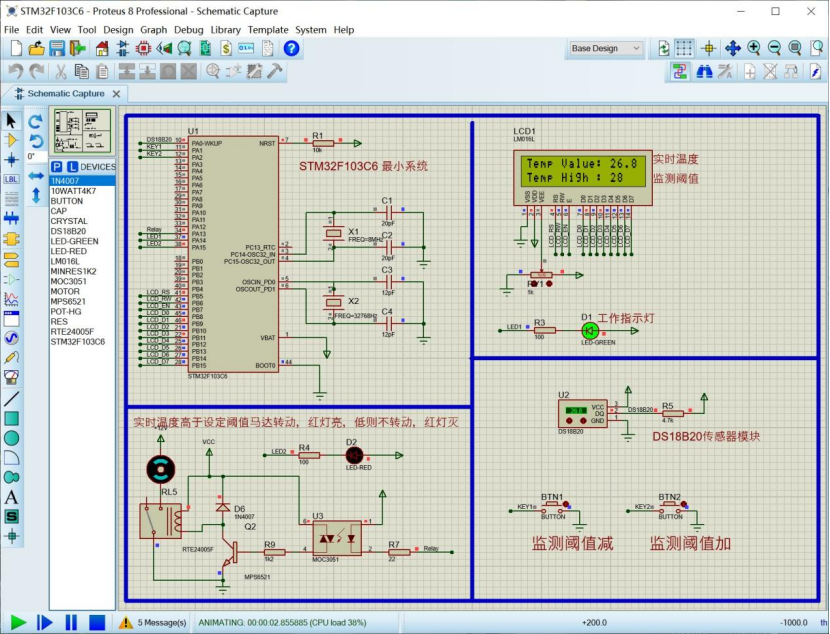
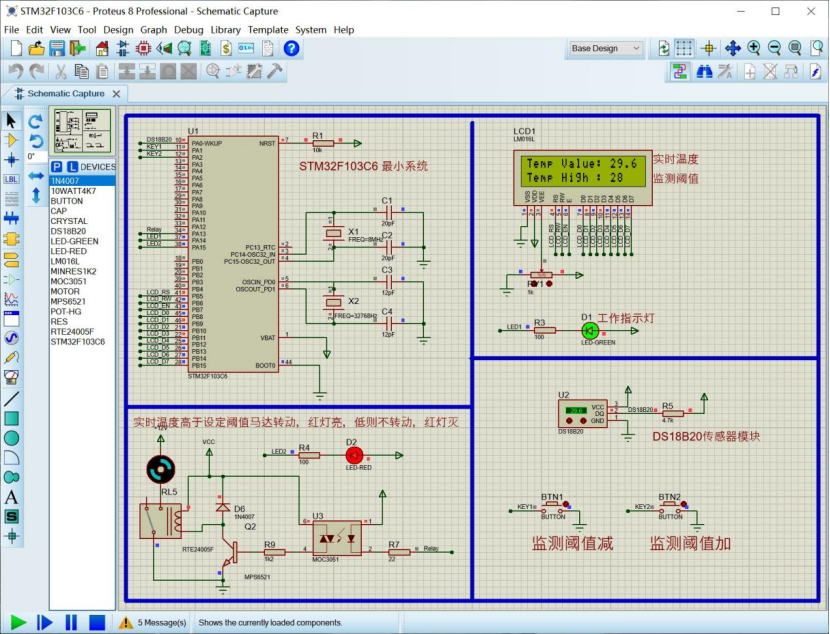
实时温度大于监测值,马达转动,红灯亮起。
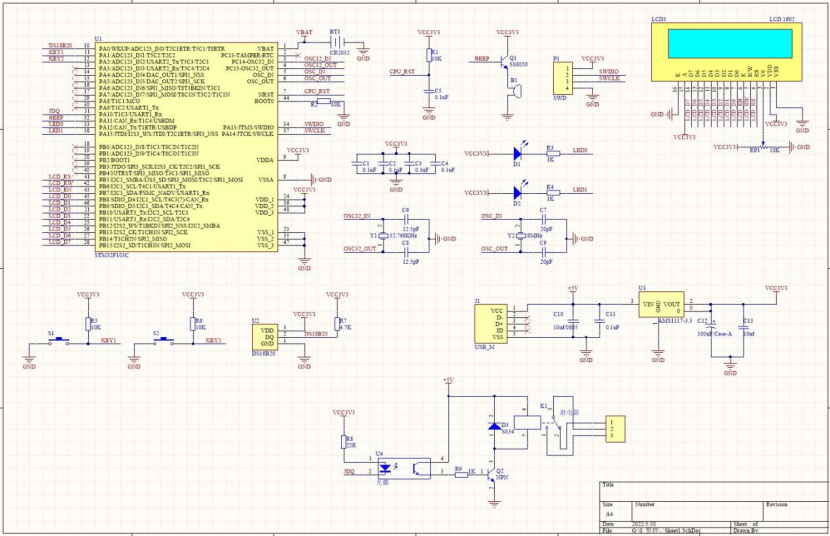
原理图
注意,此原理图由仿真图绘制而来,没做实物验证,仅供参考
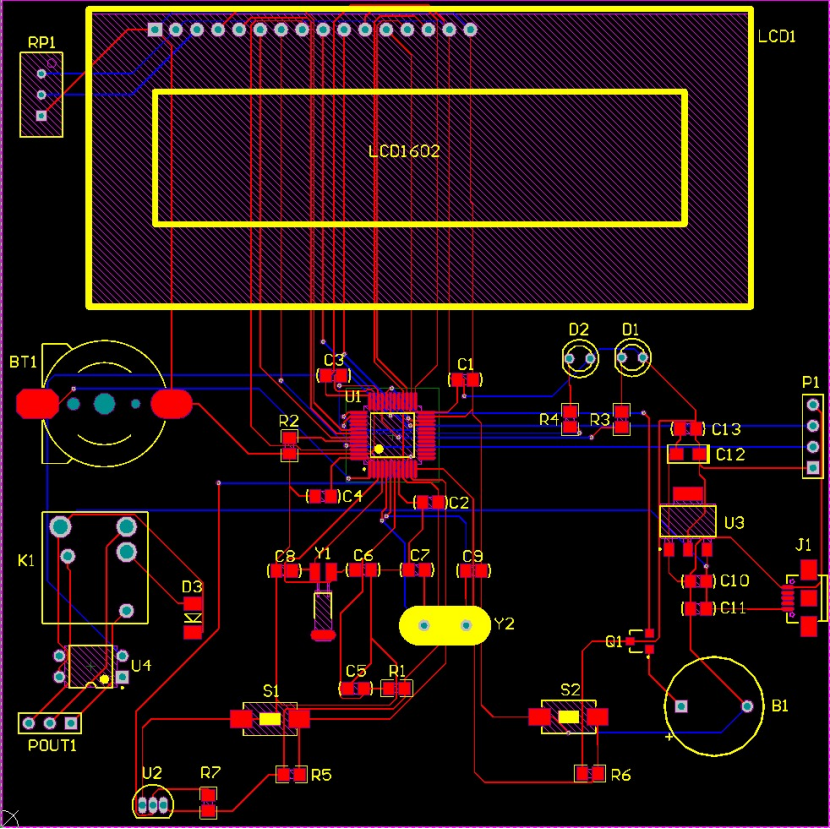
PCB
注意,此PCB图由仿真图绘制而来,没做实物验证,仅供参考
源程序
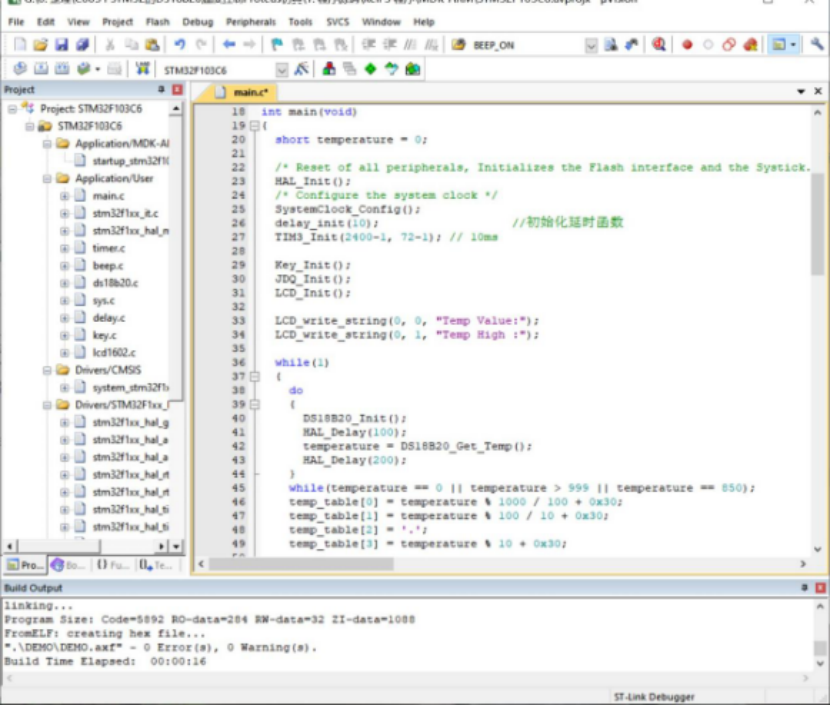
main函数
int main(void)
{
	short temperature = 0;

  /* Reset of all peripherals, Initializes the Flash interface and the Systick. */
  HAL_Init();
  /* Configure the system clock */
  SystemClock_Config();
	delay_init(10);               		//初始化定时器
  TIM3_Init(2400-1, 72-1); // 10ms

	Key_Init();
	JDQ_Init();
	LCD_Init();

	LCD_write_string(0, 0, "Temp Value:");
	LCD_write_string(0, 1, "Temp High :");

  while(1)
  {
		do
		{
			DS18B20_Init();
			HAL_Delay(100);
			temperature = DS18B20_Get_Temp();
			HAL_Delay(200);
		}
		while(temperature == 0 || temperature > 999 || temperature == 850);
		temp_table[0] = temperature % 1000 / 100 + 0x30;
		temp_table[1] = temperature % 100 / 10 + 0x30;
		temp_table[2] = '.';
		temp_table[3] = temperature % 10 + 0x30;

		limt_table[0] = temp_max / 10 + 0x30;
		limt_table[1] = temp_max % 10 + 0x30;

		LCD_write_string(12, 0, (char*)temp_table);
		LCD_write_string(12, 1, (char*)limt_table);

  }
}
DS18B20驱动程序
#include "ds18b20.h"
#include "delay.h"


//复位DS18B20
void DS18B20_Rst(void)
{
	DS18B20_IO_OUT();   //设置为输出
	DS18B20_DQ_OUT(0);  	//拉低DQ
	delay_us(740);      //拉低750us
	DS18B20_DQ_OUT(1);  	//DQ=1
	delay_us(15);       //15US
}

//等待DS18B20的回应
//返回1:未检测到DS18B20的存在
//返回0:存在
uint8_t DS18B20_Check(void)
{
	uint8_t retry = 0;

	DS18B20_IO_IN();    //设置为输入

  while (DS18B20_DQ_IN&&retry < 200)
	{
		retry ++;
		delay_us(2);
	};
	if(retry >= 200)
		return 1;
	else
		retry = 0;

  while (!DS18B20_DQ_IN&&retry < 240)
	{
		retry++;
		delay_us(2);
	};
	if(retry>=240)
		return 1;

	return 0;
}

//从DS18B20读取一个位
//返回值:1/0
uint8_t DS18B20_Read_Bit(void)
{
	uint8_t data = 0;

	DS18B20_IO_OUT();   //设置为输出
	DS18B20_DQ_OUT(0);
	delay_us(2);

	DS18B20_DQ_OUT(1);
	DS18B20_IO_IN();    //设置为输入
	delay_us(13);

	if(DS18B20_DQ_IN)
		data=1;
	else
		data=0;

	delay_us(50);

	return data;
}

//从DS18B20读取一个字节
//返回值:读到的数据
uint8_t DS18B20_Read_Byte(void)
{
	uint8_t i, j = 0, dat = 0;

	for (i=1;i<=8;i++)
	{
		j=DS18B20_Read_Bit();
		dat=(j<<7)|(dat>>1);
  }
	return dat;
}

//写一个字节到DS18B20
//dat:要写入的字节
void DS18B20_Write_Byte(uint8_t dat)
{
	uint8_t j;
	uint8_t testb = 0;

	DS18B20_IO_OUT();     //设置为输出

	for (j=1;j<=8;j++)
	{
		testb = dat&0x01;
		dat = dat>>1;
		if(testb)       // 写1
		{
			DS18B20_DQ_OUT(0);
			delay_us(2);
			DS18B20_DQ_OUT(1);
			delay_us(49);
		}
		else            //写0
		{
			DS18B20_DQ_OUT(0);
			delay_us(49);
			DS18B20_DQ_OUT(1);
			delay_us(2);
		}
	}
}

//开始温度转换
void DS18B20_Start(void)
{
	DS18B20_Rst();
	DS18B20_Check();
	DS18B20_Write_Byte(0xcc);// skip rom
	DS18B20_Write_Byte(0x44);// convert
}

//初始化DS18B20的IO口 DQ 同时检测DS的存在
//返回1:不存在
//返回0:存在
uint8_t DS18B20_Init(void)
{
	GPIO_InitTypeDef GPIO_Initure;
	DS18B20_DATA_CLK();			//开启GPIOA时钟

	GPIO_Initure.Pin=DS18B20_DATA_PIN;           	//PA0
	GPIO_Initure.Mode=GPIO_MODE_OUTPUT_PP;  //推挽输出
	GPIO_Initure.Pull=GPIO_PULLUP;          //上拉
	GPIO_Initure.Speed=GPIO_SPEED_FREQ_LOW;//高速
	HAL_GPIO_Init(DS18B20_DATA_PORT,&GPIO_Initure);     //初始化

	DS18B20_Rst();
	return DS18B20_Check();
}

//从ds18b20得到温度值
//精度:0.1C
//返回值:温度值 (-550~1250)
short DS18B20_Get_Temp(void)
{
	uint8_t temp = 0;
	uint8_t TL = 0,TH = 0;
	short tem = 0;

	DS18B20_Start ();           //开始转换
	DS18B20_Rst();
	DS18B20_Check();
	DS18B20_Write_Byte(0xcc);   // skip rom
	DS18B20_Write_Byte(0xbe);   // convert
	TL=DS18B20_Read_Byte();     // LSB
	TH=DS18B20_Read_Byte();     // MSB

	if(TH > 7)
	{
			TH = ~TH;
			TL = ~TL;
			temp = 0;//温度为负
	}
	else
		temp = 1;//温度为正

	tem = TH; //获得高八位
	tem <<= 8;
	tem += TL;//获得底八位
	tem=(double)tem*0.625;//转换

	if(temp)
		return tem; //返回温度值
	else
		return -tem;
}
#include "lcd1602.h"

#define DELAY_2N     0

void lcd_delay_us(unsigned int t)
{
	unsigned int i, j;

	for(i = 10; i > 0; i--)
		for(j = t; j > 0; j--);
}

void lcd_delay_ms(unsigned int t)
{
	unsigned int i;

	for(i = t; i > 0; i--)
		lcd_delay_us(10);
}

//==================================================
void LCD_Init(void)
{
		GPIO_InitTypeDef GPIO_Initure;

		LCD_CTRL_CLK();
		LCD_DATA_CLK();

		GPIO_Initure.Pin = LCD_RS_PIN|LCD_RW_PIN|LCD_EN_PIN;
		GPIO_Initure.Mode = GPIO_MODE_OUTPUT_PP;
		GPIO_Initure.Pull = GPIO_PULLUP;
		GPIO_Initure.Speed = GPIO_SPEED_FREQ_MEDIUM;
		HAL_GPIO_Init(LCD_CTRL_PORT, &GPIO_Initure);

		GPIO_Initure.Pin = LCD_DATA0_PIN|LCD_DATA1_PIN|LCD_DATA2_PIN|LCD_DATA3_PIN|LCD_DATA4_PIN|LCD_DATA5_PIN|LCD_DATA6_PIN|LCD_DATA7_PIN;
		HAL_GPIO_Init(LCD_DATA_PORT, &GPIO_Initure);


    LCD_RW(0);			//读写位直接低电平,只写不读

    /*********************液晶初始化**************************/
    lcd_delay_us(340);
		LCD_RS(0);

    LCD_write_cmd(0x38);          // 8bit显示模式,2行,5x7字体
    lcd_delay_ms(4);
    LCD_write_cmd(0x08);         // 显示关闭
    lcd_delay_ms(4);
    LCD_write_cmd(0x01);         // 显示清屏
    lcd_delay_ms(4);
    LCD_write_cmd(0x06);         // 显示光标移动设置
    lcd_delay_ms(4);
    LCD_write_cmd(0x0c);         // 显示开,光标开,光标闪烁
    lcd_delay_ms(4);
		LCD_write_cmd(0x01);         //清屏
		lcd_delay_ms(4);
}
/*--------------------------------------------------
函数说明:写命令到液晶


---------------------------------------------------*/
void LCD_write_cmd(unsigned char cmd)
{
    LCD_RS(0);
    LCD_Write_byte(cmd);
    lcd_delay_us(340);
}
/*--------------------------------------------------
函数说明:写数据到液晶


---------------------------------------------------*/
void LCD_write_data(unsigned char w_data)
{
    LCD_RS(1);
    LCD_Write_byte(w_data);
    lcd_delay_us(340);
}
/*--------------------------------------------------
函数说明:写4bit到液晶
--------------------------------------------------*/
void LCD_Write_byte(unsigned char num)
{
		if (num&0x01)
				data0(1);
		else
				data0(0);

		if (num&0x02)
				data1(1);
		else
				data1(0);

		if (num&0x04)
				data2(1);
		else
				data2(0);

		if (num&0x08)
				data3(1);
		else
				data3(0);

		if (num&0x10)
				data4(1);
		else
				data4(0);

		if (num&0x20)
				data5(1);
		else
				data5(0);

		if (num&0x40)
				data6(1);
		else
				data6(0);

		if (num&0x80)
				data7(1);
		else
				data7(0);

		lcd_delay_us(340);
    LCD_EN(1);
    lcd_delay_us(340);
    LCD_EN(0);
    lcd_delay_us(340);
}

/*----------------------------------------------------
LCD_set_xy        : 设置LCD显示的起始位置
输入参数:x、y    : 显示字符串的位置,X:0-15,Y:0-1
-----------------------------------------------------*/
void LCD_set_xy( unsigned char x, unsigned char y )
{
    unsigned char address = 0;
    if (y==0)
    {
        address=0x80+x;
    }
    else
    {
        address=0xc0+x;
    }
//		y ? (address=0xc0+x): (address=0x80+x) ;
    LCD_write_cmd(address);
}
/*---------------------------------------------------
LCD_write_string  : 英文字符串显示函数
输入参数:*s      :英文字符串指针;
          X、Y    : 显示字符串的位置
---------------------------------------------------*/
void LCD_write_string(unsigned char X,unsigned char Y, char *s)
{
    LCD_set_xy(X,Y);
    while (*s)
    {
        LCD_write_data(*s);
        s++;
    }
}

//=======================================================
void LCD_wstring(unsigned char X,unsigned char *s)
{
    LCD_write_cmd(X);
    while (*s)
    {
        LCD_write_data(*s);
        s++;
    }
}

开发资料
资料下载
版权声明:本文内容由互联网用户自发贡献,该文观点与技术仅代表作者本人。本站仅提供信息存储空间服务,不拥有所有权,不承担相关法律责任。如发现本站有涉嫌侵权/违法违规的内容, 请发送邮件至 dio@foxmail.com 举报,一经查实,本站将立刻删除。


